ballbearian
Veteran Member
I'll pass too. I guess I just posted the link for general interest, I hope you didn't mind. The moped switch you used is pretty period correct and functional.


If we could only do the same for broken-down humans.I guess this could be, curated reverse entropy


 , so she gets fueled up. The day of reconning is approaching...
Suggestion considered! My 1st CA95 rebuild was a 1965 back in 2008. At that time, I did install the points lobe 180 out. The result was a shotgun backfire. I was hoping for start or backfire, to which I got neither. I will check again tomorrow morning.I don't remember if you ever mentioned rebuilding the advance unit or not. If so is there any chance you reassembled it 180 out
The wording of "lowest point" is about the tooth valley, not the crank mark. The keyway on the crank should be up, so 12:00 and 12:00. Your post pics on post 232 and 241 look right.Suggestion considered! My 1st CA95 rebuild was a 1965 back in 2008. At that time, I did install the points lobe 180 out. The result was a shotgun backfire. I was hoping for start or backfire, to which I got neither. I will check again tomorrow morning.
As far as Tom's point, I really made sure cam & crank marks were "as I remember" being crankshaft mark 6:00 (bottom) and cam mark at 12:00 (top) The pdf of the manual shows both crankshaft mark and cam mark at 12:00.
I'm digging through hundreds of pictures to verify my memory.
I've got another decent morning coming up tomorrow to check things out. I will report back then. Thanks for the follow up!
Yes, it looks right. You see, the opposite side of the crankshaft key is the timing mark I was getting at. That's a relief at this point. I'm going to look at the advance and points lobe again, in the meantime, against my better judgement. I'm going to cut a new gasket from quality gasket material for the petcock adapter, then make a makeshift mount on a wooden horse to test leakage. I'll report back tomorrow! Many thanks to all for your input!The wording of "lowest point" is about the tooth valley, not the crank mark. The keyway on the crank should be up, so 12:00 and 12:00. Your post pics on post 232 and 241 look right.
The PDF is correct, both at 12:00.As far as Tom's point, I really made sure cam & crank marks were "as I remember" being crankshaft mark 6:00 (bottom) and cam mark at 12:00 (top) The pdf of the manual shows both crankshaft mark and cam mark at 12:00.
I always double check myself by removing the plugs and tappet covers to watch what happens when the pistons are at or just after TDC. Then I know I got the chain, cam and crank right. The combustion stroke has the exhaust just opening after TDC, the other, on compression, has the intake opening after TDC.I confirmed the correct position of the small notch on the points lobe to be correct by comparing a pic of a new spark advance and several used ones offered on eBay.
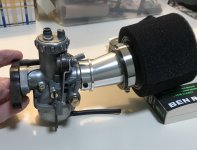
Next step is to pull the plugs and spray some starter fluid into the cylinders. With strong spark, I should at least get a pop. If no pop, then onto the valve adjustments then order a new compression gauge. Somethings amiss. The something could be simple, or I may need to pull the engine and check the head and cylinders again.
I don't like fooling with fuel and spark in enclosed spaces, so I'm going to step away from further fussing as we are expecting heavy rain over the next few days. Saturday or Sunday looks promising.
I'm surprised Gamble #1 seemed to fail. I really don't know what would happen if the cam was 180 degree out from the crank. Would the pistons hit the valves? Would there be extreme low compression? Kind of a wild academic, what if?For those who follow my 62 story, it's well known that reviving a scrap bike is a multi-challenge endeavor. Being retired I look forward to maintaining sharpness through reading, wrenching and health maintenance. In my world, this is my trifecta of happiness.
So, today's findings as to why the little 62 won't start, was based on two gambles. Gamble#1 was enlarging the used cylinders to fit .25 over pistons, gamble#2 was reusing original head and refitting new valve guides and lapping new valves into existing seats.
The addition of motor oil to both cylinders verified I lost gamble #1 and won gamble#2. My assumption that my compression gauge was too old and unreliable was incorrect. Adding oil to the cylinders increased compression from 60psi to 150psi verifying pistons & rings rather than valves.
I'm not really unhappy about the above results. I threw the dice and "it is what it is".
There are so many parts and assemblies that have turned out successful, pulling the engine, still pristine clean, and sending off the cylinders for boring and fitting .5 over pistons is no big deal.
I think, while I have the head off, I may have it shaved just to make sure it's flat. We will see what happens. I'll post more pics as I make regressive progress.
Thanks for continuing to read my posts!

I've found a few shops to bore small engine cylinders and one shop to machine the head. I will report out where I have the machining done with cost.Actual powersports machinists seem to be the only ones with boring bars small enough.
Good news. That's about what my machinist charges, $60 per hole.My cylinders ship out next week. I found a shop near Akron, Ohio to bore & hone both cylinders to fit the new .75 over pistons and fit the rings for $120.
I will report out and share results when I get my cylinders back. Then I plan to ship the cylinder head to mill flat. Hopefully all this upper work won't toast the crankshaft.
I agree with your flat plate/abrasive leveling suggestion. But in my case, I have mixed & matched parts. 1962 head and a 1963 cylinder. Best to spend the extra dough to finally have a smooth-running bike. In retrospect, I should have done this step some time ago, but I like to gamble. Win some, lose some.I had good results from doing the figure 8 on a sheet of 320 or 400 grit sandpaper stuck to a sheet of plate glass for my Dream 305 head
Me too, the cheap-skate game is kind of fun, sometimes.I agree with your flat plate/abrasive leveling suggestion. But in my case, I have mixed & matched parts. 1962 head and a 1963 cylinder. Best to spend the extra dough to finally have a smooth-running bike. In retrospect, I should have done this step some time ago, but I like to gamble. Win some, lose some.


Hopefully new condenser and points will do it. I've always heard a big spark makes for big tits and means the condenser is bad. If coil was warm, it must be points shorting or closed.Another gamble lost. Lucky, I checked out the ignition before wheeling the bike out of the shop. 1st time out; while trying to start the bike only to find no compression, I had spark at the time. Now, the engine is reassembled with great compression only to find out no spark. The gamble this time was the cleanup and reuse ignition parts. The coil reads 2.5 Ohms. The coil was warm when I pulled it out but not hot, so maybe OK. I knew the points had a large tit and valley but initially sparked very nicely. There is power to the points and coil. I'll order new points and condenser and see what happens. Maybe waking up the old electronics after a 58-year sleep was too much to handle,

New points & condenser made a huge improvement in spark. But still no start. I did get a backfire and a sloppy kinda start then stall. My next step is timing. I went against my memory regarding cam/crank timing marks. I went by the book, but the manual tells two different ways, or at least my understanding went two ways. My memory says place cam and crank timing marks highest and lowest point on the center line. The manual was vague about this fact although if you look at the timing illustration, the keyway (which is opposite of the timing mark) is shown on the imaginary centerline. Another part of the book says timing cam timing mark at 12 o'clock and crank timing mark at 6 o'clock. Against my better judgement I went with the 12 and 6 positions.Hopefully new condenser and points will do it. I've always heard a big spark makes for big tits and means the condenser is bad. If coil was warm, it must be points shorting or closed.
I've never tested resistance of these coils and never found a spec for it either.
Continuing, because I forgot to hit post reply and now it's alive. Congratulations.

That was the confusing part of the manual, but I still had the valve covers off and it seemed like the drawing on right was the way to go.New points & condenser made a huge improvement in spark. But still no start. I did get a backfire and a sloppy kinda start then stall. My next step is timing. I went against my memory regarding cam/crank timing marks. I went by the book, but the manual tells two different ways, or at least my understanding went two ways. My memory says place cam and crank timing marks highest and lowest point on the center line. The manual was vague about this fact although if you look at the timing illustration, the keyway (which is opposite of the timing mark) is shown on the imaginary centerline. Another part of the book says timing cam timing mark at 12 o'clock and crank timing mark at 6 o'clock. Against my better judgement I went with the 12 and 6 positions.
Next step is to reset cam and crank timing to high and low on the centerline. View attachment 43248


Many Thanks RobMan! Also, many thanks to all who have tagged along on my journey trying to save this little 62.We're rooting for you!