The 62 CA95 Basket Case Rescue Log, Start Date June 1st 2024

At the risk of sounding daft about crankshaft bearings I want to enter into my log what I know (or mystified by) and what I find confusing.

Consulting parts book for the CA95 and confirmation from member Ballbearian, who's advice I seek and trust, I find the following.
My recent pdf parts list:
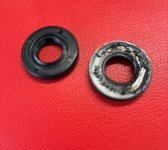
#12- 91001-205-000 Bearing 6304SHS-Cam Side
#12-91012-202-010 Bearing N304SHS-Cam Side
#11-91001-202-000 Bearing N304SHS-Clutch Side
No listing that I can find for #91001-202-020
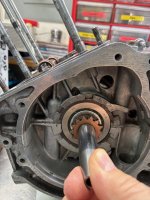
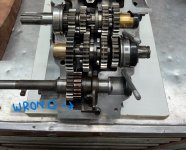
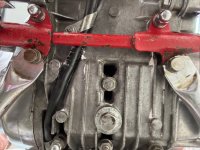
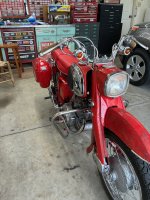
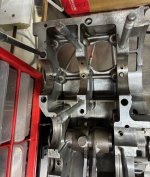
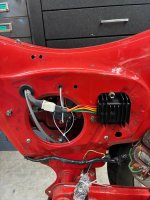
Attached is a pic of my engine prior to disassembly. Bearing N304SHS installed. Notice the gap between the bearing housing and the case.
I locate part# 91001-202-020 for the CA95, new old stock, original box and oil paper wrap. Seller indicated 56ish mm diameter. Thus, I gambled on this part number. But this bearing also sports N-304 SHS ID.
I should take delivery on my order for 91001-202-020 bearing by Saturday and will report out fitment. I would find it quite odd to have N304SHS type number in two sizes.
Odd but true.
The 91001-202-020 bearings are for the right side and they are 55mm but I wouldn't use it, on the left. The bearing on your bent crank N304SHSR had the right side bearing on the left side, not good, only 55mm, needs 57 on the left.

You need N304SHSL 57mm, 91012-202-010, for your left side. The first 5 digits of the Honda number indicate right or left. The KOYO number on the bearing has an L or R, after the N304SHS, as mine do.
The case journal size must fit the bearing exactly and also take your time to check knock pin location and oil hole drillings must match the case.


I don't know what parts book you're using but mine has different item numbers (#15 & #16, not 11&12), also the picture is reversed, showing the left side on the right side of the page.
Easy to get confused. I didn't realize they were different sizes either. I went and measured them to be sure.
 
Here is the link to the pdf parts list I was referring to.
https://store-v5z9i.mybigcommerce.com/content/CA95.pdf
I plan to wait until I get the bearing I ordered today. If indeed still wrong, PartsNow supplier has the bearing you are referring to.
In the end, even if I'm wrong about my recent order, and I still need to order the correct bearing, my engine will have new outer bearings.

I also want to note that I had an extra crankshaft bearing race, let's call it for "the clutch side/oil slinger side. NTN RN 0411
Clutch side camshaft bearing N-304 SHS & NTN 0411 have no oil hole. See pic of the inside of the upper engine case . So, had I actually used the N304 SHS on the flywheel side of the crankshaft. I would have oil starved and cooked the crankshaft rod bearings. Whereas I had N304SHSR on the flywheel side and it does have the oil hole, but it's a 55mm. Wrong fit, at least the bearing race had the oil hole.

This bearing thing has my head in a spin. I almost feel as if I'm babbling. Thanks for your response. I will update late this week. Phew..
 

Attachments

  • IMG_6622 ca95 looking inside out upper engine case.jpg
    IMG_6622 ca95 looking inside out upper engine case.jpg
    1.3 MB · Views: 4
Last edited:
You need N304SHSL 57mm, 91012-202-010, for your left side.
Going back to the bearing that I ordered, I looked again at the listing and noticed too late, no oil hole. Yes, right side bearing.
I go to the seller listing for the correct bearing. Seller verified 57mm OD and I see the oil hole in the listing pic.
 
Last edited:
Just an entry. A couple of things I needed to correct while my engine is disassembled. Battery drain with the original selenium rectifier, oil leaks at seals and case studs and of course, replace crankshaft with a known true one as well as installing the correct crankshaft bearings. Final order of correct left hand side crankshaft bearing estimated delivery Friday 10-10-25.

Solid state rectifier installed and stator to be cleaned with electronics cleaner before installation. Engine cases now as white glove clean as possible. Better lower case with smooth seal surfaces should correct oil seal leaks in that part of the engine. Replacement crankshaft flywheel/cam sprocket shaft is smooth and hand polished. I think the new pristine shaft should eliminate oil leaks from that seal.

Another head scratcher was oil leaks at the mounting studs on the bottom of the engine. I think the reason was using an aircraft case sealant rather than Honda Bond as recommended. All mating surfaces have been cleaned and lightly dressed with 1500 grit paper wrapped in a special cut square tool stock steel (flat surfaces). Round surfaces lightly dressed with 1500 grit paper followed by polishing paste. Oil journals cleaned with solvent prior to wash and blown out with compressed air. Final pics of crankcase after deep wash and dry. I will pay special attention to the areas around the case studs with the Honda Bond prior to closing up the cases. Hopefully for the last time.

I polished the exhaust ports just to be anal and plan to custom cut a thin heat-resistant gasket for exhaust ports to get away from gooping up the area with heat resisting gasket maker.
 

Attachments

  • IMG_6643 10 8 25 New Rectifier.jpg
    IMG_6643 10 8 25 New Rectifier.jpg
    1.3 MB · Views: 5
  • IMG_6644 10 8 25 Engine Cases.jpg
    IMG_6644 10 8 25 Engine Cases.jpg
    677.2 KB · Views: 5
  • IMG_6645 10 8 25 Engine Cases.jpg
    IMG_6645 10 8 25 Engine Cases.jpg
    843.1 KB · Views: 4
  • IMG_6646 Engine Cases 10 8 25.jpg
    IMG_6646 Engine Cases 10 8 25.jpg
    2 MB · Views: 5
Final order of correct left hand side crankshaft bearing estimated delivery Friday 10-10-25.
So, I'm tracking my Left side Crankshaft bearing order, anticipating a weekend assembly of the 62 engine once again. The bearing gets to Lexington distribution from California, Thursday 10-9. Next stop is my local post office. Not this time. My bearing order ships to Louisville, then back to Lexington, then Evansville, Indiana, back to Louisville then back to Lexington Distribution and finally confirmation my order has arrived at my local post office just in time for... Columbus Day. No mail delivery, so six (6) days to make a delivery after arriving at my local postal distribution to the local post office.

I wonder how the P Office knew I was hot for this one particular part and decided to play postal ping pong between distribution points just to P Off me? (humor)

I got a little good news that my CB160 manifold is fully machined and ready to ship........Tuesday. Phooey.
 

Attachments

  • KIMG0496 CB160 Manifold machined to fit Modern Carb for CA95.JPG
    KIMG0496 CB160 Manifold machined to fit Modern Carb for CA95.JPG
    286.7 KB · Views: 0
Last edited:
That seems to be the way it works. Everything I care about that looks like Friday delivery is always Monday (or Tuesday this week)
 
Finally received my Lefthand side crankshaft bearing today 10-14-25. Now I can get back to assembling my engine.
I wanted to share another goodie I tripped over and bought on eBay. A vintage Honda "Special Tool". A dealer's piston ring compressor that fits the Honda 90's and the 150's (CA95).
I have always struggled with compressing piston rings with my fingers while inserting pistons in cylinders. Although I would love two of these "Special Tools" finding this one, even late in the game, is a thrill for me.
(Numbers 1,2 &3 indicate ring gap position starting with oil ring)
 

Attachments

  • IMG_6756 Vintage Special Honda Ring Compressor.jpg
    IMG_6756 Vintage Special Honda Ring Compressor.jpg
    1.4 MB · Views: 8
FWIW - an old school band style MC oil filter wrench or 2 works too
 
That looks so great, it makes me smile so hard my face hurts.

Especially the 2nd pic of the crank cam chain sprocket. It puts to rest all the verbage confusion of the FSM concerning what gets aligned where. I couldn't remember the O mark on the sprocket. I only remember the keyway and thought, or imagined, it had a mark.

So, the truth now is, the O mark goes to 6:00 o'clock (with it's tooth point) and the keyway goes at 12:00 o'clock (with it's tooth valley). Hooray for clarity!

It's been like an argument that goes, "It's not North, it can't be...... it has to be the opposite of South". :ROFLMAO: We were both right. Thanks for putting up with me Chip.
I bet that rotor will run as steady as the Sun and the points will clap in perfect unison. Hallelujah.
 
Thanks for putting up with me Chip
Naw, I like the discussion. Early in life I was taught the difference between an argument and a discussion. Argument is who's right. Discussion is what's right.
You reminded me to do something that I promised myself at the beginning of this build. Take a picture of TDC of Crankshaft position /Piston Rod position showing keyway and timing mark. Then a picture of BTC showing the same. Now that I have crawled out of my 62-motor abyss, I need to make absolute sure with confidence the timing is spot on!
 

Attachments

  • IMG_6769 TDC CA95.jpg
    IMG_6769 TDC CA95.jpg
    1.1 MB · Views: 5
  • IMG_6771 BDC CA95.jpg
    IMG_6771 BDC CA95.jpg
    1.1 MB · Views: 5
This evening, the engine is near ready to put back into the bike. Only timing and a final recheck of valve clearance before installation needs to be done prior to remounting back on the bike. I've gone through pain staking detail putting the engine back together including pictures after every step. This way should I doubt anything I can recheck pictures. But I'm pretty confident this time around the engine should run fine.

Bottom line to all of the aggravation getting the 62 to run right was bent crankshaft-Incorrect flywheel side crankshaft bearing-utilizing old ignition parts (less coil) and reviving an original carburetor.
The same original carburetor will be reinstalled.
Speaking of carburetor, my machinist has shipped back my turned CB160 "stub" and my new racing carburetor. Further modifications to the "stub" may be needed. Fortunately, I may have access to a Bridgeport late next week.
It will be interesting to see if it's possible to retrofit new carburation these old CA95's.
Oil leaks were addressed this time around. I replaced the lower engine case with one of the same year as the upper, and near perfect sealing surfaces. Honda Bond was used on case mating surfaces (wispy applied) with special attention to mounting studs. I applied Honda Bond along the bottom of the right case, prior to installing the case gasket in hopes to cure that chronic oil drip under the sump.

This is the first time I have ever used Honda Bond. We will see what happens.
 

Attachments

  • IMG_6806  62 Right Side Engine Final Assembly.jpg
    IMG_6806 62 Right Side Engine Final Assembly.jpg
    1.7 MB · Views: 2
  • IMG_6807 62 Timing Side before Final Assembly.jpg
    IMG_6807 62 Timing Side before Final Assembly.jpg
    1.7 MB · Views: 2
To all of my readers: Normally I don't share my frustrations & mistakes to the extent that I do for this forum. I think most of my followers know this.
So, this evening I planned to check the rocker valve clearance. A good thing to do while the engine is on the bench and before wrestling the engine back into the frame.

I rotate the crankshaft with the flywheel to check the rocker clearances. I hear: Click. Click. Click. with every rotation of the flywheel.

Looks like I did not install the kickstart shaft correctly, the kick starter works but it has no travel. I rotated the Kickstarter and thought it good to close the case. Wrong. I hope the Honda Bond did not set up. I gotta pull the bottom half of the case to fix the kick starter.

Let's look at the bright side. The engine is still on the bench, no oil and I don't have to pull the cylinder jugs.

Here we go again. Check out the video.
 
Unintended lesson learned.

B-12 Chemtool Fuel injection cleaner dissolves Honda Bond. I was able to salvage my right case gasket even though I applied Honda Bond over 24 hours ago.

1st Ventilate workspace. Start by putting some Chemtool B-12 into a separate container. Using an art brush, begin to "paint" your way into the gasket. From that point, use your art brush soaked in Chemtool B-12 like a scrapper, slowly painting your way between your gasket and mating surface.

The Honda Bond will melt away as you continue to brush your gasket free. No need to tug on the gasket.

Tomorrow in order to split the case, I will "paint my way around the seams until I get some opening, then paint my way in.

An unintended lesson.
 

Attachments

  • IMG_6824 Dissolve Honda Bond.jpg
    IMG_6824 Dissolve Honda Bond.jpg
    1.9 MB · Views: 4
Engine cases split easily. Pics of wrong & correct Kick Starter positions. Not necessary to remove timing chain. My 62 project takes a couple of steps back regarding reassembly, but smaller steps than expected.
Need to clean mating surfaces again then reapply the Honda Bond. Opening the case so soon after closing offers a chance to access my Honda Bond application the first time around.
I need to apply the product more evenly this time around.

My lack of noticing detail is due to doing three projects simultaneously and one variable. The 62, Remodeling interior walls in home and accessing history and value for dozens of WW2 era collectables (I write on another forum regarding WW2 collectables) Maybe too many irons in the fire for an old dude. (Variable)
Gotta keep marching....
 

Attachments

  • IMG_6826 Correct Position Kick Start CA95.jpg
    IMG_6826 Correct Position Kick Start CA95.jpg
    1.6 MB · Views: 7
  • IMG_6757 Wrong Position Kick Start CA95.jpg
    IMG_6757 Wrong Position Kick Start CA95.jpg
    373.3 KB · Views: 6
Last edited:
I just about did the same thing on mine, but found a few pictures online from the projects of others. The manual was no help at all. Luckily a sorta easy fix for you.
 
I just about did the same thing on mine but found a few pictures online from the projects of others.
Even the picture of the correct position can be misleading. Once the kick start shaft is installed, check full travel from top to bottom. The shaft can still be installed incorrectly should the travel of the shaft goes too far and the little rachet spring hits the kick starter gears! That's how the little rachet spring gets damaged. If that happens then reposition the rachet stops to fit correctly into the cast index in the lower engine case and recheck travel. The rachet cog should stop about 1/4" before hitting the kick starter gear. I should have known this but forgot and overlooked the obvious. Hopefully someone else might learn from my missteps.

The unintentional finding (as previously mentioned) solubilizing Honda Bond with B-12 Chemtool Fuel Injection Cleaner also paid off. I noticed the uneven Honda Bond application after I split the case, so I decided to thin the Honda Bond with the B-12 and apply a perfect thin layer to the lower engine case and dress the studs on the upper case. (see pic) Thinned Honda Bond with B-12 also extended drying time. I applied a thin layer on a sample surface of another aluminum part to verify quality after the B-12 flashed off. Nice.
I had a flashback about thinning solvent-based coatings, while working with the Honda Bond. Greater than 1/2 century ago, my father thinned oil-based exterior paint with boiled Linseed oil. The Linseed oil extended drying time, and aided paint flow off the brush. His hand painted house panels always looked perfect. Thus, the idea of thinning Honda Bond came to mind.
 

Attachments

  • IMG_6827 Thinned Honda Bond.jpg
    IMG_6827 Thinned Honda Bond.jpg
    1.7 MB · Views: 3
10-18-25 Engine reassembled. Kickstart works as intended. No click. Tomorrow check valve clearance and adjust if needed. Rainy forecast for tomorrow postpones mounting the engine back in the bike. Hopefully by Tuesday or Wednesday next week I get to fire her up.
 

Attachments

  • IMG_6836 CA95 Engine 10 18 25.jpg
    IMG_6836 CA95 Engine 10 18 25.jpg
    1.7 MB · Views: 2
Great tip on the Chemtool B-12. I only use the sealant on the front, back and stator side of the cases. Nothing in the interior surfaces or the clutch side, since it's a wet clutch anyway. I put the beveled edge of the primary gear locknut towards the engine next to the multi-tabbed lock washer, as per fig.97 in the FSM. It may save the tabs if re-bent but I don't think it's critical at all.
Great pics of a clean motor assembly that will come in handy for others, like me.
 
I only use the sealant on the front, back and stator side of the cases. Nothing in the interior surfaces or the clutch side
I turned the primary gear taper side towards the engine for sure.
As far as the complete coating of the case halves. The case halves as well as all parts of my engine are not original as if production assembled new. As far as coating all engine case contact surfaces, I had oil leaks from the case studs protruding through the bottom of the case. It dawned on me that maybe, without any sealant, while the engine was running, just enough oil splashing about just enough to seep through any gaps in the case around the studs. Being that the Chemtool B-12 thinned out the Honda Bond to a nice smooth even coating, I thought why not do an even coat at all contact surfaces and a little extra sealant around the case studs. I figured what can it hurt?

Hopefully in a day or two the crankcase will be filled with oil and the engine started. Later this week I will be traveling so the bike will sit over a cookie sheet containing a layer of paper towels at the bottom for "spot checks".
We shall see what happens.

Oh, gotta love iPhones and modern technology to be able to take and share high resolution pictures so easily.
 
Side note log entry. My machined fit CB160 manifold has been pressed into my racing carburetor for the 62. I roughly measured the opening in the frame so after getting the bike up and running I plan to install this carburetor as shown just to see if my carburetor modification concept works. Likely the rare original carburetor clam will not reinstall. If my idea works, happy day, if not at least I tried.
 

Attachments

  • IMG_6839 Nibbi Carb w Mod CB160 Manifold.jpg
    IMG_6839 Nibbi Carb w Mod CB160 Manifold.jpg
    1.3 MB · Views: 4
  • IMG_6840 Nibbi Carb w Mod CB160 Manifold Top.jpg
    IMG_6840 Nibbi Carb w Mod CB160 Manifold Top.jpg
    1.7 MB · Views: 4
The pic for today is how she looked this morning; I got out to the garage mid-morning for final assembly looking forward to hitting the starter button. Turn the key to "on" (1st notch) spark plug grounded against the cylinder, hit the button. No spark. Look back at the rear taillight bulb, illuminated. During my wait for parts, I pulled the stator to repair the green wire as I buggered that wire up pretty bad with all of the tearing into the engine over the course of the last 8 months. I don't have the wiring right. Fudge. I make a mess of the connections and end up with a nest. Curses.

After my short upcoming Northern Ohio visit I will address the mess.

One nagging issue that I have had in the past is different wires with colored sleeves. It seems (my opinion) that the plant ran out of correct wire during production, used whatever wire they had, then sleeved said wire to match its mate. Or it could be me. But for the short term, bench to be cleared, tools put up and let the bike sit.

One positive note: Is learning the chain cover installs so much easier with the wheel off.
One scary note: So, the starter works great as I'm observing the points. The bolt center wobbles! Noooo! As I was throwing my imaginary hangman's noose over my imaginary center beam, I peered into the case to observe the rotation of the flywheel. Steady and true. I don't think the flywheel bolt matters as long as the flywheel is true.

I might buy a replacement harness just to work on and rewire again better.
I might buy a different flywheel bold just to see IF MAYBE the bolt is somehow bent.
 

Attachments

  • IMG_6848 10 20 25.jpg
    IMG_6848 10 20 25.jpg
    1.8 MB · Views: 3
Log Date 11-05-25. The 62 is near complete (again) I procured another wire harness and cannibalized the better switch plug. All that I need to do is install the left-hand exhaust, recheck points setting, mount the tank and seat.
I discovered that old copper wire (and dirty connectors) dipped into Muriatic Acid for a few seconds then neutralized in a baking soda solution restores the wire and connectors back to like new condition, making soldering easier.
So, good crankshaft, proper crankshaft bearing (s) both sides. Cleaned up wire harness & connectors, better lower engine case with new seals, new piston rings & polished pistons and new head gasket. Saved hardly used case gaskets sealed in with thinned Honda Bond. I cycled the engine with fresh oil, replaced the plugs and used the kick starter to check "compression feel". Got compression. No sign of oil leaks yet.

Tomorrow is the day of reckoning.
 
I think I got it right this time. The 62 started fast with little or no smoke. Responded well to a couple of light gooses of the throttle. Time to complete assembly and take her for a test spin.
 
Summary.
Project start date 6-1-24. Bike scrap. No engine, some engine parts, bike sat idle since 1966. Over 125 parts ordered, some used, some parts incorrect and many parts made good. The engine was built from used parts procured mostly from eBay. Bike disassembled down to every last nut, bolt and washer.

11-3-25, finally got the 62 running nicely. Many posts up to 9-22-25, addressed common or uncommon ailments to determine why I could not get the bike to run right. 9-22-25 I noticed wabble at the flywheel and discovered a bent crank shaft. Not only a bent crankshaft, but obvious, amateur oversight that I had the wrong left side crankshaft bearing installed. Another bite in the bum was using the original 1962 lower case with obvious nicks and dings in the seal surface for the drive sprocket, thus causing oil leaks. Incorrect seal at the upper and lower engine case caused leaks as well.

Today, mistakes corrected and the bike reassembled. Carb clams go back on tomorrow. Thanks to all who have followed my journey so far.
 
Many Thanks!
I really appreciate this forum! Such fine folks! I must admit that writing about my journey is like writing in a journal. This evening, I began revisiting my posts starting at the very beginning. Looking back, I realize several wrong decisions that lead up to the frustration with the engine. So far, I've listed 8 wrong moves and several successful moves.
1.) Not checking the runout of the used crankshaft. (#114)
2.) Trusting that I could use sealant to seal bad lower crankcase machined surfaces resulting in oil leaks (#121)
3.) Installing kick starter with bad machined surface (#130)
4.) Honing cylinders to avoid boring (#149) (had to step back and have the cylinders bored with oversized pistons)
5.) Tried to install "rebuilt" kick starter (#179)
6.) Self-pressed in new valve guides and lapped new valves against pitted seats (had to back step and send the head to machinist)
7.) Reusing old ignition parts (less coil)
8.) Not paying attention to the obvious gap between the engine case and the left side crankshaft bearing.

There were some successes.
Original chrome handlebars are straight and cleaned up nice.
Original handlebar controls salvaged and worked as intended
Original ignition switch good as well as the original headlight, speedo and neutral light
Rebuilt frozen speedometer works and appears accurate
No issues with chassis, brakes, new wheel bearing installation, lace and truing. Tires settled in the rims during ride trials. No out of balance feel.
Both black and red seats turned out nice (black seat swapped for crash bars) I'm pleased about that!
Rear fender repair & paint match pretty darn closely with original paint.
Original carb works perfectly now that the engine is good (no need to mount custom racing carb modified just in case the old carb proved faulty)
Clutch & actuator work nicely. No slippage
Tank clean! No leaks! Better replacement tank panels found!
Original tank knee pads salvaged.
Final engine rebuilt, fixing wrong decisions successful.

I sure have enjoyed being part of this forum. Hard to imagine 38K hits.
Best regards to all,
Chip
 
Last evening (11-16-25) I began the process of listing the 62 on BaT. Registration on BaT is lengthy and as all listings, goes through review prior to the listing being posted. Once approved I will post the link. As promised to this site, I plan to attach a link to my story of the 62 and pictures of the bike will include a shot of this website.
It's been a satisfying project and another learning curve late on life's road. Will there be another bike? Likely not, but as my wife said to me when I said this is the last bike " Where have I heard that before?"

One small nagging issue left on otherwise a great running bike is a seal leak at the shift shaft. A small drip, but a drip just the same. Perhaps the next owner can replace the new seal or just live with a small leak and keep a pan under the bike.

Here is one vid that gets placed on my BaT listing once approved.
 
My experiences and knowledge gained are priceless to me.
I hear you. For me it's the journey.
I have a personal policy. When I say that I will do something, I do it. (One reason that I don't make threats)
Therefore, I lived up to my commitment to list the 62 on BaT with the hopes of getting a good price for the 62 and granting more exposure to this site.
I think I will hold off letting the 62 go until spring.
Until then, I will revisit the shift shaft oil seal leak. Another seal ordered, this time by size 12x25x4.5mm, rather than part number. I installed the seal perfectly in a good case opening. Shift shaft itself was cleaned to new condition.
I even wrapped the kickstart end to prevent spline damage to the inner surface of seal when installing the shift shaft. Inserted the seal into the case evenly. Oil is leaking through the seal. Pic attached is oil volume leak over 5 days.
One gut, personal opinion about aftermarket parts, including automotive, is quality. Perhaps the seal is new junk. We shall see. I appreciate your comments as well as those who have followed my project.
 

Attachments

  • IMG_7163 oil leak 11 19 25.jpg
    IMG_7163 oil leak 11 19 25.jpg
    696.9 KB · Views: 4
Perhaps the seal is new junk.
Another seal ordered, this time by size 12x25x4.5mm, rather than part number.
9th wrong move added to my project. Shift Shaft seal. The new shift Shaft seal originally ordered for the 62 was not "new" although never used. New old stock maybe. I dismissed the "new seal' being stiff.
I replaced the "new" leaking shift shaft seal with a seal ordered by size rather than part number. Big difference between seal by part number ordered and by size ordered.
No leaks with the real "new" pliable seal with robust shaft seal area. Pics are ordered by part # seal pulled (with damage from extraction) vs new seal ordered by size to show difference and the first time during my project the engine has a dry bottom. In addition to show how crash bars are bolted to the engine case but reinforced by the foot peg mount. The 62 starts fast, idles great with instant throttle response. Just in time for winter.
 

Attachments

  • IMG_7200 shift shaft oil seal.jpg
    IMG_7200 shift shaft oil seal.jpg
    679.4 KB · Views: 7
  • IMG_7202 11 26 25 Dry Bottom.jpg
    IMG_7202 11 26 25 Dry Bottom.jpg
    689.3 KB · Views: 7
I wanted to report out the 62 has no leaks and the battery is holding charge while sitting in the shop. I've been taking short rides when weather permits.
One aspect I noted while riding the bike is that I could not tell if I had the turn signals turned on, except looking at where the switch position is.
Being bored with the cold and with no pending projects, I thought I would address this issue. Attached is a short vid of the final result. Mini visors on the bullet turn signal light with a carbon fiber insert, this way I get a reflection of the turn signal light off of the headlight bucket and a little indicator illuminated in the visor.
 
On an old c90 I once had the top of the turn signal lamps had a small hole with an amber screen in it so you could see them blinking from above. I always thought that was a neat solution and similar to your idea.
 
My replica Japanese Motorcycle Plate for the 62 arrived today. Flat aluminum. I'll hang the plate over my legal plate should I show the bike at our local car/bike show held every 1st Saturday.
I will be updated this thread along with the Buco Saddlebag Thread because the bags go on the 62.
 

Attachments

  • IMG_7775 Plate.jpg
    IMG_7775 Plate.jpg
    796.1 KB · Views: 1
This post will be parallel to my Buco Saddlebag post.
I find that replacing the early CA95 rear fender stays with later year fender stay provides the opportunity to mount bullet lights further back on the fender (or install later Asian rectangular turn signals), looks better and helps mount Buco Twinmaster Saddlebags.
 

Attachments

  • IMG_7835.jpg
    IMG_7835.jpg
    1.5 MB · Views: 1
  • IMG_7836.jpg
    IMG_7836.jpg
    1.7 MB · Views: 1
  • IMG_7837.jpg
    IMG_7837.jpg
    857.3 KB · Views: 1
Hard to believe over 22 months have gone by. The bike as she sits today as I fit a pair of Buco Twinmaster saddlebags to her mounts. The 62 has come a long way since the scrap yard.
 

Attachments

  • IMG_7996.jpg
    IMG_7996.jpg
    2.1 MB · Views: 2
  • IMG_7994.jpg
    IMG_7994.jpg
    2.4 MB · Views: 2
  • IMG_2963 Start 6 1 24.jpg
    IMG_2963 Start 6 1 24.jpg
    986 KB · Views: 1
  • IMG_2965 Start 6 1 24.jpg
    IMG_2965 Start 6 1 24.jpg
    846.2 KB · Views: 2
Back
Top Bottom