The 62 CA95 Basket Case Rescue Log, Start Date June 1st 2024

Maybe I sound like a broken record, but I continue to be amazed at the rust build up inside this engine. Fortunately, the bike came with rusty engine parts as well.
My sourced engine was locked up in all places. Cylinders, Rods, Transmission gears, clutch plates & discs, kick starter gears and shift fork. Finally, I'm slowly refinishing surfaces and combining salvageable parts. here's a finished shot of the rotating shift fork. More to come as engine IMG_3494.JPGreassembly progresses.
 
Those look really good now. It's good that those forks have a machined side that can be used to measure from the fork tips to check for any deflection.
 
I've had good spark with original coils as long as they read around 2.5 Ohm's. The brackets that hold the coil serve as ground. Brackes removed, contacts cleaned, old spark plug wires replaced (I chose red). The 7mm spark plug wire to be trimmed and matched with original Honda spark plug boots.IMG_3506.JPG
 
Nice. Those original coils are pretty tuff.
I tried to use Japanese made hibachi skewers but could only find US made ones, to stake the HT leads on my Dream.
kKPVIYHt.jpg
 
I argued with myself about sourcing the engine for my project. On one hand was to buy each part as they became available. On the other hand, buy a complete engine and hope for the best. I went with the complete engine gamble. Turns out, after tear down of the engine, which was locked up at all points due to severe internal corrosion, The only salvageable parts were the head, cylinders, upper engine case and some odds & ends. Fortunately, I gained some salvageable engine parts from the original bike purchase to help fill the void of needs. Late next week, after all replacement part assemblies are delivered, cleaned and inspected, the engine bottom end will be complete.
Pictures forthcoming. Was the gamble worth it? The answer at this writing is no. I'm not unhappy, I'm just reporting out!

Again, this engine, when last running, likely ran low on oil. Before engine fail, bits of rod bearings got circulated just prior to failure. Those bits fell into the transmission gears and imprinted deeply. At some point, someone drained the oil. Years of northern unheated storage, condensation created excessive internal rust everywhere.
 
That's always the risk when buying an engine from afar with no internal views or previous use/storage information.
 
My donor engine was supposed to be running, just add spark and gas which I took with a large grain of salt and as I found out would have required a bit more but I have been able to salvage a number of parts off it so that it has paid for itself plus some.
 
Good parts arrived. I wanted to offer a couple pics of the bottom engine case before adding back guts. Just a before and after shot. The bottom end is from the 62 engine that came with the bike. I presume the bottom engine case sat exposed since 1966. More to come soon. IMG_3097.JPGIMG_3549.JPG
 
Thanks for your feedback. I too enjoy marking progress to such detail. The pic(s) for today shows the gear assembly placed in the lower engine case. The kickstart shaft was the only salvageable part in engine case. As a matter of fact, as previously mentioned, even the lower case from the engine purchased could not be trusted. One overlooked item that got past me was the Tab Lock Washer for the shift forks. Ordered and once received, the engine case will be assembled. On to another sub project while I wait for this little part. Upcoming is mounting bullet light turn signals on the handlebars, rear frame and subsequent wiring. I'm also thinking about installing modern handlebar controls as I did with my CA95 Army Bike. My internal ying/yang discussion, ying defends the use of as many original parts as possible. My yang argues the fact the bike cannot be "original" due to newer engine and whatever else creativity dictates. Yang says: Safety 1st.
Army Bike 007.JPG
I highly recommend thread chasers (as pictured). I can't stress enough the need for clean assembly and clean threads. I would like to share another tidbit. Restoring the Phillips head screw head. Often times when applying muscle to these old screws, especially with an ill-fitting screwdriver, one tends to distort the Phillips head screw. Place the thread side down wood or a thick, but resilient surface as not to distort the bottom starting thread. Tap back the metal distorted by force with a flat clean hammer. IMG_3560.JPGIMG_3562.JPG
 
Last edited:
I couldn't part with the OEM controls when I winkered my Dream. So a bracket and a on-off-on switch is hung from the lever pinchbolt]
Yipw8P7m.jpg
XVHWax6m.jpg


Nice thread maintenance kit there. I actually posted a thread about peening the flared crosses on those screw heads. I think the work hardening can aid in loosening some tough ones. I smooth with a wire wheel and even buff them, can't hardly tell some have been refinished.

The lower case looked great with no sign of gear rubbing from missing knock pins or bearing retainer half rings causing side load shifting and improper wear. Attention to those details like you've done is the only right way.
 
Today's basket case sub project was the Stator Generator Housing and the Stator Generator itself. Both Stator housings from the original basket case buy and the housing that came from the whole engine buy could not be trusted. Structurally, both looked good, but the oil seal surfaces at the crankshaft opening appeared rough from corrosion. Remarkably, the Stator-Generator, from the original basket case buy looked rather good. I found a fair gamble low bid crankshaft from Ebay, it appeared the seller could not get the flywheel off, leaving the Stator Inner Housing trapped behind it. The finished pic shows the previously mentioned Stator Inner Housing and the salvaged Stator Generator from the original procured basket case buy.Crank & Housing.jpgmag close up b4.jpgmag close up After.JPG
 
I agree with you. I wear gloves when handling nasty parts. Speaking of nasty parts, today was dive into the overhead valve cylinder head. Dang, the camshaft has rust! once again I am saved by the fact the bike came with the same head so I can salvage its cam. The tachometer drive removal from both heads was brutal. The bushing removal seems precarious. Manual suggests using a drift pin to force the bushing up and out. Oddly, the bushing had a davit from the side bolt and the bushing is bronze. I failed to salvage the bushings and damaged the tachometer gears from both heads. The tachometer gear housing will be sealed and reinstalled less the drive bushing and gear. No picture of the boogered bushing and gear. But the one shot attached shows rust on the camshaft. BTW, the next job is removing valves. Cam Rust.JPG
 
Those cam bearings with the tacho drive are a bit of a puzzle. I don't know why they continued to sell the bikes with them, as I've never even seen a tacho head available. I just removed my drive and put an Oring in the cap to keep it oil tight.
Glad you have a spare cam. That rust does look too bad to be salvageable.
Hope your valves, guides and seats come out serviceable.
 
Thanks, I hope the valves are ok as well. If not, then another task added to the list. I will be closing up the engine case soon and I wanted to share one last look inside the crankcase before and after pics. Sadly, the only internal salvageable part from the engine I purchased was the kick start shaft. IMG_3438.JPGIMG_3576.JPG
 
Looks pretty good now. Just when it seems the world supply of Benly parts is exhausted, another one pops up, but we know that time will come eventually.
 
Thanks, I hope the valves are ok as well. If not, then another task added to the list. I will be closing up the engine case soon and I wanted to share one last look inside the crankcase before and after pics. Sadly, the only internal salvageable part from the engine I purchased was the kick start shaft. View attachment 35565View attachment 35566
I'm sure glad no one saw my MAJOR error in this pic! I finally assembled both halves of the engine, but before I did, I noticed the crankshaft was reversed!
Gotta love old age....
 
Time stamp 8/17/24. I finally got the engine case buttoned up. (Garage shop) I'm now waiting for my good used primary gear to arrive. Even the original primary gear was damaged!
In the meantime, truing wheels (rear shop). IMG_3585.JPGIMG_3586.JPGIMG_3587.JPG
 
Historically I've taken in the worst of the worst 60's Dreams. My favorite is indeed the CA95. The worst of the worst bike projects require disassembly, literally down to the last nut & bolt. Without indexing small parts, reassembly would tough. What is not mentioned is my shed set up to stage large parts and stinky oily parts awaiting cleaning.
Solvent degreasing is done in a parts washer tank. Once cleaning is complete parts are staged to be sub assembled and stored until needed. The actual assembly of the bike is much like a one-man assembly line.

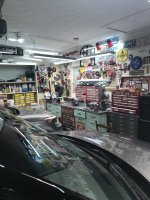
"Enviable garage organization" I've always had shop space wherever I lived, even as a young teenager in his parents' basement. My father had shops; my grandfather had shops.
Prior to April 28, 2021, I had an outbuilding shop. The shop was 1/3 of a larger open-ended barn with a concrete center and an adjacent 1/3 just covered dirt. Lots of room, lots of property and a great job just 1.5 miles away in a tiny Georgia town.

That scenario ended abruptly April 28, 2021. Life flight, botched stint, sent to Savannah, 5-day coma. Two weeks I'm out of the hospital. Three months recovery. I abruptly retired. I had a second home in Lexington, Ky. Unlike my Georgia home, far away from everything, my Lexington house is in a neighborhood and a tight one at that. I intended not to give up. I needed to be creative. Enjoy the pics! Georgia shop, Lexington home garage and a converted sunroom into a rear shop and a greenhouse for the wife. I wanted to share this story with those who have had catastrophic health events. Never give up. Take on challenges you see fit. Everything you think you left behind, is waiting for you in the future. Ok back to bikes! 098.jpgIMG_0640.JPGIMG_3596.JPGIMG_3598.JPGIMG_0737.JPGIMG_3595.JPGIMG_3592.JPGIMG_3593.JPG
 

Attachments

  • IMG_3592.JPG
    IMG_3592.JPG
    1.9 MB · Views: 3
Last edited:
You're making better use of your space than most people, that's a hell of a lot of equipment and parts in there. And way more organized than mine is.
 
Thanks for sharing. I'm still processing the experience of a catastrophic healthcare event and will continue to as I ponder the incoming bills and wander in my messy garage. There is always much work to do there but, gratefully, there is a stool to sit on as well.
Since I didn't put myself here in this world, under the sun, I can only hope I'm being a good steward of this gift of life and that I'm more a blessing than a curse to others. I've yet to receive my final billing summary for this life, but happy to be working on the eternal existential assistance application that is available, an even bigger gift.
I will, until I can't. Yeah, stuff happens.
These old Hondas are a great metaphor. They need to be fixed, replaced, redeemed and enjoyed.
 
I remember a dream I had when I was 7 years old. You see, my father buys a new home back in 59. The home had a full unfinished cinderblock basement. The washer & Dryer was downstairs as well. Think dark, cool and in my mind, scary. I dreamt a force was dragging me downstairs and was drawing me into the drain under the laundry sink. Nothing I could do. I was drawn down the drain, only to be met in a field with my family waiting for me while leaning on our 56 Ford. Where have you been? I was asked.

That's what I expect to see after the final curtain. My 81-year-old brother and I have a pact. He will be waiting for me on his Cushman at the end of the street. We plan to have a cup of Sanka with mom. I was employed when I got hit. I always carried additional catastrophic healthcare insurance. My bill, including the $52K ambulance helicopter was 1.2 million. All said and done insurance and healthcare agreed to $875, 000. Roughly $62,000 per day or $2604 per hour. My cost was $5k.

When I got out of the Hospital, I was a mess but determined to beat the odds. Remember to walk. Early in my recovery I would go out into the shop, with my wife's help, I sorted parts and put things away. Do something every day. Six weeks out, I pissed off my wife when she heard the Honda 90 start up, and away I went around the property. I had two projects going when I got hit. A mid 50's Schwinn Bike and a Fox Campus minibike. I finished the Schwinn by the 8th week, the 12th week I retired, packed the house and shop (with the help of a coworker engineer and his sons) and moved 525 miles up to Lexington. The minibike you ask? I just finished it before the 62 journey.
IMG_2870.JPG
 
I intended to record another amazing phenomenon with this project. Of the two original rims found with the bike, only the front rim looked fairly nice once the rust was removed. The front hub was salvageable, but the spokes were eaten away. I've been advised not to lace and true old rims. Original rear hub was broken, so a used rear hub complete with brakes and hardware was found on eBay for under $30. The pic below is the refurbished used hub, original front rim, laced with OEM Honda stainless spokes and trued within .003 round and side to side. I figured that was close enough. Not planning to go over 50mph anyway. The front gets the new rim and trued as well. Here is a pic of the trued rear rim as described.IMG_3601.JPG
 
Date stamp. Ordered new wheel bearings all around. As in the past I opted for metal wall sealed bearings. Speedometer drive rebuilt, brake shoes good, brake springs replaced. Once bearing arrive the wheels will be assembled and stored until tires, tubes and rim strips arrive. I also ordered new .25 over pistons, rings and pins. Cylinders will be sent out for boring sometime before years end. Lots of small stuff to do like electrical and minor decisions regarding custom work.
 
I buttoned up the engine crankcase only to have a stiff and non-retracting kick start shaft. Today I will split the case again to find out the cause. My .25 over pistons came in yesterday. Check the fit and wonder. See pic. I enjoy mechanical mysteries along the journey.  IMG_3640.JPGIMG_3642.JPG
 
I buttoned up the engine crankcase only to have a stiff and non-retracting kick start shaft. Today I will split the case again to find out the cause.
I have to retract a statement I made earlier that the only salvageable part from the original whole engine purchase was the kick start shaft. I opted to save the original kickstart shaft due to the clean kick start splines. I must admit I tried to resurface the corroded machine surface of the shaft that meets the machined surface of the two-engine cases. The rough surface shown in the picture (bottom shaft) caused the stiff non-retracting kick starter. Parts were reinstalled on the shaft they came with. The splines are good, just not as good as the original kick starter assembly. IMG_3646.JPG
 
Looks like you are using the OEM and used friction discs in a stock 4 disc setup. Hope it works good for you. I finally gave up on my slipping one and modified it to 5 disc, although the modern replacement discs do have an increased amount of contact surface area.

Beautiful wheels there. Even has the felt seal on the brake pivot shaft.
Your paint on the hub shell and brake plate looks really good and may be a good reason to throw in the towel from all that tedious polishing that I've been doing.
 
The engine pic is a work in progress. Wasted basket case projects can bury you in parts. What I do, after cleaning and assess components is to build assemblies. Occasionally I build assemblies using parts known to be replaced at some point, just to reduce loose part count. New OEM friction discs and plates on order. I'm trying something different. Clutch part blow-up for the CA95 indicates "A" & "B" plates. "B" plate goes 1st into the clutch basket. I believe I have sourced "B" plate. "B" plate is thicker than "A" plate. I have certainly considered your recommendation to go to five plate clutches. As much feather's fly when I bring up oil's, I'm convinced from professional training and building many vintage Hondas, using modern oil technologies like those with friction additives and "wet clutch" protection, causes sticky and/or slipping clutches in our old heavy, air-cooled, low horsepower motorcycles hauling heavy riders.

Thanks for the fine compliment regarding the wheels shown. I've gone back and forth between polishing and painting wheels. Attached is a finished bike I completed back in 2012 with painted hubs. I've gone with painted hubs with this project to compliment the fact that I'm trying to keep as much "patina" and original paint as possible. Kind of a 60's punk, sh&t creek survivor bike,8 August 2018 Honda CA95.jpg
 
BTW. The black bike sports 3.25 x 16 tires rather than the 3.00 x 16 tires normally found on the CA95's. I liked the beefier look of the bigger tire.
 
Those tyres do look very good on the OEM rims. Some people don't believe me when I say the rims are the same for the Dreams and the Benlys, but I've measured all the examples around here, and they are. The Benly fenders are narrower than the Dreams but the 3.25 and even the 3.50 fit fine.
When I bought tyres for my CA95, I couldn't find many blackwall ones in the 16 inch size, so I got a pair of Shinko 714 in 90/80 16. I love the way the Benly handles and really wanted a modern tread tyre to max that out.

What tyres are those 3.25 and where did you find them?

I've been running a newer Duro traditional block tread on the rear but am still riding the original 60 year old OHTSU ribbed front. Now that the bike will do 70mph, I should be reasonable and get that swapped out.

Nice touch with the door edge chrome trim on the front fender and side covers, it sets it off real nice, especially on the black.
 
Finally got the front wheel trued. See before & after pics. before front wheel.jpgIMG_3685.JPG The new Union Cycle rim spoke holes had to be opened up to accept Honda original (new) spokes. Going forward, should I take on another bike, I need to remember to order aftermarket spokes for aftermarket rims.
On a side note, the OHV cylinder head that came with the engine I purchased, can't be used. Fortunately, the head that came with the bike can be salvaged. I continue to believe the engine I bought ran dry of oil before failure. Another odd finding is the new .25 over pistons fit 50% down the cylinder. This means I can hone the difference of a few thousands to fit the new pistons.
 
Time Stamp 8-29-2024. Three months into my project, the frame comes into the shop from backyard storage unit (set up as a mini holding shop).
Today marks zero time of reassembly of the bike.
IMG_3686.JPG
 
This time around it's "as is". I had to paint the rear part of the fender due to repair. The new color is as close to old color as possible. All of my Dream projects have been sandblasted and repainted in the past. So, this time I plan to keep the old "patina" (I love that term) and the repair. Under the ragged looking paint will be a new bike essentially. If for some reason I don't like the end product, I can easily break down the bike and do a custom paint job. I wanted to add a couple of pics this evening. Here is a shot of the bullet rear turn signals, a before shot of the frame at the rear trim as found, one of the cleaned-up shocks and a sourced left-hand control to be wired in. The throttle side control may be chrome plated to match. IMG_3694.JPGIMG_3693.JPGB4 Side trim.jpgIMG_3162.JPGIMG_3697.JPG
 
Those bullet winkers and that switch you found look very good.
I've never seen that switch, I wonder if it is still available.
 
Here are some pics of the inner fender wiring for turn signals. I reroute the signal wires as well as the taillight wires through the fender well. While I'm at it, I brush touch up rust spots. IMG_3732.JPGIMG_3733.JPGIMG_3734.JPG
 
When reassembling the CA95, the very 1st thing to install is the center kickstand. Although this step seems insignificant, I want to share some insight. Before retirement, I managed chemicals and lubrication for Koyo at one of their southern plants. We made over 2600 different parts mostly needle bearings. This plant made needle bearings for automotive starters and alternators. We all take for granted the smooth-running alternators under the hood. I once calculated the alternator spins approx. 10^14th revolutions in 100,00 miles of driving. (Thats 1 followed by 14 zeros). The alternator and starter needle bearings use a lifetime permanent grease called Krytox 225. This grease has an infinite life span, but under law the usage timeline was 50 years. Today's prices this grease costs $72.58 per ounce. I bought the grease in 200kg kegs. The plant uses drum pumps for grease. They always left a couple of pounds in in the empty keg. I've been using Krytox 225 for all my Honda builds for any joints that move. I still have 1/2 # left. The grease should be good until the year 2069 and beyond.

The kickstand picture is insignificant, but the grease inside the housing and on the shaft is coated with Krytox 225.

Back in 1972, Woody Allen made a movie called "The Sleeper" in which he woke up from a state of suspended animation after 200 years. He finds a Volkswagen beetle in a cave.
He gets in the car, and it starts right up! Someone might find one of my Honda's in the year 2224. The bike may not start, but the kickstand will work!

IMG_3745.JPG
 
Finished honing cylinders today. Oddly enough, when I placed the replacement .25 over pistons in the untouched cylinders, they fell nearly 1/3 way down. I neglected to look closely at the pistons I cut off the rods that froze in the cylinders. Were they standard or oversize? I've been taking lost and abused parts to my local recycle yard, so the old pistons are no more. I was able to hone cylinders to .25 over size. Very unusual to able to do this. Although I'm happy to be able to avoid boring and shipping costs. Here are two pics. ThirdwayIMG_3749.JPG down pistons in the untouched cylinders and finished honed shot. I may not be completely done as I have to fit rings to check gaps.IMG_3640.JPG
 
Back
Top Bottom