Timing Keeps Going Out

Violet

Member
Joined
Feb 19, 2024
Total Posts
25
Total likes
37
Location
Salt Lake City
Hi everyone!

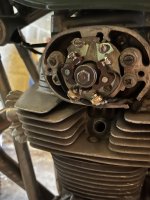
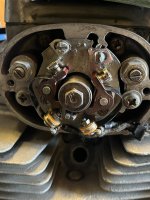
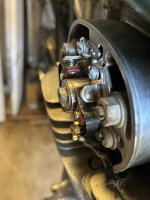
I am stuck, and could use some help figuring out my next steps. I am fixing up a not-so-previously-loved SL 350 K2, and I have had it running multiple times, even drove it for 30 minutes once! Only stopped because the tires were dry rotted and I didn't want to push my luck. The thing I am realizing is, the points timing keeps going out of whack after every short ride. So this is the third time I've gone in to try to fix it, I tightened the bolts down as much as I dare because I don't want to strip them... but I don't think that they're the issue now. Currently, I CAN'T get my points timing set correctly as even at the far extreme of the spectrum my right point is almost an inch off of sparking when it's supposed to (sparks after the mark, if that matters). I will post a pic of the extreme points setup right now so you can see how far I have it adjusted.

A little info, I completely redid the entire electrical system - so the spark is good and the coils / condensers should be good. I have set the cam-chain tensioner and valve clearance. I got the points from 4 into 1, I don't think those are Daiichi, here's the link https://www.ebay.com/itm/173806285751?hash=item2877a973b7:g:AToAAOSwLXBcb0aq

I am stumped! I am also just learning how to work on motorcycles so the more details you include the better. :giggle:

V
 

Attachments

  • points.JPG
    points.JPG
    1.5 MB · Views: 27
I'm going to include the FSM instructions below. Is this the procedure you are using to adjust the ignition timing?

View attachment 34520

View attachment 34521
Yes, I did everything correctly at first when initially doing the points - but was unable to ever get the right point to fire as i couldnt adjust it enough. So I ended up having to skew the plate so that the right point would fire, and then adjust the left one to ever get it timed in the first place. Something seems wrong, which is why I am making the post. The issue seems to be that no matter what I do, correct or otherwise, the points will not both be able to be timed at all with any of the plate adjustments.

I will note that I never bought the bulb. I was trying to use a continuity tester but then saw someone mention in another post to just check for spark from the spark plug so I've been doing that in place of a bulb. Spark plug fires when passing the point the light would fire I assume, unless I am completely wrong to have done it that way.
 
but was unable to ever get the right point to fire as i couldnt adjust it enough. So I ended up having to skew the plate so that the right point would fire

The cam lobe is 180 degrees off. Pull the bolt at the end of the cam lobe and rotate 180 degrees. I'm fairly certain the cam lobe is removable and simply reinstalled 180 off.
 
Last edited by a moderator:
Yes, I did everything correctly at first when initially doing the points - but was unable to ever get the right point to fire as i couldnt adjust it enough. So I ended up having to skew the plate so that the right point would fire, and then adjust the left one to ever get it timed in the first place.
As Jim alluded to above, some of the aftermarket points do not provide an adequate range of adjustment out of the box. One possible remedy is to enlarge the through holes on the points to increase the range of adjustment. Jim's suggestion to obtain better quality points is also good.

If you have a voltmeter, you can use the resistance tester to determine when the points open. I like this method because it works without using power from the battery and thus cannot cause the coils to overheat. I typically disconnect the yellow or blue points lead and connect it to one of the voltmeter leads. The other voltmeter lead is connected to ground (like a fin on the cylinder block). You should see a resistance while the points are closed and it should change to open (infinite resistance) when the points open.

It's best to stick to the FSM instructions.
  • Set point gaps.
  • Adjust left point timing by rotating base plate.
  • Adjust right point timing by repositioning the point.
The notes at the end of the instructions are also important. Hopefully it's just the points themselves that are causing the difficulty.
 
Put some engine oil on the felt (that appears to be missing?) and a dab of grease in the 'L' of points heel.
It could just be the points cam had some rust and new points always bed in?
The rubbing block/heels of points seem to be pretty worn down, usually they are 'thinner' with a radius (when new)
 
I do appreciate the tips on adjusting points / possibly replacing them. The original problem I’m trying to solve is that the points timing isn’t sticking - I’ve had them adjusted to both fire on time twice before and then after a short ride they’re not adjusted anymore. To the point where now I cannot adjust them.

Is that a normal problem to have with aftermarket points? I was thinking something was going on internally that was messing up what was a good time very quickly.

I will look into the possibility of missing felt that should be there and try to flip the cam lobe to see if I can make the proper timing with it reversed!
 
I’ve had them adjusted to both fire on time twice before and then after a short ride they’re not adjusted anymore. To the point where now I cannot adjust them. Is that a normal problem to have with aftermarket points?
It's not normal. Do you believe the points or points plate were actually moving? The points are secured by two screws each and the plate is secured by two slightly larger screws. If the threads are all good and the screws are tight, everything should stay in place. You could take "before" pictures after setting the timing to compare to the configuration after a ride. This might help confirm unwanted movement.

I will look into the possibility of missing felt that should be there and try to flip the cam lobe to see if I can make the proper timing with it reversed!
Have you ever removed the points cam lobe previously? If not, there's no reason to suspect it's 180° off and it won't help to rotate it, especially since you had it running with the current orientation.
 
Have you ever removed the points cam lobe previously? If not, there's no reason to suspect it's 180° off and it won't help to rotate it, especially since you had it running with the current orientation.
Exactly the question I wanted the answer to. If not, then things should still be the same. I will say the advancer should probably be looked at, as the question raised by PJ about possible light rust on the breaker cam lobe could cause accelerated wear on the heels of the points and make for a quick change in the gaps. At this point we only have one picture of the points and plate and when enlargedit's too blurry to define some important things.

The flat washer on the (correct) bolt over the end of the advancer looks too large, and it could be influencing the movement of the breaker cam lobe or even be holding it still. And, for whatever reason (possibly the angle) it looks like the lobe on the breaker cam is significantly shorter than a stock one. A clear picture directly at the end of the shaft and advancer would help clear that up.

points2.png
 
The points wires are not in great condition and I probably will change them! I also did order new Allen head screws for the plate which are taking their sweet time to get here. Here are more pics of the points to hopefully get you all some better viewing. I am curious about the washer being too large, it’s possible someone rigged this up poorly before I got it with incorrect parts. Does anyone have a detailed photo of what the SL350 K2 should look like in there?

I haven’t removed the points cam lobe and since I have had it running maybe I’ll refrain from that for now.

The first time it happened I thought the points plate may have moved but I am fairly certain all was held down after the second time. Once tightened I can’t move it with a flathead like I could while adjusting.

Could something be skipping or slipping internally that may result in timing being thrown off?
 

Attachments

  • IMG_7945.jpeg
    IMG_7945.jpeg
    1.9 MB · Views: 16
  • IMG_7946.jpeg
    IMG_7946.jpeg
    1.8 MB · Views: 16
  • IMG_7950.jpeg
    IMG_7950.jpeg
    1.5 MB · Views: 16
Here's a picture of my CB350 points plate for reference. I don't think there is any difference between the SL/CB/CL 350's in this area.

View attachment 34551
I notice yours has some scruffy looking material in the bottom center, is that the felt that was mentioned? What does that do?

It’s like 110° here right now so I think I’ll wait a few days to go out and work on the bike but when I do I want to start from scratch on the timing and just see if it’s possible to get it timed at all. Maybe if I can I’ll take a pic, ride it and see if it moves.

Sounds like I would then check out the cam chain if the timing goes out again but the plate doesn’t move.
 
I notice yours has some scruffy looking material in the bottom center, is that the felt that was mentioned? What does that do?
That piece of felt is supposed to be oiled periodically and provides lubrication to presumably reduce wear on the points followers and cam surface.
 
The points wires are not in great condition and I probably will change them! I also did order new Allen head screws for the plate which are taking their sweet time to get here.
But when you use allen screws, it's easy to overtighten them for the strength of the threads in that thin plate and strip the holes, so be careful with them.
Here are more pics of the points to hopefully get you all some better viewing. I am curious about the washer being too large, it’s possible someone rigged this up poorly before I got it with incorrect parts.
Perhaps it was an illusion because of the angle of your picture, and maybe the washer isn't too large based on Brody's picture. However, the concern here is that the washer only contact the advancer unit on the end of the center shaft section of the advancer. The outer portion behind the washer has to rotate a little bit for the advancer to function properly, and if the washer is rubbing on the points cam lobe it would hold it still and the timing would not advance as the rpms increase. The gap between the back of the washer and the end of the points cam lobe is very small, causing concern that it might be rubbing. Note the tight clearance between the washer and the end of the points cam. Also, note the rust pitting on the backside of the lobe. If there is any of that pitting on the opening ramp of the lobe, or on the lobe itself, or even on the closing ramp, it will grind off the heel of the fiber points material in a hurry and would absolutely cause your points to wear quickly and change gap as a result.

pitted.png
Could something be skipping or slipping internally that may result in timing being thrown off?
If the cam chain (which drives the camshaft where the advancer is located) were to jump a tooth, it will likely bend a valve and would then be dead on one cylinder with very low compression.
 
An inconsistent advancer could be the culprit. There could be grit or rust between the center shaft and the cam that rotates on it, or springs that are not returning the cam consistently from being overstretched.
I'd have a good look at your advancer. Remove that special bolt and special washer carefully and lift off the advancer. then soak and clean it and lube it with oil. If you do remove the cam from it for more cleaning, take note (or mark it) so the cam is not re-assembled 180 degrees backwards.
Show pictures.
 
If the cam chain (which drives the camshaft where the advancer is located) were to jump a tooth, it will likely bend a valve and would then be dead on one cylinder with very low compression.

I hope I would have noticed that when it happened if it’s that extreme, but I can test the compression again to make sure nothing has changed significantly since the last time I checked it.

I appreciate the detailed explanations and advice, I will fiddle with things to see if I can make that gap larger and clean off the rust or else look into possible replacement parts. Maybe the damage has been done to this set of points already.

Also I’ve got to get some of that felt and oil things up too! When I got the bike there was no cover for the points which I’m sure helped to cause problems.

I will be re-reading everyone’s comments as I go haha.
 
Last edited:
I hope I would have noticed that when it happened if it’s that extreme, but I can test the compression again to make sure nothing has changed significantly since the last time I checked it.

I appreciate the detailed explanations and advice, I will fiddle with things to see if I can make that gap larger and clean off the rust or else look into possible replacement parts. Maybe the damage has been done to this set of points already.
Oh - if your cam chain jumped a tooth, you'd know it for sure! If you look at your points compare to the other pictures, you'll notice that yours don't quite fit on the plate (hanging over the edge a bit.) Even though they fit the screw holes, something just looks off about that and could explain why it's almost impossible to time them correctly.

I'd hop on over to Harbor Freight, you should be able to get a simple test light for $5, which makes this job WAY easier than using the spark plug, while reducing the strain on your coils
 
I hope I would have noticed that when it happened if it’s that extreme, but I can test the compression again to make sure nothing has changed significantly since the last time I checked it.

I appreciate the detailed explanations and advice, I will fiddle with things to see if I can make that gap larger and clean off the rust or else look into possible replacement parts. Maybe the damage has been done to this set of points already.

Also I’ve got to get some of that felt and oil things up too! When I got the bike there was no cover for the points which I’m sure helped to cause problems.

I will be re-reading everyone’s comments as I go haha.
I would consider getting a new set of points.
Have you checked how your condensers are doing? They may be defective and arcing/burning your points contact surfaces.
Daichi brand points and condensers are Very poor quality from China;if those are what's installed in your bike,I would certainly replace them.
The stock Honda ND points and condensers are So Much better (y)
 
But when you use allen screws, it's easy to overtighten them for the strength of the threads in that thin plate and strip the holes, so be careful with them.

Perhaps it was an illusion because of the angle of your picture, and maybe the washer isn't too large based on Brody's picture. However, the concern here is that the washer only contact the advancer unit on the end of the center shaft section of the advancer. The outer portion behind the washer has to rotate a little bit for the advancer to function properly, and if the washer is rubbing on the points cam lobe it would hold it still and the timing would not advance as the rpms increase. The gap between the back of the washer and the end of the points cam lobe is very small, causing concern that it might be rubbing. Note the tight clearance between the washer and the end of the points cam. Also, note the rust pitting on the backside of the lobe. If there is any of that pitting on the opening ramp of the lobe, or on the lobe itself, or even on the closing ramp, it will grind off the heel of the fiber points material in a hurry and would absolutely cause your points to wear quickly and change gap as a result.

View attachment 34552

If the cam chain (which drives the camshaft where the advancer is located) were to jump a tooth, it will likely bend a valve and would then be dead on one cylinder with very low compression.
I think removing the advance unit with points cam and smoothing-down those rough areas is essential.
 
While we are on this topic...does anyone have a good source for that oil felt? The Honda Part # is obsolete. I found one for sale that for a CT70, any chance that might be easy to make work? Honda 30205-041-005
 
While we are on this topic...does anyone have a good source for that oil felt? The Honda Part # is obsolete. I found one for sale that for a CT70, any chance that might be easy to make work? Honda 30205-041-005
They're all essentially the same, the only differences would be length and width. If that one is larger you'd simply cut it to fit, just so it rubs on the high part of the lobe as it rotates to keep an oil film on it. If it happens to be thinner than the original you can just bend the two "fingers" together that hold it to the points plate.
 
I wonder if something like this would work. It's 1/4" thick and is probably cheaper than anything comparable that has a Honda part number. And about a million could be made from it. (slight exaggeration)

 
I'm sure that would work just fine when cut to the size and shape necessary. All it has to do is absorb and contain a little oil. I use chain lube instead of oil since it has graphite in it and thickens up after dispensing. I also wipe a small droplet on the heel of each set of points' rubbing blocks.
 
They're all essentially the same, the only differences would be length and width. If that one is larger you'd simply cut it to fit, just so it rubs on the high part of the lobe as it rotates to keep an oil film on it. If it happens to be thinner than the original you can just bend the two "fingers" together that hold it to the points plate.
OK thats what my thought was. I figured if it was a dumb idea someone here would tell me so. I'm going to grab one and I'll report back.

I've been looking in stores locally for something similar to that large pad stl360+450 posted above. The closet that I have found are the stick-on bottoms for furniture...the kind that protect your wood floors.

I've been using dielectric grease for now, but chain lube is a good idea...
 
You can use that it's cheap. I have a tube of this lubricant sl-2 and will last beyond a lifetime, lol.

I also use this product and add a bit of oil together with it into the felt.
The felt is very important and was designed to use oil which I think seems to work best through the years,you can add a little more later when it dries-out:it absorbs and holds the oil very well & keeps the little cam just wet enough to lube the points heel but not so much that it throws the oil into the contacts.
I like the felt design because it catches and absorbs what ever is on the points cam.
I have been successful at carefully washing out a used one,then drying it.
Look out not to put too much lubricant on the points cam,because whatever you use on there will end-up being shot into your contact surfaces;that's why I prefer oil as it's much easier to clean-off the points contact surfaces than other lubricants.

Edit: Violet,are you confident that the points cam on your advance mechanism is smooth enough to keep from wearing-out the points fiber arm ?
The picture of it looks very rough.
 
OK thats what my thought was. I figured if it was a dumb idea someone here would tell me so. I'm going to grab one and I'll report back.

I've been looking in stores locally for something similar to that large pad stl360+450 posted above. The closet that I have found are the stick-on bottoms for furniture...the kind that protect your wood floors.

I've been using dielectric grease for now, but chain lube is a good idea...
I use high temp grease on points hell, dielectric grease seems to melt off too quick and just make a mess (although being non-conductive doesn't cause any other problems)

One thing I forgot to ask, are the points gaps closing up when timing goes out?
That would be an indication heels are wearing excessively.
If not, get a JIS screwdriver, it fits properly and doesn't 'cam-out'.
You need it for other screws (switches, head light retaining screws, etc)
 
One thing I forgot to ask, are the points gaps closing up when timing goes out?
The OP of this thread is actually @Violet and she hasn't been here since July 15th, but it's a question I'd like the answer to as well.
That would be an indication heels are wearing excessively.
And from the looks of the rust pits on the points cam lobe in this pic I posted above, I'd say it's possible.

1721670630153.png
 
Hello again! I still need to get some felt so I’m glad you all had that discussion. I disassembled the points plate and the parts behind it following this helpful (and funny) video:

I cleaned everything up, replaced the points with new ones that I extended the holes of with a dremel for better adjustment range, reassembled correctly (not upside down), set the timing according to Honda (step by step followed those pages posted at the beginning of this thread), and replaced the wires and connectors as well so everything is fresh and new.

Just like the past times I set the timing, the bike kicked right up. I drove it around for 30 minutes in circles in the parking lot / around the block. It sounded so good and I was very pleased. I woke up at 7am excited to ride it again, got my helmet and boots on and ALAS… it won’t kick up. Tried to start and blubs a few times before popping and dying. Got another huge pop and then nothing.

I took pics of the points before and after and it does not appear anything has moved. I am thinking something is going on with the cam chain. Perhaps the chain is too loose / crusty or just plain bad? Maybe the tensioner is broken or not working correctly?

I’ll attach the photos before / after the cleaning and also of the finished assembled points before and after the ride. I still have to check the gap to see if that has changed because it was for sure in spec before the ride. IMG_7994.jpegIMG_8022.jpegIMG_8027.jpegIMG_8035.jpeg
 
I agree it doesn't look like the points or the points plate moved based on the before/after pictures.

Maybe the advance mechanism is sticking in an advanced position? Is that the same washer as before on the end of the cam? I guess one test would be to loosen and then tighten the bolt on the end of the cam and then try to start it, without disturbing the points or points plate.
It is the same washer at the end of the cam but it had been cleaned and lubed. Easy enough to try to loosen and tighten the bolt and try to start it again! The mechanisms should not stick after my cleaning I wouldn’t think… unless I tightened that bolt too much?
 
It is the same washer at the end of the cam but it had been cleaned and lubed. Easy enough to try to loosen and tighten the bolt and try to start it again! The mechanisms should not stick after my cleaning I wouldn’t think… unless I tightened that bolt too much?
Let's see. I think if your cam chain were jumping around, you would never have gotten it started so I'm hopeful this test will give some new information.
 
Last edited:
It is the same washer at the end of the cam but it had been cleaned and lubed. Easy enough to try to loosen and tighten the bolt and try to start it again! The mechanisms should not stick after my cleaning I wouldn’t think… unless I tightened that bolt too much?
The design of the advancer would keep you from tightening the bolt too much (short of breaking it off in the cam, which obviously you wouldn't do). The center post of the advancer is just slightly longer than the points cam that rotates on it when the weights swing out with higher rpm. The washer size is intended to only cover the post and part of the diameter of the points cam, which is why you can easily see the high and low areas of the points cam lobe when the proper washer is used. Based on the pics you've posted of your points and advancer, I'm not sure the washer on yours is the original as it looks a bit larger than the one in my pic below. This is also part of why the proper washer is a hardened one, because it stands up to the tightness needed without becoming concaved and retains the small amount of clearance between the outer part of the washer and the points cam behind it to allow free rotational movement when the weights swing outward to advance the timing, but not excessive clearance that would allow the points cam lobe to move axially and cause erratic timing. (ignore the annotations in this instance)

adjust points.jpg
 
Hello again! I still need to get some felt so I’m glad you all had that discussion. I disassembled the points plate and the parts behind it following this helpful (and funny) video:

I cleaned everything up, replaced the points with new ones that I extended the holes of with a dremel for better adjustment range, reassembled correctly (not upside down), set the timing according to Honda (step by step followed those pages posted at the beginning of this thread), and replaced the wires and connectors as well so everything is fresh and new.

Just like the past times I set the timing, the bike kicked right up. I drove it around for 30 minutes in circles in the parking lot / around the block. It sounded so good and I was very pleased. I woke up at 7am excited to ride it again, got my helmet and boots on and ALAS… it won’t kick up. Tried to start and blubs a few times before popping and dying. Got another huge pop and then nothing.

I took pics of the points before and after and it does not appear anything has moved. I am thinking something is going on with the cam chain. Perhaps the chain is too loose / crusty or just plain bad? Maybe the tensioner is broken or not working correctly?

I’ll attach the photos before / after the cleaning and also of the finished assembled points before and after the ride. I still have to check the gap to see if that has changed because it was for sure in spec before the ride. View attachment 34818View attachment 34819View attachment 34820View attachment 34821
You may want to check your Left yellow points wire where it attaches to the bottom of the points;I hope it doesn't touch the outer points cover and Ground to Earth- which would short-out your spark.
The other thing I thought is:make sure your points are opening far enough on both and not being impeded by the large allen-head points hold-down screws.
 
The design of the advancer would keep you from tightening the bolt too much (short of breaking it off in the cam, which obviously you wouldn't do). The center post of the advancer is just slightly longer than the points cam that rotates on it when the weights swing out with higher rpm. The washer size is intended to only cover the post and part of the diameter of the points cam, which is why you can easily see the high and low areas of the points cam lobe when the proper washer is used. Based on the pics you've posted of your points and advancer, I'm not sure the washer on yours is the original as it looks a bit larger than the one in my pic below. This is also part of why the proper washer is a hardened one, because it stands up to the tightness needed without becoming concaved and retains the small amount of clearance between the outer part of the washer and the points cam behind it to allow free rotational movement when the weights swing outward to advance the timing, but not excessive clearance that would allow the points cam lobe to move axially and cause erratic timing. (ignore the annotations in this instance)

View attachment 34822
Hmm it does look like my washer might be a little bigger than yours… I can search online and see if I can find one for sale (assuming it can’t be a lot of money) and just compare when it arrives?

The yellow wire is not shorting out, I just remade them and they’re really tight and tidy. The points are not being impeded by the Allen head, I did just replace those but the problem was happening long before I replaced them and these seem to fit very nicely! The problem is that I set the timing and then after one ride it’s completely out of whack again. If I set it again the bike will run, until the next time I kick it… and repeat haha.

I do wonder if an incorrect washer can cause all this trouble! If it’s stopping the rotation even a little I suppose it could be the culprit!
 
Hmm it does look like my washer might be a little bigger than yours… I can search online and see if I can find one for sale (assuming it can’t be a lot of money) and just compare when it arrives?
Actually, because they're not common, they're hard to find and usually overpriced. As with many things, Honda overdid the durability part of that choice and a thick standard washer of proper outside diameter would probably work fine. As long as the washer does not impede the points cam's rotation behind it then it's fine.
The problem is that I set the timing and then after one ride it’s completely out of whack again.
I asked about this rough area previously. It's clearly rust-pitted in that area (seemingly the low spot on the lobe) but I wondered if the entry point of the high area where the points being to break, or anywhere on the high area of the lobe, has similar pitting? That would rub off a fair amount of fiber rubbing block on the points in short order, causing a change in points gap as well as timing.

1721780569079.png
 
Too hot to try the simple test? Loosen, tighten, start?
I have a battery charger on now to make sure it’s topped up and not the problem. I’m also currently rebuilding the clutch on my KTM so I can go riding / camping this weekend and a part just came in the mail haha… so, multitasking. I’ve always got a lot of projects. I’ll check before bed though!
 
Okay battery is good, loosened and tightened that end nut and still no start. One glug and a huge pop is all I got out of her.

Overall the lobe seems smooth as far as any big gashes or lumps but it is a little rough overall from use. I could replace it if that’s a concern? [edited]: Nevermind, I’d have to get the whole advancer which is pretty expensive! It’s evenly rough I would say. Maybe I can sand it smoother just a little bit to even out any rough edges?
 
Last edited:
Drat! It still feels like the advancer must be involved. The tank had an adequate supply of gas?

Before you reset the timing again, I would be curious to know how far "off" it is after riding. In other words, if you can rotate the crank to see whether the points are opening early, on time, or late on each side.

If the advancer were stuck in an advanced position, the points should open before the F and LF marks are reached. This could be a helpful clue.

Another thought that occurred to me was that if the advancer was stuck when you set the timing, that would throw things off after it ran. I doubt this happened last time since everything was removed and cleaned prior to setting the points.

Last question for now. When you were able to start the bike, how did it sound? No popping sounds? Was the performance deteriorating as you rode it? If you go through this process again, I wonder if you could start it again directly after riding it.
 
Overall the lobe seems smooth as far as any big gashes or lumps but it is a little rough overall from use.
Seems like I'm repeating myself, but if the pitting on the actual surface where the fiber heel of the points makes continuous contact while they are open is anything like what we can see in the single side-view picture that I re-posted above, THAT alone would wear the fiber heel of the points very quickly. BUT, until we can see that area clearly in a picture (and the lobe's high spot where the points are open is about 270°) then there's no way for us to rule out the possibility that the points are simply wearing a LOT in between adjustments.

OR, if we had the answer to what the points gap is after riding it when it won't re-start.

This can't be a rocket science problem on a bike with an ignition system not much more advanced than '70s lawn mower ignition technology.

The red arrows point to what seems to be pitting and far less than a polished surface where the heel of the points rides continuously while the points are open. Again, if that roughly 270° area is not polished shiny, the fiber heel of the points will wear in a hurry - which directly affects your points gap, which directly affects your timing. The blue arrow shows direction of rotation and the white arrow points to a pile of apparent debris caught by the left points heel, that which my guess would be fiber material being scrubbed off at a much higher rate than normal, which could lead to what I've described above.

1721828868920.png

If that 270° span of the points cam doesn't look as shiny as this below, then it will cause accelerated points heel wear.

1721829357357.png
 
OR, if we had the answer to what the points gap is after riding it when it won't re-start.
It's a good observation about excessive heel wear while riding leading to a reduced point gap. This would also cause the points to open later, correct?

So, if Violet can check the gaps and current timing without making any changes, it should provide useful clues.

I'm baffled by the fact that the bike seemingly runs okay and then ends up in a no start scenario. It would make more sense to me if it got to a no run condition while riding.
 
It's a good observation about excessive heel wear while riding leading to a reduced point gap. This would also cause the points to open later, correct?
Correct, the more closed the gap gets, the later the points open.
I'm baffled by the fact that the bike seemingly runs okay and then ends up in a no start scenario. It would make more sense to me if it got to a no run condition while riding.
Here's a similar example: when I first put my red 450 together (and was having yet-unknown oiling issues), during the first ride the bike ran great for the first 10 miles or so. On my way home I came to a stop sign and it stalled (which was the first clue, but I didn't recognize it immediately). I tried to restart it but it wouldn't even fire. I kicked and kicked and finally gave up and pushed it. Got it running and headed home, and as I turned into my long driveway it stalled again. I pushed it up the drive and into the garage. Took the points cover off, checked the points gap and it was almost closed. However, it wasn't rubbing block wear, it was cam bearing wear allowing the camshaft to move about in the bearing creating erratic points gaps and timing. Different cause, but the same result.

If her points cam lobe is as rough as that last screenshot I showed where you can just barely see some pitting on the high area of the lobe, I'm thinking it's just trashing the rubbing block on the points and because of the rotation direction it's only piling up fiber particles on the left points, the right points' rubbing block wear debris is falling to the bottom of the cover area. Of course, it's only speculation until we can actually see a good picture of the points cam lobe.
 
Alright, thank you everyone for your replies. I have been trying to address and fix everything that gets brought up, but it seems I misunderstood ancientdad and did not realize initially HOW smooth the cam lobe needed to be. I do think that has probably been the issue, I cleaned up the rust on it before but it was still too rough.

I checked the points gap today and the left gap is almost non-existent. Right one is still in spec. I didn’t even bother checking how far off the timing was, I could see the heel of the left point was worn down and smeared on the lobe.

To answer other questions, the advancer is almost certainly not getting stuck and has a smooth actuation, there is fuel / carbs are spotless (I cleaned them about 30 times before figuring out it was a points problem) and when the bike was running last time there was absolutely no popping and I thought it sounded really good.
I do also think it's weird that the bike continues to run well until I shut it off, maybe I haven't ridden it for long enough... it probably eventually would have just stopped working.

I was able to find some used advancers on eBay for $20-40 but I am giving a go at cleaning mine up first before buying anything else.

Here is a video from today when I took it off the bike again, where you can see that it is rough, and then a video of what it looks like now. I took sandpaper to it from 220 grit all the way up to 10,000 like I do when I shine my epoxy pieces, then hit it with a polishing compound. There are only very small marks on it now and mostly only on the low area, so I’m hoping that does the trick.

I'm going to try to use the points I just bought but they may be thrashed already. I have to get my dirtbike together so I don’t know how much time I can invest in this for the rest of the week, but I will try to at least try to set the timing again today and see if it’s still possible with these points.
 
Back
Top Bottom