A 1975 CB400F high mileage complete engine rebuild

Yes, resistor type plugs, BR8EIX as well

IMG-20250110-WA0019.jpg

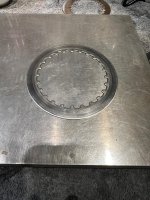
Cleaned the oil pan, and did put it back under the engine with a new gasket. The oil pan was relative clean, at least no metal particles or shavings, but there was a lot of black (micro) dust. The last few 100 km's before winter maintenance, the clutch slipped violently (as mentioned earlier in this thread, there are many traffic lights on my way to work, and I'm only 18 when it comes to traffic light sprints :cool:). And on the other hand, since I'm used to accelerating with 2-strokes, when I really want to accelerate fast, I let the clutch slip from a standstill with the engine revving around 7000 rpm, and keep it there until the engine speeds reaches the 9500 rpm before shifting to the next gear (and I do this in the first 4 gears otherwise the speeds are highly illegal).

Before taking the pan off, I was in doubt to replace the clutch plates and solve it with heavy clutch springs, but after cleaning the pan, I made my decision to replace the plates.

Besides the oil pan, everything seemed to be clean, as expected.

IMG-20250110-WA0022.jpg

IMG-20250110-WA0024.jpg


IMG-20250110-WA0029.jpg

Tonight I will take the clutch pressure plate off, and see how bad I behaved :ROFLMAO:
 
Took the rear wheel out (for changing the rear tire as planned), and blocked the secondary shaft to loosen the clutch nut. Now the Honda tools come in handy :). The Honda CB400f has a complex but reliable clutch operating method, many components that can wear down. Fortunately, the clutch operating mechanism is in good shape, thus focussing on the clutch plates and clutch springs. The front sprocket seems worn, I will take it off to see if the backside shows the same pattern, if so, I put it back, if not I have an alignment issue that I have to figure out,

Afbeelding van WhatsApp op 2025-01-10 om 22.53.33_6115bc4e.jpg

The (metal) clutch plates are in relative good shape, but the other ones are really worn out. I have to check the metal plates for warping, since the wear patterns are not homogeneous on some plates, but that's for tomorrow to look into. The first working week was a very busy week, I need some rest as well.
 
Last edited:
I see the valley's between the teeth elongating, so yeah it's getting there.

Yes, I didn't expect it so soon (17,000 km), but I'm not riding this bike as an oldie, so wear to this critical part is more or less my own fault. The rear sprocket is good to go, chain as well, so only replacing the front sprocket when needed. Both groups of parts, being the clutch and the secondary drive chain are prone to wear out quickly when abused, that's the price of riding this bike as if it was stolen (not really my fault, it's the sound of the 4 into 1 exhaust system at 9500 rpm that is addictive, and as we know, every addiction has a price ;) ).
 
Last edited:
O dear, I went for some "made in the US" aftermarket parts, being Barnett clutch plates, and springs, hopefully these parts will hold up better than the "made in Japan" parts.

IMG-20250117-WA0047.jpg

IMG-20250117-WA0044.jpg

Tried to save as much steel clutch plates, but unfortunately, two were warped and slightly burned, luckily I head a few NOS plates lying around. All plates of steel were way too smooth, including the NOS ones. Sandpaper time.

IMG-20250117-WA0038.jpg

IMG-20250117-WA0040.jpg

IMG-20250117-WA0039.jpg


IMG-20250117-WA0045.jpg

IMG-20250117-WA0046.jpg


IMG-20250117-WA0043.jpg

ready for rebuild...
 

Attachments

  • IMG-20250117-WA0042.jpg
    IMG-20250117-WA0042.jpg
    306.2 KB · Views: 1
280-grit, noted... ..I'd earlier made a note from somewhere else here on VHT where someone recommended 180-grit to "resurface" my '82 450's brake disc.
Not having any 180 (surprisingly) but having a life's worth of sheets of many other grits including 220, 150, 120, 100, 80, 60, I spent at least an hour with 150 on both sides of the disc rotor, not enjoying the tedious task...

How long did you spend with the 280 on the (one or two or all ?) metal clutch plates so I know what I can possibly look forward to, if you don't mind sharing ?
 
Would the discolored, burnt steels be due to high speed slippage, rather than aggressive starts? Long inclines and even shorter hills would be when my slippage would become evident. very strong headwinds too.
I notice the new Barnett discs have a little larger breaks between the contact pads, perhaps allowing a greater oil flow from the center outwards. Is this perhaps intentional to aid cooling of the steels?
CrazyPJ had suggested extra drillings in the clutch center, that enlupi was incorporating into his 350 race prep.
Finally, I include a pic of a steel that has had a stippled, or dimpled surface treatment. I can't remember if this was a Newfren, Barnett or other replacement. I don't know if this treatment was to retain oil or to increase friction, somehow.
qTC6PfL.jpg


I've heard some dislike friction modifier additives in some of the modern oil blends and changing oils helped them. I guess it's a trade off, which engine parts need the most protection.
Clutches should be destined to live a hard, if short, life.
 
How long did you spend with the 280 on the (one or two or all ?) metal clutch plates so I know what I can possibly look forward to, if you don't mind sharing ?

Would the discolored, burnt steels be due to high speed slippage, rather than aggressive starts?

I think both, since the clutch was slipping when accelerating full power at high rpm's over a longer period. At one of the last rides last season, when I was overtaking a truck on an (empty) highway, in third gear at 9000 rpm, shifting up to fourth, and fifth, the clutch didn't engage until I shifted to sixth gear. The engine was doing, 9000 to 10.000 rpm, over the whole period (going from 80 km/hour to 160 km/hour). I might be that the blue-isch stains came from that action.

I have several options when it comes to sandpaper, and since the disks were sorted on flatness, and the circular grooves were not too deep, I started with 400, but that was not rough enough. I ended up with 280, and it did take 1,5 hour to treat all six of them (both sides). With a good glass of Spanish wine and some nice music in the background, this job was manageable.

My choice for Barnett came down to the material. I don't like cork, or cork based friction plates, it's old-fashioned, contaminates the oil unnecessarily quickly, and the "glue" between the cork particles cannot / less withstand modern oils. However, it has one big advantage, the cork particles are relatively soft and won't accelerate wear of other engine parts. When rebuilding this engine two years ago, I used these (cork-isch) plates because I had them lying around, but against my better judgment, I have to say. Other brands like EBC or TRW contain fibers, when circulating in the oil, accelerate wear, especially to the crank and camshaft bearings. Barnett uses different fibers, softer, more harmless for the engine internals, but harder than the old-fashioned cork plates, and more resistant to acid (due to exhaust gasses) and other chemicals used in modern oils.

Normally clutch plates wear out after 50.000 to 100.000 km, especially for wet clutches, 17.000 km, like mine, isn't good enough, even under the heavy conditions I put them trough.
 
Last edited:
Thanks for sharing that material information that I had very little knowledge of.
Your well tuned bike and your riding style are a challenging test bed for clutch durability, I think.
 
That’s the low point of the system, right? Had to be some condensation from heat/cool cycles in a humid environment. It looks like there might be enough meat back there to try and trim back to patch - being on the somewhat “hidden” side you might be able to get it somewhat aesthetically masked.
 
That’s the low point of the system, right? Had to be some condensation from heat/cool cycles in a humid environment
Maybe, however, it's a fact that it is rusted. Maybe the muffler was mounted under stress over a certain period. and with the hot / cold cycles, the chrome fractured and the metal started to be brittle, giving room for rust. The rest of the muffler and headers are in good shape, and indeed the material around this position is still solid.

I will use the bike this coming season like it is now, and repair it next season, or, when it starts leaking, I 'll change this header for a new one I already have bought many, many years ago and repair this one like suggested.

CB400F_1.jpg
 
IMG-20250123-WA0050.jpg

IMG-20250123-WA0048.jpg

These pictures are showing that it's not the lowest point of the mufflers, on the contrary, almost the highest point in that part of the collector. I wonder why the rust is there, on that specific spot, the rest of the headers and collector are solid.
 
One of the things I always replace once in the two years or every 10.000-15.000 are spark plug caps on any bike I ride. I know, seems to be a waste of money, but spark plug caps are a root cause to many ignition issue's, being bad starting behavior, irregular tic-over, and many other not so obvious issue's. I use iridium plugs in my 450's and 400, but the downside of these plugs is the R, meaning a resistance of 5k ohm. Most spark plug caps are also 5K, but Honda advised a total of 5K per spark plug and spark plug cap combination.

I really don't want to go into the non-iridium solution. Modern caps are not demountable, so the trick with replacing the resistor with a conductor can't be achieved. They're hard to find, but if you know the product number, you can order 1K spark plug caps from NGK. 1K is much better than 5K, the bike start better, and the the the tic-over is more constant (also with point ignition like I run on the cB400f.

IMG-20250126-WA0008.jpg

IMG-20250126-WA0009.jpg

IMG-20250126-WA0007.jpg

IMG-20250126-WA0010.jpg

IMG-20250126-WA0006.jpg

Everything is back in place, but I have to change the front tire within 5000 km. The muffler is the next (and last) job before the bike is ready for its 3rd commuting season.
 
Next patient on the bench is the CB450 K0, with a long list of things that are necessary to look at, but I'll report back in my maintenance thread "https://www.vintagehondatwins.com/f...b450-k0-a-reliable-workhorse-pick-heavy.9671/

The CB400f is just finished within the planning, being the end of January, the CB450 K0 should be ready to roll the end of February. The painted C77 and CB72 frames and parts will be finished around half march, then the build of the CB72 and the C77 will start, and one of them, or both, should be finished before the summer holiday's. I don't know if that's realistic, but I'll go for it.
 
Last edited:
Thanks for sharing how you keep your high tension resistance in balance. I hope NGK keeps making those 1Kohm caps.
 
Last edited:
Jensen I thought at least in NA that NGK is out of the spark plug cap business??? Many of the more popular caps are NLA as stock dwindles at retailers. Is this not the case in Europe since you seem to have sourced a 1K cap easily? I too never realized that they were available in anything but 5K versions.
 
Available, but pricey. I paid 28 euro's for the ones I show in the thread, the large straight version is the most expensive, being 18 euro's for the two. For the CB450's and CB72 / C77 I have a box of 20 of the 0K versions, just for future purposes. Since these caps are used for mopeds, they are readily available, but only one type, the 90 deg angled one. I can't use this type on the CB400F, the wires from the coils are too short :ROFLMAO:
 
Last edited:
Some years ago I dismantled the plug caps on my CB600 so that I could replace the plug leads with some copper cored leads. I took some photos during this process and I suppose the red thing with a rubber sleeve around it is a resistor of some sort ? There was a fair amount of green corrosion to clean off, and I reassembled using dielectric grease. That engine uses NGK CR9EH-9 spark plugs.

Ek0zURs.jpg
 
One of the things I always replace once in the two years or every 10.000-15.000 are spark plug caps on any bike I ride. I know, seems to be a waste of money, but spark plug caps are a root cause to many ignition issue's, being bad starting behavior, irregular tic-over, and many other not so obvious issue's. I use iridium plugs in my 450's and 400, but the downside of these plugs is the R, meaning a resistance of 5k ohm. Most spark plug caps are also 5K, but Honda advised a total of 5K per spark plug and spark plug cap combination.

I really don't want to go into the non-iridium solution. Modern caps are not demountable, so the trick with replacing the resistor with a conductor can't be achieved. They're hard to find, but if you know the product number, you can order 1K spark plug caps from NGK. 1K is much better than 5K, the bike start better, and the the the tic-over is more constant (also with point ignition like I run on the cB400f.
Thanks for this explanation, this was what I always thought about when thinking of putting Iridium in my bike (although I admit that my moped runs just fine with a 5k spark plug + 5k resistor cap on a fully chinesium setup).
And oh boy did this take me to a rabbit hole.

Did some research and discovered that there's a brazilian brand (Magnetron) that still manufactures the spark plug caps for the 450 SOHCs... So I thought... Maybe, just maybe, they also manufacture non resistor caps.
Boom. They do.
1738096799519.png
I don't think you guys will find these brazilian caps easily, but I thought that maybe if I found what bikes they fit and their P/N, it could help.
Not really the same angle as well, but I bet I can make it work.

These are the models that the non resistored caps fit, according to the seller:
CG 125 Titan/Fan 1992 -2004
CG 125 Today
CG 125 Turuna
C 100 Biz [Kind of like the daughter of the Honda Dream cub, might use the same]
CBX 200 Strada
XR 200
CBX 150 Aero
Yamaha models: YBR 125 / XTZ 125 / Crypton 105 / YBR Factor

Here are some original part numbers for the non resistored caps (they reported that their plug cap works on these part numbers, so they should be manufacturers original ones):
30700-098-153 / 30700-152-153 / 30700-152-163 / 5HH-H2370-00 / 5HH-H2370-01

Hopefully this can help someone.
 
Just when I thought that I would be ready with the CB400F, I got an CB400F engine for free. It was advertised at a local marketplace, being an engine for parts, only pickup. It was close by, so I picked it up, expecting a half engine, or at least a molested partly engine. Since I'm a decent guy, I bought a bottle of wine, and the trade was fixed.
IMG-20250209-WA0027.jpgIMG-20250209-WA0026.jpg

I took the part's engine back home in crates, and didn't look at it too much, but at home I unpacked the crates and to my surprise it was a complete engine, just missing seven parts only, being three valve covers, two oil distributors in the head, the spring for the oil filter and the cam chain tensioner bold at the crankcase.

From that point I expected that the inside of the engine would be a mess, completely ruined by oil starvation or something else terrible, but the further I got into the engine, the better it got. Yes, the conrods are rusted, and I didn't clean the crank yet, but the camshaft, cam followers, and transmission gears are showing me that the engine didn't see much of the world.

The outside is very dirty, and smells bad, but the inside is greasy, and kept the oxidation process out. The camshaft bearings in the head are good to go (visually), but the camshaft has a rusty stain at the bearing surface.

The only issue I found, and probably the reason why this engine is replaced by another, is the cam tensioner bolt threads in the upper crankcase half. This issue is notorious for these engines, making it impossible to set the cam chain tension properly. One has to split the engine to fix it, as shown in the beginning of this thread.

As I work in a Machine builder company, it would be an easy fix, and If I can't find anything else what is wrong with the cases, I can build a spare engine out of this engine and all the parts I have acquired over the years (including a set of conrods and conrod bolts, bearing halves etc.).

Like I mentioned earlier, I have a NOS cylinder lying around (but need an overbore due to oxidation of the cylinder walls), and since I have a set of overbore pistons, an oil cooler, and other nice goodies, I'm thinking of making a big-bore (458 cc) engine. I have to do the calculation, and the decision depends on the state of the crank.

One thing that is annoying me when I'm listening to my own engine is the rattling of the primary chain, and, it's told that every CB400F has that issue since there is no primary chain tensioner. There must be a way to add that to the list of improvements.

The guy from the add is a nice older guy, retired, fixing and selling Honda fours as a hobby for a small income. We talked a bit, and he had a CB450 K3 standing, without the engine in. He told me it was from a lady, who got the bike from her father, and he had to fix it for her. The engine and especially the head was shot (probably did run with fuel in the oil). I told him that I had parts for the 450's, and he gently asked if I had a few decent rockers for him, I said, yes, no problem, so he asked what I needed.

I saw a lot of front forks of the CB500F and CB550 F lying around, and I asked him if he could help me with a decent front fork with dual disks for my CB400F. He said yes, no problem, so next week I'll trade the followers for two front fork legs with disks , a T-piece and a top of a CB500F.

And since the sun is getting up while doing my morning walk, so not running in complete darkness anymore, a few nice pictures.

IMG-20250201-WA0006.jpg

I captured this pink / purple light nebula at the right time, just before it's getting light. It only stays a minute or two, then the pink / purple glow will change to more red.

IMG-20250202-WA0003.jpg

IMG-20250202-WA0013_cut.jpg
 
Last edited:
Afbeelding van WhatsApp op 2025-02-09 om 19.54.49_a44d4a8b.jpg

O dear, that's bad, you're looking at the thread for the cam chain tensioner. Nothing beyond repair, but what a mess. Either it's a heli-coil gone wrong, or a bolt that's been bored out, and threaded under an angle.

Afbeelding van WhatsApp op 2025-02-09 om 19.54.49_1bc180f2.jpg

The oil filter thread is fine, but what a butcher. I can't even imagine how and why the outer surface is damaged.

Afbeelding van WhatsApp op 2025-02-09 om 19.54.49_d49f6207.jpg

Crank main (outer) bearing surface seems to be in good shape.

Afbeelding van WhatsApp op 2025-02-09 om 19.54.49_c1946c9f.jpg

Crank inner bearings are also OK, as it seems. No deep scratches, and an even pattern are good news.

Afbeelding van WhatsApp op 2025-02-09 om 19.54.50_45c5fe9c.jpg

The other outer bearing surface, just perfect, hardly any wear.

Afbeelding van WhatsApp op 2025-02-09 om 19.54.50_3257ad7d.jpg

Crank is out, and ready for cleaning. It is dirty, very dirty. Con rods are corroded, but I will oil them and see if the small-end inner surface is within specifications. Big-ends seem to be ok, but measuring will give more information.

Afbeelding van WhatsApp op 2025-02-09 om 19.54.50_25c3fd5d.jpg

Afbeelding van WhatsApp op 2025-02-09 om 19.54.50_06f55063.jpg

Some cleaning to do here. Both primary chain guides are absolutely in perfect condition, meaning that the engine is low miles. I found wear from the cam chain rubbing the tensioner (deep), so my guess would be that the engine got loud, and when trying to adjust the cam chain, the bolt either broke off, or bored out. From that moment on, the cam chain rubbed the tensioner horseshoe until the owner decided to take out the engine and replace for another engine, or ditch the bike as a whole.
 
IMG-20250209-WA0042.jpg

Tensioner spring completely stuck, it's tight, so part of the bolt that keeps it there is still in. Clean the cases is the next step, and then take it to the shop and get it fixed decent,

IMG-20250209-WA0043.jpg

Surfaces are really in good shape. This is the surface were the crank bearing rests on, no signs of overheating or any other damage.

IMG-20250209-WA0044.jpg

No visible wear at the groves of the shift drum.

IMG-20250209-WA0045.jpg

All gears seem to be in great shape, no broken tooth or cold welds spots.

IMG-20250209-WA0046.jpg

And finally the oil pump, the heart of the engine. If something is wrong in the engine, the oil pump tells the story. This oil pump hasn't had a story to tell, other than I did my job, and wasn't hurt doing so.

IMG-20250209-WA0047.jpg

Just a few scratches on the rotor of the pump, I've seen much worse in the past.

IMG-20250209-WA0048.jpg

Inside of the outer rotor, same as the outside of the inner rotor, just a few scratches.

IMG-20250209-WA0049.jpg

And a picture together.

IMG-20250209-WA0050.jpg

Inner surfaces of the pump body in great shape too, of both pumps (the large one is for the crank and cam, the small one is for the transmission and clutch.

IMG-20250209-WA0051.jpg

A few surface scratches, but that's all.

IMG-20250209-WA0052.jpg

The side plate of the small oil pump, minor scratches as well, nothing to worry about.

IMG-20250209-WA0054.jpg

The rust on the camshaft. I'll see what I can do, and if not salvageable, I have another one lying around (used, but good).

IMG-20250209-WA0055.jpg

And a close-up of the cam chain tensioner, as can be seen, the cam chain almost grind into the pivot.

IMG-20250209-WA0053.jpg

Next is the crank, I'm taking it to my work, and clean it in the parts washer.
 
Very much enjoyed the pictures. Interesting spare motor project. Mis-aligned tapping of threads is a shameful event, I'm guilty as charged. At least the price was right and you've the proper means to correct it.
 
Spare engine completely dissembled, checked all parts if re-usable, and put the parts in a box, labeled it, and will be stored until I need it.

Afbeelding van WhatsApp op 2025-02-16 om 22.22.15_a45d0e01.jpg

The crankcases bolted together, added the cylinder, head and the clutch side cover. Ready for high pressure steam cleaning. The only part I can't use is the camshaft, the lobes are in good shape, but one of the outer main bearings is rusted, and not just on the surface.
 
Today, the CB400F made its first trip this season, and everything works as it should.

This is what I wrote before the winter stop:

Things to do are:

- removing the exhaust system, and check for rust (especially the collector), painting those spots with heat-resistant gray paint DONE
- remove the oil pan and check for particles in the pan (first time after the rebuild) DONE
- change all fluids except the engine oil (this was done lately, together with the oil filter)DONE (including engine oil)
- remove the valve cover to check the valves, rockers, camshaft and adjust the cam chain tension DONE
- clean the bike, clean the electrical contacts, and treat the contacts with Vaseline DONE
- change the rear tire, since the tire is square and worn (8000 km) DONE
- take out the carburetors, cleaning the jets, adjust the float height DONE
- add two new mirrors to the bike DONE
- fix small flows DONE

- maybe add e-ignition, but not sure. DONE


And I added new rear shocks as well (YSS) and new clutch plates.

The space in the shed wasn't empty for long:

Afbeelding van WhatsApp op 2025-02-23 om 22.42.25_bd0e6102.jpg

btw, if anybody need pictures, close-ups from certain parts, cable routing, bolts etc, don't hesitate to ask.

I will go further in my thread about maintenance of the CB450 K0 : https://vintagehondatwins.com/forum...b450-k0-a-reliable-workhorse-pick-heavy.9671/
 
As promised, comments after a long ride with the CB400F. Today it started chilly (-2 degrees Celcius), and I decided that the heated gloves should protect me from the cold. Well, they did .... a bit.

IMG-20250304-WA0020.jpg

IMG-20250303-WA0025.jpg

IMG-20250303-WA0023.jpg

Ripe means frost, and it was really cold, but as you can see really sunny as well. Spring has begun, and everywhere the flowers are growing (picture is taken after the ride home, a lot warmer).

IMG-20250304-WA0022.jpg

IMG-20250304-WA0023.jpg

Comments on the bike:

e-ignition:

Bike started really bad this morning, took a long time to get it running after a cold start. Original points where better. I'm sure this is due to the cold, lead acid battery's are not very good at these low temperatures. Starting in the afternoon went good, but the same as with points, not really a difference.

No difference what so ever, in riding behavior, or pulling, just the same. Actually, accelerating went slower in the first 2-4k rpm of the rpm range, I guess the replacement (aluminum) bush on the advance mechanism is responsible for that (too tight fit). Hopefully this will get better over time, otherwise I have to grind a bit out of the aluminum bush.

Not good point, is there anything better ?

Yes, the bike tends to like revving above 5k rpm into the red zone quicker, and runs better at 10k+ rpm.

Overall judgement is neutral, it has some flows, but these flows are getting better when the weather gets better and the aluminum bush on the advancer starts to war out (faster response). For me, not really an improvement, a not so good investment.

On my CB72 I have a Sachse E-ignition, and compared with the original points ignition, a huge difference.

YSS shocks:

I'm impressed, worth the money, very good compared with the old worn original shocks.

Barnett Clutchplates and springs

Again, impressed, work like a charm and very good to dose the power to the rear wheel. The only set-back are the stiffer clutch springs (I used two, not four), so if I'm shaking hands (right hand) with somebody in the near future i have to be careful not to do harm ;)


All other improvements work like a charm, as expected.

IMG-20250304-WA0027.jpg
 
Beautiful rich colors. Interesting color shift from the shadow to full sun. Sunlight has such interest properties.

Do you use a stroboscopic timing light to verify timing? I wonder what is the advance at idle, perhaps that effects starting a bit.
 
Afbeelding van WhatsApp op 2025-04-29 om 09.35.44_13103d7b.jpg

Fueled, heated gloves, winter motorcycle gear, thus ready for a long trip to work. Riding the CB400f every day for three weeks now. The landscape with the tulips in every color you can think of is marvelous, every time again.

In the morning low temperatures around 3 - 4 degrees Celsius (35-37 Fahrenheit), in the afternoon, when riding back home, temperatures around 20 degrees Celsius (68-73 Fahrenheit). I take an extra backpack for clothes I don't need in the afternoon :ROFLMAO:
 
Last edited:
I got the same problem over here in the US. Have to dress warm in the morning and by afternoon it's hot out. Been having to travel with a backpack with different gear.
 
Just back from a marvellous ride from work, enjoyed the weather, the tulips fields, the smell of spring in the air, the smell of fresh mowed grass, the cloudless blue skies and of course my bike. I rode 259 km (160 mls) in total, from doing 50 km/hr (30 mls/hr) back roads to 160 km/hr (100 mls/hr) highway and everything in-between.

I also had an issue with the bike, my rev counter went dead. As soon as I noticed, unluckily on the highway with no way to stop within miles, I got off the highway, and it seemed that the rev counter cable came loose from the tachometer. It was an easy fix, and after that, I could continue my journey. It was the first time I had to stop for a bike issue with this bike. Well, maybe the bike wanted a stop to cool down, because I was just doing160 km/hr @ 9000 rpm in fifth gear for a minute or 3.

Just had dinner (my youngest son cooked dinner), and now I have to clean the bike from all insects. It's still nice weather outside, and with a glass of red wine at hand, it will be a nice evening.

Afbeelding van WhatsApp op 2025-04-29 om 20.34.51_ec4b3c1e.jpg
 
Last edited:
I hate when those cables get loose on you. I always wrap a pair of linesman's pliers in a shop cloth and give it a 1/4" turn after I get it finger tight and that puts a stop to it.
 
Nice that you can motivate to take the bike on those chilly mornings. I don't motivate so well in the morning, I did finally take the CM450 to work, not too cold. A short drive of 7 miles, but enjoyable. That chilly air does bite into you at higher speed. With your long commute and high speeds I bet you have to dress up with full body bunny suite. Your reward is the ride home in the warmer afternoon.
 
I only just noticed you have rear mudguard extension piece.
They are incredibly rare on British bikes but more common in continental Europe.
Rev counter cable coming loose used to be quite common unless you tighten with pliers
 
When you look through this thread you might think that it is always nice and sunny in the Netherlands, but the opposite is true. Our weather is depending on the wind direction and since the wind direction can change quickly, we are blessed / doomed with changeable weather. I always carry sunglasses and a raincoat in my backpack, just in case.

Afbeelding van WhatsApp op 2025-05-26 om 16.16.00_aa990885.jpg
 

Attachments

  • Afbeelding van WhatsApp op 2025-05-26 om 16.16.00_37ae86dc.jpg
    Afbeelding van WhatsApp op 2025-05-26 om 16.16.00_37ae86dc.jpg
    489.6 KB · Views: 2
Over here in the UK, we have a magazine entitled 'Classic Motorcycle Mechanics.' In this months issue, there's an article by a chap rebuilding a 400/4. Nothing like as meticulous as this build by Jensen. I'm particularly puzzled by his inability to undo the nuts that hold the big end shells in place. He's posted a photo that shows a socket not being able to engage with the nut, due to the crankshaft webs either side. Consequently, he's rebuilding the engine without inspecting the big end bearing shells, simply relying on waggling the conrods to check for play. Seems very amateur to me to publish this in a magazine. What is the answer, simply a thin walled socket ?
 
Over here in the UK, we have a magazine entitled 'Classic Motorcycle Mechanics.' In this months issue, there's an article by a chap rebuilding a 400/4. Nothing like as meticulous as this build by Jensen. I'm particularly puzzled by his inability to undo the nuts that hold the big end shells in place. He's posted a photo that shows a socket not being able to engage with the nut, due to the crankshaft webs either side. Consequently, he's rebuilding the engine without inspecting the big end bearing shells, simply relying on waggling the conrods to check for play. Seems very amateur to me to publish this in a magazine. What is the answer, simply a thin walled socket ?
I am sure there is a special tool listed in the FSM for that model but from what you are describing a good quality thin wall socket is probably the answer.
 
Nothing like as meticulous as this build by Jensen
I'm getting a little embarrassed by it, too much credit :cool: . It took me over 13 years to get that bike on the road again, and when you have the time, you do it properly. I'll see if I can get a copy of the magazine, fun to read.

What is the answer, simply a thin walled socket ?

A normal socket (1/4 inch connection), and a pipe wrench for some.

Naamloos.jpg
 
Last edited:
Back
Top Bottom