
-
Don't overlook our Welcome Package, it contains many links to important and helpful information about functions at VHT like posting pictures and sending PMs (private messages), as well as finding the parts you need.
AD
You are using an out of date browser. It may not display this or other websites correctly.
You should upgrade or use an alternative browser.
You should upgrade or use an alternative browser.
1966 Honda CL160 commissioned build
- Thread starter Flyin900
- Start date

Pete thanks it is a private group, so how did you see the listing of the motor for sale? I did ask to join though and appreciate the heads up.
I have a spare side stand although it has a slight bend that Superman could likely straighten up") Shipping would be costly though with Canada Post or another carrier to the USA. Likely $40 as a best guess.
Shipping would be costly though with Canada Post or another carrier to the USA. Likely $40 as a best guess.
I have a spare side stand although it has a slight bend that Superman could likely straighten up
Shipping would be costly though with Canada Post or another carrier to the USA. Likely $40 as a best guess.The parts are starting to slowly arrive now as Canada Post has switched tactics to a rotating strike system. "We got mail today" Who Hoo!
I also received the first of two CMSNL shipments as FedEx is the carrier there. The front frame rear brake cable stay which was ground off the frame by some miscreant arrived today. It is much larger in the threaded section than I imagined with a M10 X 1.25 TP sized attachment point. Amazon to the rescue as the drill bit size to tap that sized stud is 8.8mm and a M10 X 1.25 TP tap. I have the tap but not a M8.8 drill bit. While an M9 drill bit would work, I just ordered a complete kit of both pieces for $20 Canadian that has the Metric tap and 8.8 mm drill bit.
Here is the brake cable holder piece with two CMNSL key chain guys. The posters are now discontinued is seems unless you get lucky.
Orange.... Just in time for Halloween.
I received a CMSN: shipment yesterday which included the correct right side air filter which is normally impossible to find and stupidly expensive when you do find one. This is listed for a CB125 model and it looked correct, so I took a flyer on it since it is really cheap in my opinion. It fits the frame mounts on the CL160 correctly and looks like it will align with the carb throat. It should fit all CB/CL175 Slopers along with the CB/CL160 Sloper motors.
The part is on sale for $45 US if you have an order going into CMSNL. Even if you don't my shipping charge was $20.00 Canadian for the shipment, plus a FedEx customs clearance charge plus our hated 13% Canadian taxes we pay.
Here is the listing for the part and here is a picture of the part. They unfortunately don't have a left side filter available, so I am still looking for that side and expecting to pay around $150+ when found.

 www.cmsnl.com

The part is on sale for $45 US if you have an order going into CMSNL. Even if you don't my shipping charge was $20.00 Canadian for the shipment, plus a FedEx customs clearance charge plus our hated 13% Canadian taxes we pay.
Here is the listing for the part and here is a picture of the part. They unfortunately don't have a left side filter available, so I am still looking for that side and expecting to pay around $150+ when found.
17210216000: CLEANER,AIR Honda - buy the 17210-216-000 at CMSNL
✓ In stock now CLEANER,AIR ✓ Manufacturer Part Number: 17210-216-000 ✓ Quality part
www.cmsnl.com
"Winner Winner Chicken Dinner."
I have to be excited with all the challenges this project has brought. I received the replacement frame mount rear brake cable metal stay from CMSNL. It was for some reason previously cut off this frame. Today I carefully hand drilled a new frame hole starting with a 4mm Cobalt bit and worked up to the 8.8 mm size from the Amazon kit. I then used the 10mm X 1.25TP tap in the kit to rethread the frame tube. I love Amazon! I ordered the kit yesterday afternoon and it was on my doorstep this morning.
The new cable stay when threaded into the new frame hole bottoms and aligns perfectly on the correct angle needed for the brake cable to attach to the rear brake lever.
So the ownership that Chris has is incorrect. Surprise! It has the hinkey motor serial number not the frame number so it will not fly with an insurance company. He could keep it as is if he didn't expect to ride the bike. Service Ontario will continue to change over the past to present owners no problem.
My previous 1968 CL175K0 had the same issue. So I asked Chris to send me a copy to compare to the CL160 frame. It seems back in the 60's when first registered it was easier to locate and read the motor VIN vs the frame stamped one. Rules were much more relaxed back then it appears, with no strict guidelines.
My previous 1968 CL175K0 had the same issue. So I asked Chris to send me a copy to compare to the CL160 frame. It seems back in the 60's when first registered it was easier to locate and read the motor VIN vs the frame stamped one. Rules were much more relaxed back then it appears, with no strict guidelines.
Troy
Veteran Member
Here in Alberta this stuff has always been very simple for me. If I present a bill of sale with a serial number of bike that isn't currently in the system then I need to have an Out Of Province inspection done by certified motorcycle mechanic and then I'm good to go. I have done this with bikes that have sat in sheds for decades and also with newish bikes that I've bought in other jurisdictions, it doesn't matter.So the ownership that Chris has is incorrect. Surprise! It has the hinkey motor serial number not the frame number so it will not fly with an insurance company. He could keep it as is if he didn't expect to ride the bike. Service Ontario will continue to change over the past to present owners no problem.
My previous 1968 CL175K0 had the same issue. So I asked Chris to send me a copy to compare to the CL160 frame. It seems back in the 60's when first registered it was easier to locate and read the motor VIN vs the frame stamped one. Rules were much more relaxed back then it appears, with no strict guidelines.
So in the case that you are describing I would present a Bill of Sale with the frame serial number on it and have it inspected. Viola, it's registered and it seems so simple compared to the hassles in US jurisdictions.
Troy,Here in Alberta this stuff has always been very simple for me. If I present a bill of sale with a serial number of bike that isn't currently in the system then I need to have an Out Of Province inspection done by certified motorcycle mechanic and then I'm good to go. I have done this with bikes that have sat in sheds for decades and also with newish bikes that I've bought in other jurisdictions, it doesn't matter.
So in the case that you are describing I would present a Bill of Sale with the frame serial number on it and have it inspected. Viola, it's registered and it seems so simple compared to the hassles in US jurisdictions.
Chris has a contact at a local motorcycle dealership who is licenced by the province. He is picking up the frame tomorrow and getting a legal affidavit from them once they check it over. With that paper he can arrange for Service Ontario to make the VIN changes in the system and print a corrected new ownership.
I personally have encountered this situation with at least a dozen bikes in the past 20 years. I refuse to buy a bike now that doesn't have an ownership or the paperwork in order. I always check the ownership against the frame VIN. In the case of my 1968 CL175K0 that was the last bike I bought with that issue. I used it as a bargaining chip and offered a few hundred less than the $800.00 asking which the seller accepted. It too had the motor VIN on the ownership not the frame VIN as needed to insure the bike in Ontario now.
I believe here in Ontario if it is an out of province bike and not in their system it is good to go. You only need the bill of sale and Service Ontario will issue you an ownership. You just don't know in the case of a bike with no ownership. When you buy their "Used Vehicle Package" (mandatory) it tells you if it is in their system or not.
Last edited:
A few items received one from Chris Crawford which was the NLA rear brake cable frame standoff. It cleaned up well and I am working on rejuvenating the rubber donut which holds the cable mid point on the frame.
I am missing the main stand spring which is NLA from a reasonably priced vendor. I found one at a US vendor for $25 + $15 US shipping which is about $60 Canadian for a spring. I have a shorter used one in my stock which I modified to fit, yet it is too short and the stand is under too much spring tension.
If anyone has one or a line on one that isn't a silly price, then please reach out to me with a option.
Cable Standoff - Thank you Chris C

Rear main stand spring mod which really needs a stock spring on the part. Totally out of position here with stand vertical to frame.

I am missing the main stand spring which is NLA from a reasonably priced vendor. I found one at a US vendor for $25 + $15 US shipping which is about $60 Canadian for a spring. I have a shorter used one in my stock which I modified to fit, yet it is too short and the stand is under too much spring tension.
If anyone has one or a line on one that isn't a silly price, then please reach out to me with a option.
Cable Standoff - Thank you Chris C
Rear main stand spring mod which really needs a stock spring on the part. Totally out of position here with stand vertical to frame.
Turn it 180 degrees?A few items received one from Chris Crawford which was the NLA rear brake cable frame standoff. It cleaned up well and I am working on rejuvenating the rubber donut which holds the cable mid point on the frame.
I am missing the main stand spring which is NLA from a reasonably priced vendor. I found one at a US vendor for $25 + $15 US shipping which is about $60 Canadian for a spring. I have a shorter used one in my stock which I modified to fit, yet it is too short and the stand is under too much spring tension.
If anyone has one or a line on one that isn't a silly price, then please reach out to me with a option.
Cable Standoff - Thank you Chris C
View attachment 51316
Rear main stand spring mod which really needs a stock spring on the part. Totally out of position here with stand vertical to frame.
View attachment 51317
That's not the issue. It is a few coils too short. Nothing wrong with the mounting of the spring that would make a difference.
When the stand is positioned correctly, not where it is now then the spring is under a lot of tension being too short vs the stock spring.
When the stand is positioned correctly, not where it is now then the spring is under a lot of tension being too short vs the stock spring.
So the stand is vertical at 12 o'clock and it could never be there with the swing arm in place. I use this option when I am installing the spring if the frame is stripped down, as it allows you to install it with no tension. Once you bend the stand down to the 9 o'clock or 8 o'clock position where it would normally be positioned. It seems like it is really too tight.Looks fine to me in the picture. When "relaxed" most bike will have the spring under some tension and I'm not seeing a lot of air between the coils.
The stand may not be correct for the bike based on the fiche stand picture, just like so many other parts that were cobbled together on this thing. So there is no bumper to stop the stand which is normally on the frame in the case of the CL series or on the one muffler on a CB series.
When this thing swings up on the spring I am unsure at this point what it is going to hit as a stopper. Likely the bottom of the chain, which will require a modification and a custom stopper built to keep it from hitting the chain.

Flying do you mind sharing your method of rejuvenating rubber parts ??? I have this exact part that I’m trying to save for my 160 !A few items received one from Chris Crawford which was the NLA rear brake cable frame standoff. It cleaned up well and I am working on rejuvenating the rubber donut which holds the cable mid point on the frame.
Yep found that one and its only $350+ Canadian landed. It is the only correct one on EBay presently. I think I have the CB version of the main stand. Which is a different design, since the left muffler usually has a bumper on the bottom section to catch the one arm of the main stand.If I were a betting man - I would say that the top hole in this pic is for a bumper
View attachment 51318
Last edited:
I just use any product that is from say McGuire's or any other company that is touted for rubber products and rejuvenation? I use a number of applications to help it along. Frankly on 59 year old rubber there is only so much you can do. This rubber is shedding a black colour every time I apply the solution., so it has seen better days.Flying do you mind sharing your method of rejuvenating rubber parts ??? I have this exact part that I’m trying to save for my 160 !
That's the plan. I am no welder and there are a number of custom weld jobs needed on this bike, so add more $$ for Chris. This build is way underwater and it isn't in the home stretch yet. I recently also found a few clutch metal plates that are scored and warped.So just weld a tab on the one you have?
ballbearian
Veteran Member
Mine was pretty bad. It was off the bracket and I used a flat head countersunk wood thread screw from inside the bracket and the split loop got reinforced with fine copper wire then a coat of either shoegoo or black liquid tape.Flying do you mind sharing your method of rejuvenating rubber parts ??? I have this exact part that I’m trying to save for my 160 !


If it's not cracked and just dry and hard, I soak it in this stuff.
Last edited by a moderator:
Nah,No time like the present to learn if people are paying you to do stuff like this. Plus side is that the factory welds look like a learning disabled monkey did most of them, so there isn't a high bar.
This is a special one off build. I rarely take on custom work for anyone. This was a special case with a story behind this model that has special meaning for Chris the present owner. I would never take on another persons semi finished work again. I have done close to 50 of my own builds in the past 20 years and seen some hinkey stuff. This one is beyond anything I have ever seen before and it just keeps going. This main stand is the latest wrong part, so everything needs scrutiny to the nth degree.
The sad part is both the PO who I know well and the current owner who commissioned this build paid way too much for this bike out of the gate.
ballbearian
Veteran Member
Perhaps someone with a real CL centerstand can post a pic of the up position stopper. The Benly stand has some frame to hit the stopper bracket on but these 160s don't have much down there. My CB160 only hits the muffler with a rubber band on the side extension.


Pardon my DIY side stand add on. Looks like the center stand spring is longer also.
Pardon my DIY side stand add on. Looks like the center stand spring is longer also.
mike in idaho
Veteran Member
The rubber bumper hits the rear of the main frame downtube. I put a CB stand on My cl160, welded a short length of one inch square tubing on the rear side of the stand, trimmed away the part I didn't need to form a tab on backside. The rubber bumper I used was a car part from the local parts store.
I just spent some time measuring the place to put a correctly fabricated new tab on the upper rear CB stand at the right angle. I have in stock the correct style of rubber bumper in a aftermarket part. It maybe not the same thickness as the one Honda used. I compensated for the rubber thickness, since mine is just a 1/4" thick once pressed through the hole on the new bracket.The rubber bumper hits the rear of the main frame downtube. I put a CB stand on My cl160, welded a short length of one inch square tubing on the rear side of the stand, trimmed away the part I didn't need to form a tab on backside. The rubber bumper I used was a car part from the local parts store.
My neighbour is a welder and a metal fabricator with both skills and tools. He works out of his garage doing custom work, so I will see what can be done.
The exhaust system muffler needs a new rear outlet pipe on the rear of the muffler. Someone cut it out? The engine bash shield has 3 broken areas that also need some welding done.
Like I said earlier. This is the project that keeps giving and taking. Giving more problems and taking more money.
Last edited:
Tom,Perhaps someone with a real CL centerstand can post a pic of the up position stopper. The Benly stand has some frame to hit the stopper bracket on but these 160s don't have much down there. My CB160 only hits the muffler with a rubber band on the side extension.
Pardon my DIY side stand add on. Looks like the center stand spring is longer also.
Here is the main frame stopper on the CL frame it is on the bottom of the downtube main frame spar.

ballbearian
Veteran Member
Makes sense that Honda just welded on that additional plate with the semi-grove and must've added a bar to the centerstand.
Yes the picture oldjeep posted in post 115 is the correct NOS CL160 stand at a cool $350+ Canadian on EBay presently.Makes sense that Honda just welded on that additional plate with the semi-grove and must've added a bar to the centerstand.
ballbearian
Veteran Member
I think that was a CA95 stand. It may have come from a CA160, but both are a different animal.Yes the picture oldjeep posted in post 115 is the correct NOS CL160 stand at a cool $350+ Canadian on EBay presently.
I'd have to do some digging to measure and see if that is even possible. It wouldn't need that monster side extension to clear downpipes.
As Mike in Idaho said, use a CB160 stand and add whatever bracket it needs.
Last edited:
Tom,I think that was a CA95 stand. It may have come from a CA160, but both are a different animal.
I'd have to do some digging to measure and see if that is even possible. It wouldn't need that monster side extension to clear downpipes.
As Mike in Idaho said, use a CB160 stand and add whatever bracket it needs.
That picture was from this eBay listing which indicates it is a correct 1966 CL160 main stand with what appears to be the correct part number. It is eBay though and he maybe not correct on the actual part???
I defer to your expertise on these early bikes as I am like Sgt. Shultz " I know nothing"
Here is that listing:

NOS Honda Center Main Stand 1966 CL160 50500-223-670B | eBay
Find many great new & used options and get the best deals for NOS Honda Center Main Stand 1966 CL160 50500-223-670B at the best online prices at eBay! Free shipping for many products!
www.ebay.ca
Last edited:
So Chris's crankshaft has been at the Kerosene Spa for the past 5 days and it has removed more junk than the original 2 day treatment I did a few weeks ago. The two inner oil passageways that feed the big ends of the conn rods are buried under the two inner roller bearings I believe. Both Paul and I spent time last week checking for a pathway that was reachable. We came to the conclusion you would need to press the crankshaft apart to gain access to those passageways.
So this is the next best option for me to soak and break down anything that may be built up inside the oilways internally. I feel that they are likely pretty clean, yet this is just extra insurance to ensure that I have done my best to clean all the bearings and crankshaft oil areas.
You can see the bits of dirt on the bottom that has continued to dissolve out of the bearings and crankshaft crevices.
If you didn't slide the inner races back far enough to see them, the big end orifices are in the sludge traps unless this crank is different than the 350s and 450s. One of the builds here shows a picture of one of them, could be Teebo's or Ballbearian's but I can't recall.
Different crank and no possibility of sliding the inner bearings. There is an inner lower part of the race on the two inner bearings that stays put right against the inner crank weight. There are stoppers cast into the crank on the outboard bearing side of those two inner bearings. That only allows about 2 mm of movement of the top part of the bearing before it hits the stoppers. The lower part of the inner race on those bearings doesn't move away from that inner weight at all.
My theory is there aren't any sludge traps like the other cranks you mentioned. I think that likely there is an angled drilled hole under the two inner bearings on the crank journal, or beside the journal that connects into the big end of the conn rod.
My theory is there aren't any sludge traps like the other cranks you mentioned. I think that likely there is an angled drilled hole under the two inner bearings on the crank journal, or beside the journal that connects into the big end of the conn rod.
ballbearian
Veteran Member
It is a different design crank with no apparent sludge traps. Looking at the lube diagram, it would seem there is a center drilling in the center crank axle that then connects to an angled drilling through the inner flywheels to the crank pins that feed the rods.
If there was a way to stand up the crank and feed oil or solvent into the oil slinger cut outs on the rods for gravity to rinse back down to the center bearings, that may be the best option without press disassembly.
I wonder if the 175 upright cranks had the first sludge traps, or if the 350s were the first to incorporate that feature. Can't say I know anything about the 250/305 or DOHC 450 crank evolution.
It still would be fun to hear @G-Man comment.
The 1966 CL77 305cc engine I did had the same designed crank as the CL160. It was identical in the bearing design and layout with the stoppers cast into the outboard outer side of the middle bearings. The one outer bearing was a large ball bearing where the other 3 were roller bearings. I made the mistake of taking the other outer roller bearing apart to see if it was good. Getting the rollers and the aluminum cage all back inside the bearing outer shell was fun.
ballbearian
Veteran Member
I just looked at the 250/305 FSM and there are no diagrams showing crank oilways. Only Jensen and G-man have seen that construction. I can only hope I got mine clean enough.
I dropped my rollers too and used sticky grease to reassemble, Ancientdad had a good rubber band trick to do his.
I dropped my rollers too and used sticky grease to reassemble, Ancientdad had a good rubber band trick to do his.
I remembered reading that using grease isn't the best idea because of the thickness and oil flow, and I also remembered seeing (I think) Bill Lane show that rubber band trick and fortunately it stuck in my head.I dropped my rollers too and used sticky grease to reassemble, Ancientdad had a good rubber band trick to do his.
For applications where the grease is just temp glue - Vaseline works great. I use it in automatic transmission applications mainly to hold balls in the valve bodies the oil will integrate it easily.
I remembered reading that using grease isn't the best idea because of the thickness and oil flow, and I also remembered seeing (I think) Bill Lane show that rubber band trick and fortunately it stuck in my head.
ballbearian
Veteran Member
Good tip on the vaseline. It's been a while but I think I just used regular bearing grease and followed with generous red assembly lube oil to help disperse the grease.For applications where the grease is just temp glue - Vaseline works great. I use it in automatic transmission applications mainly to hold balls in the valve bodies the oil will integrate it easily.
Back to crank cleaning;
Short of containing pressured air to back blow the grit, or access to mechanically dig it out, a giant ultrasonic bath may be useful, perhaps filled with Evaporust.
Teebo used an aquarium type pump, but he had better access on his 450 crank.
I was getting a slight bubbling on the big end conn rods when I used a WD40 straw can inserted into the two middle bearing oil holes. This was prior to this 5-6 day soak. The issue was the side flow out of those bearings was where most of the WD 40 was exiting on the side away from the journal webbing.Good tip on the vaseline. It's been a while but I think I just used regular bearing grease and followed with generous red assembly lube oil to help disperse the grease.
Back to crank cleaning;
Short of containing pressured air to back blow the grit, or access to mechanically dig it out, a giant ultrasonic bath may be useful, perhaps filled with Evaporust.
Teebo used an aquarium type pump, but he had better access on his 450 crank.
I feel it is been at the kerosene spa for quite awhile now. If there was anything in there it must have softened it up. I will try compressed air and standing it on end to check for flow.
Then it is up to the crank fed oil pressure to do it's thing or not. I'm at that point where I have done my best and feel it's time to move on to the rebuild when the engine seals arrive next week.
After a 7 day soak in kerosene for the crank the bottom of the container had quite a bit more dirt again. I blew compressed air into the two centre bearings and no joy for any exit on the conn rod big ends. I tried standing it upright and no change which was a bit disappointing. So I sealed the outer part of those two inner bearings with shop towel as best I could. I then sprayed some WD40 around the conn rods to wet them and blew compressed air into the bearing holes.
There was some bubbling from each conn rod each time I tried that procedure. The easiest exit for the oil feed into the conn rods will be out the open side of the bearing that I sealed up for the test. So unless the passageways are still partially blocked, it appears the conn rods only get a small amount of oil feed.
Here is the extra dirt that came out of the crank which is about 50% more than I got on the first 2 day cleaning that I did previously.
ballbearian
Veteran Member
Looks like rust and some dirt. I'd use Evaporust or Rust911 solution. A large ultrasonic would be nice or even a cheap battery powered sex toy in a zip lock thrown in.After a 7 day soak in kerosene for the crank the bottom of the container had quite a bit more dirt again. I blew compressed air into the two centre bearings and no joy for any exit on the conn rod big ends. I tried standing it upright and no change which was a bit disappointing. So I sealed the outer part of those two inner bearings with shop towel as best I could. I then sprayed some WD40 around the conn rods to wet them and blew compressed air into the bearing holes.
There was some bubbling from each conn rod each time I tried that procedure. The easiest exit for the oil feed into the conn rods will be out the open side of the bearing that I sealed up for the test. So unless the passageways are still partially blocked, it appears the conn rods only get a small amount of oil feed.
Here is the extra dirt that came out of the crank which is about 50% more than I got on the first 2 day cleaning that I did previously.
View attachment 51588
Moving on to the reassembly of the engine. I installed the crank and the transmission set and resealed the case halves. So now I am ready to start to build the top end and the outer parts on the cases.
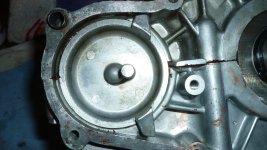
Interesting the starter delete plug was a bit of a mystery to install. Didn't take a picture of the original position. So I looked at the CL175 engine for a clue. No cigar as they use a different locking set up which is another change Honda made between the Sloper CL160 and the CL175K0 model one year apart.
Engine cases together again.

CL160 Blanking plug design locks

CL175K0 Blanking plug design locks.
Interesting the starter delete plug was a bit of a mystery to install. Didn't take a picture of the original position. So I looked at the CL175 engine for a clue. No cigar as they use a different locking set up which is another change Honda made between the Sloper CL160 and the CL175K0 model one year apart.
Engine cases together again.
CL160 Blanking plug design locks
CL175K0 Blanking plug design locks.
Attachments
Last edited:
Super clean cases, very nice work as usual. Even the Tech Steel blends right in!
I did actually have the picture and got it right this time. You maybe right on the fitment. There is a notch on the one case section that I did have the plug in slightly differently up against the notch and it seemed OK. My pictures of the engine teardown did show it in this current position, so I am good to go.Looks like the plug would only fit the one way?
Last edited:
A little more progress and another mystery question brought about by another poster regarding the clutch adjuster mechanism in the left side outer case cover. My adjuster is missing the ball bearing that is shown on the Honda Parts fiche. While I am not there yet in the reassembly. It begs the question of what is supposed to be inside the adjuster part where the clutch rod shaft connects through the output shaft of the motor.
Anyone who is familiar with the CB/CL 160 who has one under restoration or ownership and can confirm the correct set up. Does the ball bearing fit into the cup of the adjuster or not?
Here is a little more assembly done while I await on a few metal clutch plates to finish up the clutch pack.

Anyone who is familiar with the CB/CL 160 who has one under restoration or ownership and can confirm the correct set up. Does the ball bearing fit into the cup of the adjuster or not?
Here is a little more assembly done while I await on a few metal clutch plates to finish up the clutch pack.
Last edited:
mike in idaho
Veteran Member
The bearing ball goes in the clutch adjuster, on the let side of the engine.
ballbearian
Veteran Member
No 5/16" ball on 150 0r 160, only 305/250. Not sure on 175 sloper or upright.