Yeah that sucks, they should have known better than to sell it like that. Have you sourced another 73mm gasket?Check out that supposedly NOS Rocky 73MM head gasket. Welp, looks like the project was going to take a pause anyway.
-
Don't overlook our Welcome Package, it contains many links to important and helpful information about functions at VHT like posting pictures and sending PMs (private messages), as well as finding the parts you need.
AD
You are using an out of date browser. It may not display this or other websites correctly.
You should upgrade or use an alternative browser.
You should upgrade or use an alternative browser.
74 CB 450K Build - "Texas Midnight"
- Thread starter EzPete
- Start date
ballbearian
Veteran Member
I guess, if entering a GFZ but that's where you probably need it.to attach a lockbox for a subcompact CCW
Try Andrewsmotosports for gasket?
Working on that right now. I was hoping the guy that sold it happened to have another, no dice - he's willing to do a full refund though at least.Yeah that sucks, they should have known better than to sell it like that. Have you sourced another 73mm gasket?
Cometic made a 72mm, 74mm and 75mm MLS gasket for a while, and have seemingly quit producing them (or anything for the 450 for that matter), so now it's finding one of their dealers that still has one of the 75's in stock. The only ones around me really only stock the scarce stuff for these bikes made in Milwaukee . Andrewsmoto is a Cometic dealer, they don't have one on the website, but I'll give them a call since that doesn't mean they don't have one floating around. Thanks for the referral!
After that, it's Capellini - there's one used on Ebay, but nothing new on their site... which means I've got to dig the big torch out of the attic and do the whole quenching bit. It does have the advantage of being reusable with the right care, which may make the most sense long term. Downside is I planed the block, cylinders and head for MLS/Standard gaskets, so I'll have to check tolerances again and make sure that works with copper.
Rocky made one for a while, and given the 3.95 that was the handwritten dealer price on the bag it was in - that was quite a while ago. Can't seem to find any of those out there that look anything different from what I have already.
Which got me to thinking. I wiped it down a little bit and got the gauge out - .95 was what I was getting at about every spot I checked. No compression marks (apart from one spot it looks like it got set on a bolt or something like that). What it appears to be is the finish on the flame ring that basically disintegrated over the years in that bag. I've got half a mind to maybe take some 2500 grit or rock polishing cloth and knock down that finish, put an almost see through ring of gasket sealant on the center of the gasket surface and let that dry for about 45-60 minutes to make sure there's no boogers and just use it for at least the break in period while I look into a custom solution and maybe have a couple made... Another one of those parts that only seem to be getting harder and harder to find.

ballbearian
Veteran Member
I bet it's still usable if no pits.Working on that right now. I was hoping the guy that sold it happened to have another, no dice - he's willing to do a full refund though at least.
Cometic made a 72mm, 74mm and 75mm MLS gasket for a while, and have seemingly quit producing them (or anything for the 450 for that matter), so now it's finding one of their dealers that still has one of the 75's in stock. The only ones around me really only stock the scarce stuff for these bikes made in Milwaukee . Andrewsmoto is a Cometic dealer, they don't have one on the website, but I'll give them a call since that doesn't mean they don't have one floating around. Thanks for the referral!
After that, it's Capellini - there's one used on Ebay, but nothing new on their site... which means I've got to dig the big torch out of the attic and do the whole quenching bit. It does have the advantage of being reusable with the right care, which may make the most sense long term. Downside is I planed the block, cylinders and head for MLS/Standard gaskets, so I'll have to check tolerances again and make sure that works with copper.
Rocky made one for a while, and given the 3.95 that was the handwritten dealer price on the bag it was in - that was quite a while ago. Can't seem to find any of those out there that look anything different from what I have already.
Which got me to thinking. I wiped it down a little bit and got the gauge out - .95 was what I was getting at about every spot I checked. No compression marks (apart from one spot it looks like it got set on a bolt or something like that). What it appears to be is the finish on the flame ring that basically disintegrated over the years in that bag. I've got half a mind to maybe take some 2500 grit or rock polishing cloth and knock down that finish, put an almost see through ring of gasket sealant on the center of the gasket surface and let that dry for about 45-60 minutes to make sure there's no boogers and just use it for at least the break in period while I look into a custom solution and maybe have a couple made... Another one of those parts that only seem to be getting harder and harder to find.
AndrewsMS also listed various thicknesses which may help. My old boss used to put a small marble sized ball of soft clay, dumbdumb, he called it, on the crowns to check valve clearance.
Todd Henning probably still sells oversized Cometic gaskets, I got one with his 74mm pistons for my drag bike engine. If you can't find a 73mm I'd use a 74 rather than 75. I just looked for a way to buy from them and can't find anything but their Earthlink email address, no sales info at their website. Maybe VHT member @Stan Lipert might know where you can get one, he builds very strong 350 race engines.
Yeah. Cometic will produce almost any thickness you want in their MLS and MLX lines. It’s odd that they completely quit supporting the 450 bikes, and still have stuff for other CB/CL models, although it does appear that they’re gearing more and more toward the newer applications.I bet it's still usable if no pits.
AndrewsMS also listed various thicknesses which may help. My old boss used to put a small marble sized ball of soft clay, dumbdumb, he called it, on the crowns to check valve clearance.
I must be confused here. I thought there was a 1 Mil gap around the actual cylinder bore, making the 72 the stock, 73/74 for the slightly oversized bore combos and the 75’s for the +3-4mm bore… after which you’re getting into the complete custom jobsTodd Henning probably still sells oversized Cometic gaskets, I got one with his 74mm pistons for my drag bike engine. If you can't find a 73mm I'd use a 74 rather than 75. I just looked for a way to buy from them and can't find anything but their Earthlink email address, no sales info at their website. Maybe VHT member @Stan Lipert might know where you can get one, he builds very strong 350 race engines.
I've never actually measured the inner diameter of any of the aftermarket head gaskets and never really wondered about it, but the stock gasket is capable of being used up to Honda's S4 (71mm) pistons. So I'd assume the stock gasket is 71mm max. I'll measure my Cometic gasket and a stock gasket later on today and post back what I find.I must be confused here. I thought there was a 1 Mil gap around the actual cylinder bore, making the 72 the stock, 73/74 for the slightly oversized bore combos and the 75’s for the +3-4mm bore… after which you’re getting into the complete custom jobs
That would be awesome. I went way down the rabbit hole on gaskets last night and likely have more information competing for space than I should.
At 22ft/lb, the Rocky gasket should compress to about .7 I would imagine, which appears to be well within spec, and I’m leaning more and more to just going with it for now to even see if this thing is worth going way out on. Knowing myself, the minute I open up the custom parts Pandora’s box, I’m ending up with a $3,000 engine wrapped in a $100 frame.
The gasket isn’t brittle or damaged outside of the discoloration from that finish so I may be making a mountain out of a molehill.
I just measured a couple of stock gaskets and my Cometic gasket for the 74mm pistons. The stock gaskets (but not OEM, they're either Vesrah or NE brand) vary more than I realized, from 71.4 to over 72mm. The Cometic I got from THR for their (Wiseco) pistons is 75.3mm.
Alright. Between the head gasket, the carbs and a sneaking suspicion that there’s something off on the points side exhaust bearing cap.. and now this - ******* bike is this close to ending up with a 755 Hornet, because I’m fed up with all the ticky tack pieces that don’t fit. At least then, the bump to 90HP is worth all this effort.
Ok. Bike was missing the clutch joint, so I thought I’d just grab one - not realizing they’re like everything else in this bike. Unavailable. Managed to find one about a week ago and it just got here. Quadruple checked that there is only one part number, item looks exactly like the picture, tagged with that exact part number and


Doesn’t fit. Now I could grind down the sides and likely finagle it in there, but the threaded hole doesn’t even fit the end of the cable so then I’m drilling and tapping a new hole. Why?
So I need to figure out if the crankcase cover on the bike is wrong, or the part. Leaning part due to the clutch cable piece, but every time I turn around, something on this bike wasn’t from this bike.
So - does anyone have a spare crankcase cover they can flip over and measure that spot or even eyeball it and see if it looks right.
Either that or anyone have an extra 22875-283-000 to compare the part to?
Ok. Bike was missing the clutch joint, so I thought I’d just grab one - not realizing they’re like everything else in this bike. Unavailable. Managed to find one about a week ago and it just got here. Quadruple checked that there is only one part number, item looks exactly like the picture, tagged with that exact part number and
Doesn’t fit. Now I could grind down the sides and likely finagle it in there, but the threaded hole doesn’t even fit the end of the cable so then I’m drilling and tapping a new hole. Why?
So I need to figure out if the crankcase cover on the bike is wrong, or the part. Leaning part due to the clutch cable piece, but every time I turn around, something on this bike wasn’t from this bike.
So - does anyone have a spare crankcase cover they can flip over and measure that spot or even eyeball it and see if it looks right.
Either that or anyone have an extra 22875-283-000 to compare the part to?
stl360+450
Veteran Member
Doesn’t fit. Now I could grind down the sides and likely finagle it in there, but the threaded hole doesn’t even fit the end of the cable so then I’m drilling and tapping a new hole. Why?
So I need to figure out if the crankcase cover on the bike is wrong, or the part. Leaning part due to the clutch cable piece, but every time I turn around, something on this bike wasn’t from this bike.
So - does anyone have a spare crankcase cover they can flip over and measure that spot or even eyeball it and see if it looks right.
Either that or anyone have an extra 22875-283-000 to compare the part to?
It does not look like the correct part. Here's a picture of the correct piece from CMSNL. Notice that the lower portion has a different width than the upper portion.

Mine was lost, so I improvised and have been riding without that piece for several years. Sometimes there are used clutch cables available on eBay and the only reason to buy one would be if this part is still attached to it. Here's one.

Last edited by a moderator:
Thanks man. That’s basically the route I was going to go, I just get annoyed by those “fixes” when it’s a visible part. Maybe I’ll just machine down the wrong part to match and add it to the fabrication list.
stl360+450
Veteran Member
I feel the same way, but I won't let that feeling keep me from riding. It looks like that eBay cable will cost about $25 including shipping. If you aren't interested, I may scoop it up to replace my missing part.Thanks man. That’s basically the route I was going to go, I just get annoyed by those “fixes” when it’s a visible part. Maybe I’ll just machine down the wrong part to match and add it to the fabrication list.
I took the measurements (in mm) of the cable locking piece if you go the route of cutting down your existing piece:
sideview, front view,


bottom plate, inside piece


sideview, front view,
bottom plate, inside piece
I’ll DM you to make sure it’s not the same guy I bought from. Misrep on the part itself and basically said “sorry, good luck”.I feel the same way, but I won't let that feeling keep me from riding. It looks like that eBay cable will cost about $25 including shipping. If you aren't interested, I may scoop it up to replace my missing part.
If you bought it on eBay by part number, it's another unfortunate example of how so many eBay sellers don't really know exactly what they have.I’ll DM you to make sure it’s not the same guy I bought from. Misrep on the part itself and basically said “sorry, good luck”.
Thanks. I had mocked one up out of steel stick - luckily the inner channel is the right size so it’s just trimming down the Tabs and widening the hole.I took the measurements (in mm) of the cable locking piece if you go the route of cutting down your existing piece:
sideview, front view,
View attachment 29192 View attachment 29193
bottom plate, inside piece
View attachment 29194 View attachment 29195
Looks like this part is actually a 268-000 for the early CB/CL 72/77 series - I’m a little hesitant to basically destroy a piece that’s only getting harder for someone else to find, but that’s life I guess.
Well. Onto the tight exhaust bearing. Everything slid together with no percussive maintenance, so hopefully it’s just in my head here.
If the bearings are even just slightly not square to the head, they jam pretty quickly. A little oil on the head where the bearing slips in helps.Well. Onto the tight exhaust bearing. Everything slid together with no percussive maintenance, so hopefully it’s just in my head here.
You're not trying to put the cam bearings on with the cam positioned at the timing mark, are you? Not trying to be presumptuous here, but slip the cam bearings on in a position where no valves are being opened and once assembled, then rotate the exhaust cam using a screwdriver against the sprocket teeth to turn the cam to the timing mark before setting the head on the cylinder studs.Well. Onto the tight exhaust bearing. Everything slid together with no percussive maintenance, so hopefully it’s just in my head here.
It felt really square, so I’m hoping it’s just a little dry on one side. I did squirt some clean oil at about 5 psi up through the main pickups to make sure there were no obstructions and that leaked up through the lube holes, so there’s definitely oil in those races. I’m wondering if it flushed up maybe a tiny bit of something even after solvent, water, compressed air and a little bake under the heat lamp to dry out.
Better to just reset, strip back down to the torsion bars, clean it up a bit, relubricate and run the install again. If it didn’t feel right now, a few thousand explosions isn’t going to make it better. If it pops back in still tight, I’ll take some pictures and try to maybe grab a video of where it’s feeling off.
Better to just reset, strip back down to the torsion bars, clean it up a bit, relubricate and run the install again. If it didn’t feel right now, a few thousand explosions isn’t going to make it better. If it pops back in still tight, I’ll take some pictures and try to maybe grab a video of where it’s feeling off.
Oh no. Followers are laid as flat as they get, then lay in the cam - I kind of have to kind of roll the right side in or go from the top left handed to get the right angle to lay the cam in at low point (all valves closed, lobes of the cam at their minimal contact depth, slide that points cap on. Cam is now in the races and should be able to be fairly easily rotated maybe 20ish degrees (never really measured it, but you know what I mean) before the cam lobes begin to engage. It’s in the “free spin” area that the right side doesn’t feel like it wants to run as easily as the left.You're not trying to put the cam bearings on with the cam positioned at the timing mark, are you? Not trying to be presumptuous here, but slip the cam bearings on in a position where no valves are being opened and once assembled, then rotate the exhaust cam using a screwdriver against the sprocket teeth to turn the cam to the timing mark before setting the head on the cylinder studs.
So, it’s prior to rotating to the timing mark. Speaking of which - this is the only thing close I could identify. Luckily, I have two cams and they both have similar marks in this precise spot, so I’m probably going to do the old impact socket trick and wipe paint in there to make it a touch easier to see. Keep getting the photo error - it’s a small hash about 15 degrees behind the casting mark - basically in line with that little tab in between the chain and bearing if that makes sense.

Yep, that's the mark though your picture is a bit out of focus to clearly see it on your cam. Is it possible the resistance in rotation you're feeling is from the seal in the left bearing cap (behind the points)?
Speaking of the intake cam, did you make sure the oil restriction plug in it is on the right side of the head? (as sitting on the bike, of course)That’s a definite possibility, but I know I was frustrated when I was putting them in, had to take the intake out anyway for the missed cam chain roller… trying to eliminate a possible bonehead move.
That I did do. Luckily for me they’re the same “right”.
So I was comparing the two cams I have. The right side is what I was planning on running, as it’s mate was in far better shape than the intake from the other set and I wonder if this is it.

So I was comparing the two cams I have. The right side is what I was planning on running, as it’s mate was in far better shape than the intake from the other set and I wonder if this is it.
The diameter of the seal area of the cams should be the same despite the different designs. The left cam bearing (points base) part number has not changed since a very early supercession in the K0, and I've used various exhaust cams in the same left cam bearing more than a few times.
Turns out the seal on that side was the cause. Little too much assembly lube and it had slipped a bit at an angle to the shaft. Easy fix, and good to know I'm not crazy.
Dry-gapped the cam followers to a .0015 once they were at their timing marks, replaced all the head nuts and washers, wrapped up the cam chain (quadruple checked this one as it lined up almost too easy). I'd say the tensioner let out 2/3rds-ish of the total throw, but it looks right, feels right, timing marks lined up and everything spins at the same rate. Going to do the final valve timing later this week when I have time for the finicky stuff.
Unfortunately, didn't get photos on any of this due to a small mishap involving fiberglass resin... that'll be some fun to get off the camera lens.
So now I'm moving on to some of the planning for the engine install (removing all the brackets that are just hanging on the frame, etc.) and planning the cable routing with the low/wide bar height and all the modifications it's just the clutch and throttle. The clutch is fairly self-explanatory, but I'm having a hard time with the throttle routing and I know this one is particularly touchy to keep things synced up. Does anyone have a picture of where the install point is for the Y junction? From that point to the engine is straightforward stock install with pods - I can trim the single end as far down as I want to as I left it about 3' long.
I'm also on round 3 or 4 with getting the rust out of this tank. It's solid all the way around so I hate to scrap it for just some rust but the juice may not be worth the squeeze here, and I'm not super stoked on the look of the K7 tank. Does anyone know if the smaller 9L tanks will fit w/o modifications? (I really like the look of the K2-K5 tanks.)
Edit: I think typing that out made me think that I never considered the possibility that the tank was lined in the past. I never ran a cycle of paint stripper - stopping at the big orange box on the way home - still like the K2-K5 tanks better though. If they're a fit, I may grab one of those as well.
So, that'll give me fuel storage and a place to explode it in. Next step is the whole air and spark combination. I'm sure come carb/timing time, that'll be fun.
Last edited:
Turns out the seal on that side was the cause. Little too much assembly lube and it had slipped a bit at an angle to the shaft. Easy fix, and good to know I'm not crazy.
")
You can slip a short probe into the back end of the tensioner body to feel how deep the tensioner shaft went when it adjusted.I'd say the tensioner let out 2/3rds-ish of the total throw, but it looks right, feels right, timing marks lined up and everything spins at the same rate.
Honda typically went down the opposite side of the frame for most cables, clutch across to the right side of the steering head and back across to the left under the tank and the throttle across the left side of the steering head. You can go either way as long as it doesn't cause any issues with stop to stop handlebar turns. Since I have Mikunis on my 450 I had to modify a lower half of the throttle cable from a slide carb Honda and it was a bit short, so I ran mine like this. Not fond of the look but I've been to lazy to bother changing it because it works.Does anyone have a picture of where the install point is for the Y junction?

That makes sense. I was trying to do the separate side of the top tube thing but it got messy and weird with fully locked out turns.
Doing some more farting around today because I didn’t have enough time to really tackle much more than a new layer of fiberglass on the speedo/switch cowl and headlight bracket covers to hide the redneck engineering at the core of that setup.
While waiting for it to tack up I was taking a look at ride height and really want to find a way to drop the pegs down and back - but not as far as a rear set (haven’t really found one I liked/looked relatively practical) at 6’2 with the lowered front bar height it’s a hair awkward for anything longer than maybe an hour or two ride.
I’ve got a size 13 foot, so I’m fairly confident I can move the peg back two inches and not really have to worry about shifter/brake.
So that leaves custom, or repurpose another model’s parts. Enter rabbit hole…
Would the 500T pegs fit with minimal mods? They look like they’ll give the correct ride height, without having to do something crazy around the exhaust.
wentwest
Veteran Member
Ebay MC 3.0 rings
Back to the 3.0 oversize pistons for a moment. I told you I had a set of these, too, but only 1 had rings. My pistons look new. Today I found new old stock MC brand 3.0 oversize rings on EBay at the link at the top of this post. Not super cheap but what else will work? Anyway I ordered a set. The ad says they have more.
Back to the 3.0 oversize pistons for a moment. I told you I had a set of these, too, but only 1 had rings. My pistons look new. Today I found new old stock MC brand 3.0 oversize rings on EBay at the link at the top of this post. Not super cheap but what else will work? Anyway I ordered a set. The ad says they have more.
Dude. Sweet find. I found a set locally too and the guy wanted $75. I was really close to buying them just to have a set.Ebay MC 3.0 rings
Back to the 3.0 oversize pistons for a moment. I told you I had a set of these, too, but only 1 had rings. My pistons look new. Today I found new old stock MC brand 3.0 oversize rings on EBay at the link at the top of this post. Not super cheap but what else will work? Anyway I ordered a set. The ad says they have more.
I will say, the solid iron final ring is a monster to get inside the cylinder.
Yes, the one piece oil rings are more challenging once the cylinder is bored beyond 1mm over, the loss of stock taper is almost complete at 3mm over. With my 4mm (S16) oversize pistons, I put the pistons in the cylinders first, leaving the wristpin hole just far enough below the sleeve to insert the pin once I slide the cylinders on the studs. Wristpin clips are difficult then but IMO easier than fighting with the rings when you're like me and won't spend $100 for Honda ring compressors that I'd only use once every 5 to 7 years. But I'll be using teflon buttons in my drag bike engine build so it will be a snap.I will say, the solid iron final ring is a monster to get inside the cylinder.
I was blown away at how much the ring compressors were. Opted for the bathed in oil technique and spent the better part of the first quarter of a basketball game slowly working them in ring by ring. It really helped to have a third hand on the oil ring to keep some stable pressure on the backside of the ring while working the gapped ends together. That little "tick" sound when that last one finally drops in... pretty satisfying for a one-time thing. Heavy emphasis on one-time.
I thought about Teflon buttons, we used to use those with air-cooled VW race, sand and Baja setups, since you were basically rebuilding those every 10 runs. That would definitely be a significant improvement, although we never took them to the 9000 RPM range, although I'm sure they'd still hold, a 2332 VW crankcase will not.
I thought about Teflon buttons, we used to use those with air-cooled VW race, sand and Baja setups, since you were basically rebuilding those every 10 runs. That would definitely be a significant improvement, although we never took them to the 9000 RPM range, although I'm sure they'd still hold, a 2332 VW crankcase will not.
Interesting though not surprising. I found out about teflon buttons while building my first drag bike using S16 Powroll pistons, they came with the piston set. That engine spent its life turning 10,500 to 11,000 rpm twice a week, run after run and the only time I ever pulled the top end down was to put bigger cams in it along with a fresh set of rings while I was there, so I know they'll hold up.I thought about Teflon buttons, we used to use those with air-cooled VW race, sand and Baja setups, since you were basically rebuilding those every 10 runs. That would definitely be a significant improvement, although we never took them to the 9000 RPM range, although I'm sure they'd still hold, a 2332 VW crankcase will not.
I just took a look at your solution to this, as I may go the same route - When I trimmed the lower tabs down on that piece I received it feels like there's a lot of flexing going on (granted, that's without the clutch cable tied to the frame at any point, but still doesn't feel solid). Where do you have the wiring from the Generator and Neutral Switch exiting that cover?It does not look like the correct part. Here's a picture of the correct piece from CMSNL. Notice that the lower portion has a different width than the upper portion.
View attachment 29190
Mine was lost, so I improvised and have been riding without that piece for several years. Sometimes there are used clutch cables available on eBay and the only reason to buy one would be if this part is still attached to it. Here's one.
View attachment 29191
Interesting though not surprising. I found out about teflon buttons while building my first drag bike using S16 Powroll pistons, they came with the piston set. That engine spent its life turning 10,500 to 11,000 rpm twice a week, run after run and the only time I ever pulled the top end down was to put bigger cams in it along with a fresh set of rings while I was there, so I know they'll hold up.
Sand and salt are killers on those air cooled engines, and we were stretching the limits of that VW block for sure. When we started running TBI and EFI setups with aviation fuel and pressing 260HP, I've sent my fair share of rods halfway down the track.
Jays100
Veteran Member
When you're ready, I have a new, higher output, oil pump available.
Yeah, but 260 hp is crazy strong output for one of those engines! By comparison, these twins bottom ends are tough enough to withstand at least a 25% increase in power and still be reliable. I probably made over 1000 runs with my first drag bike, essentially set up exactly as my current street bike is and never had any problems with it despite it being run WFO every time it was run.When we started running TBI and EFI setups with aviation fuel and pressing 260HP, I've sent my fair share of rods halfway down the track.
I'm all ears. TX summer will be here before I know it and I really wanted to do a semi-long cruise down to ROT Rally in Austin and eventually a week-long road trip to Northern CA. Everything is out of the bike and even that crankcase cover is off right now. What's the setup look like?When you're ready, I have a new, higher output, oil pump available.
I had halfway mocked up an external oil cooler/reserve with an electric pump fed from a signal from the ignition to increase pump speed relative to engine speed, priming switch to turn the pump on to bring oil to the top end prior to starting.
You won't need any exotic priming pump when you use this pump. A few members here have one in their 450s and I'll be using one in my drag bike engine. Jay's an engineer and spent a lot of time designing it, super easy to install.I'm all ears. TX summer will be here before I know it and I really wanted to do a semi-long cruise down to ROT Rally in Austin and eventually a week-long road trip to Northern CA. Everything is out of the bike and even that crankcase cover is off right now. What's the setup look like?
Introducing A Better Oil Pump, New For 450 & 500T
This is a multi-part series on a new design oil pump for the 450 & 500T's. Stay tuned, its a fun read, gives some insight into my quirky self and ultimately reveals a new, improved and superior Oil Pump that will bolt-in to your DOHC twin! Part 1, Discovery When I first encountered the small...
 www.vintagehondatwins.com
stl360+450
Veteran Member
I'm afraid I don't have a good picture to share, but the wiring ruins along the upper crankcase behind the sprocket cover and comes out at the back. Maybe Tom or someone else will have a better picture.Where do you have the wiring from the Generator and Neutral Switch exiting that cover?

Ah crap. I had it set up to come up through that same port, using that little gap created by the “bubble” on the crankcase and the flat spot of the cover. There’s my problem - well, off to extend that sub harness.


stl360+450
Veteran Member

Thanks. Snapped it up. Luckily the wiring was pretty simple to fix. Just snipping and soldering.I did pick up that used clutch cable so I will be able to go back to stock.
View attachment 29376
I found another listed for $7 + $7.43 shipping. Here's the link.
Yeah. My buddy took one look at what I had started on, grabbed a beer out of the fridge and stood there until I came to my senses.You won't need any exotic priming pump when you use this pump. A few members here have one in their 450s and I'll be using one in my drag bike engine. Jay's an engineer and spent a lot of time designing it, super easy to install.
Introducing A Better Oil Pump, New For 450 & 500T
This is a multi-part series on a new design oil pump for the 450 & 500T's. Stay tuned, its a fun read, gives some insight into my quirky self and ultimately reveals a new, improved and superior Oil Pump that will bolt-in to your DOHC twin! Part 1, Discovery When I first encountered the small...
@Jays100 I sent you a PM if you have any in stock.
Listen, it's not a bad idea and one I've considered (briefly) myself, but the design and connection requirements was more complicated than I wanted to bother with considering the alternatives are so much simpler (proper oil level, to the top of the flat-pressed area of the dipstick which is about a pint more than the factory full mark, and proper warm-up to allow oil flow to the top end even with the stock pump)Yeah. My buddy took one look at what I had started on, grabbed a beer out of the fridge and stood there until I came to my senses.
Well. I was planning on hanging the engine today but the chance to get one of Jay’s oil pumps and put it in before filling, etc put that on hold for a bit.
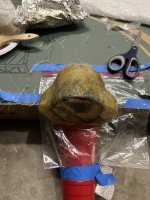
So, took a shot at some art projects instead - just like paper mache with a head rush if you forget ventilation.

Stage one of the cowl that will house the speedometer, neutral light, headlight controls and day/night auxiliary lights (might as well have some fun with micro LED’s)
Since fiberglass is one of those 3-4 hours between layers projects and the whole thing is hand-shaped, It’s been a fun time. Just about have it there - little skim coat of Bondo to smooth, some more dust creation and it’ll be ready to go off to paint with the tank and headlight brackets (although these still need another layer - had some real fun with this one trying to make the bar clamps and scrap metal bracket look a little more respectable. Fiberglass really doesn’t like 90 degree angles in small spaces. trust me. It’ll look better eventually.

During drying and non-dust creation times, I pulled the engine out and rerouted that generator wiring I had done wrong, and noticed that the polish on the block was totally discoloring. I’ve shined more than my fair share of aluminum and this has to
be some kind of chemical reaction - I just have to figure out how to strip it and start again - any ideas on this black discoloration? It’s only the block. Just odd.

And. Since it was arts and crafts day, my son wanted a new desk lamp and pen holder set and came up with this idea using leftover crap laying around. Pretty impressed with what he did - needed some help with the soldering and figuring out the current flow for the switch to keep the LED ring lit. Fun teaching moment - I think smashing up the license plate was the most fun he had though. If you’ve got a busted turn signal, a stripped carb body some decorative flange nuts, a random assortment of screws and wires it’s a good hour long project with the kids that teaches a lot of different skills.

So, took a shot at some art projects instead - just like paper mache with a head rush if you forget ventilation.
Stage one of the cowl that will house the speedometer, neutral light, headlight controls and day/night auxiliary lights (might as well have some fun with micro LED’s)
Since fiberglass is one of those 3-4 hours between layers projects and the whole thing is hand-shaped, It’s been a fun time. Just about have it there - little skim coat of Bondo to smooth, some more dust creation and it’ll be ready to go off to paint with the tank and headlight brackets (although these still need another layer - had some real fun with this one trying to make the bar clamps and scrap metal bracket look a little more respectable. Fiberglass really doesn’t like 90 degree angles in small spaces. trust me. It’ll look better eventually.
During drying and non-dust creation times, I pulled the engine out and rerouted that generator wiring I had done wrong, and noticed that the polish on the block was totally discoloring. I’ve shined more than my fair share of aluminum and this has to
be some kind of chemical reaction - I just have to figure out how to strip it and start again - any ideas on this black discoloration? It’s only the block. Just odd.
And. Since it was arts and crafts day, my son wanted a new desk lamp and pen holder set and came up with this idea using leftover crap laying around. Pretty impressed with what he did - needed some help with the soldering and figuring out the current flow for the switch to keep the LED ring lit. Fun teaching moment - I think smashing up the license plate was the most fun he had though. If you’ve got a busted turn signal, a stripped carb body some decorative flange nuts, a random assortment of screws and wires it’s a good hour long project with the kids that teaches a lot of different skills.