74 CB 450K Build - "Texas Midnight"

image.jpgQWay better now than later. If you have any doubt as to the looseness of the roller on the shaft, replace it anyway. Just another thing you won't likely ever have to do again. Here's a pizza cutter 'attack' during my ride with @12ozPBR on the Copperhead Loop in October 2019

Well. Now I’m a little stumped. I had the shift roller and neutrals roller installed correctly. Probably just going to replace that anyway while I deal with this clutch thing image.jpg

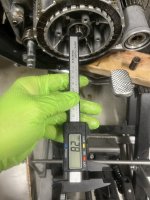
So, onto the clutch. This is the maximum throw full actuation was getting and it wasn’t making a difference. I check and lo and behold, I hadn’t left the elusive SAE ball out - it was there. Definitely perplexed.
 
I check and lo and behold, I hadn’t left the elusive SAE ball out - it was there. Definitely perplexed.
You don't mean a ball behind the lifter in the center of the mainshaft, do you? Hope not, the only ball involved in this clutch release mechanism is in the front sprocket cover. The rounded end of the clutch rod is all that should be behind that lifter pictured.

1708995534467.png
 
You don't mean a ball behind the lifter in the center of the mainshaft, do you? Hope not, the only ball involved in this clutch release mechanism is in the front sprocket cover. The rounded end of the clutch rod is all that should be behind that lifter pictured.

View attachment 30007
Correct. Initially I thought it was just the ball missing on the other side, which was not the case. Oh well, a whopping $0.58 down the drain for a spare.

I’m just going to chalk it up to probably the clutch plates drying out a little. Soaked them in oil as I did the install but that was a while ago. It really doesn’t feel like it’s generating any pressure against that rod though.
 
Your steels and friction discs are out of order. First is a steel in back and last is a friction on top, next to the cover.
 
Your steels and friction discs are out of order. First is a steel in back and last is a friction on top, next to the cover.
Good catch. I was sitting here trying to think of what could have possibly changed between the bench test and post install.

Took it all out to install that new oil pump and must have stacked them face up.
 
Welp. Not it either. Guess it's time to pull the lifter mechanism out, clean it again and see if there's something that jammed or got out of alignment. I’ve run every dang adjustment on this thing and it just won’t actuate. You can hear the lifter end hit, but that’s about as far as it goes.
 
I hate to sound like a broken record (old school, I know), but when you encounter a situation you want to talk about, pictures really help. So many people here, including myself, have seen so many of these types of things happen that we can often help you avoid a lot of frustration - but we can't see it from our houses.
 
Yep - I've just been nitpicking at it, rather than gutting and starting over. Going to do a teardown and clean with photos by stage this afternoon - at the end of the day, its a pretty simple mechanical action that slides a rod into a lifter, decoupling the clutch. it's just that the rod has to be the exact length/place at the right time.

Just a matter of figuring out which of the pieces to the puzzle isn't in the right place at the right time.
 
FYI - one of the steel clutch plates has a slight curve on one side - that is the first plate to go in the basket with the flat side out.
 
Yep - I've just been nitpicking at it, rather than gutting and starting over. Going to do a teardown and clean with photos by stage this afternoon - at the end of the day, its a pretty simple mechanical action that slides a rod into a lifter, decoupling the clutch. it's just that the rod has to be the exact length/place at the right time.

Just a matter of figuring out which of the pieces to the puzzle isn't in the right place at the right time.
Well, we're just trying to give you the best help we can, and seeing what you see is often a big part of it.
 
Well, we're just trying to give you the best help we can, and seeing what you see is often a big part of it.
I remember once threading the spiral pieces together on the lifter and finding it worked better when I started threading it 180 degrees opposite. IDK if the 450 is like that.
 
I remember once threading the spiral pieces together on the lifter and finding it worked better when I started threading it 180 degrees opposite. IDK if the 450 is like that.
The 160 and 175 use a similar threaded setup like the 450 does and they are rarely a problem (unlike the 350 which works well but not in the hands of someone who doesn't understand its design and limitations). I'm curious to see how he has his put together and adjusted.
 
D9C84085-D86F-4173-85D7-7A6D62B3E996.jpeg

89088B34-2D23-42D9-A2AA-7FB1A1E70EED.jpegOk. Here’s where I left it last night and the tear down.

E168C691-7436-45BB-B6FE-B857FE24B523.jpeg

Removed clutch plates (stacked right this time for reinstall) to get a look at lifter throwout. As you can see, I’ve adjusted it out quite a ways trying to get it to engage.

A3D6F406-085C-469C-B654-323E5BC04377.jpeg

That’s static, no load on the clutch lever.

Full max clutch lever

1709075081126.jpeg

Flipped around to the other side.
1709075191791.jpeg

Again. Supermax preload.FYI, if I drop the cable slack and move the adjuster back to the index mark, it’ll sag down to about the tip of the spring and at that point doesn’t meet the back of the clutch spring plate.

10106B10-0BC7-474E-9E5E-E1E460C1D362.jpeg
DA6F16E0-4331-4178-A360-BC02C0070E18.jpeg
Already funky from digging around in the grease, but you can just make out the steel ball there.

Everyone is in the pool now taking a quick bath, then we’ll get to inspect and reassemble. I didn’t pull the lifter or rod. They slide and rotate freely in their spot and, unless I’m missing something, there’s just those two parts there and all they need to do is slide back and forth freely.
 

Attachments

  • DC0AA8D3-6F78-4419-B666-D563A1B3195D.jpeg
    DC0AA8D3-6F78-4419-B666-D563A1B3195D.jpeg
    1.8 MB · Views: 0
  • 05F3A3A1-53DC-4421-B2F9-8A538AE20F57.jpeg
    05F3A3A1-53DC-4421-B2F9-8A538AE20F57.jpeg
    1.7 MB · Views: 0
Last edited:
I remember once threading the spiral pieces together on the lifter and finding it worked better when I started threading it 180 degrees opposite. IDK if the 450 is like that.
You’d have to lever the heck out of it to get back inside the cover and I’m pretty sure it would be dancing with the sprocket at that point.
 
View attachment 30034

View attachment 30029Ok. Here’s where I left it last night and the tear down.

View attachment 30028

Removed clutch plates (stacked right this time for reinstall) to get a look at lifter throwout. As you can see, I’ve adjusted it out quite a ways trying to get it to engage.

View attachment 30031

That’s static, no load on the clutch lever.

Full max clutch lever


Flipped around to the other side.


Again. Supermax preload.FYI, if I drop the cable slack and move the adjuster back to the index mark, it’ll sag down to about the tip of the spring and at that point doesn’t meet the back of the clutch spring plate.


Already funky from digging around in the grease, but you can just make out the steel ball there.

Everyone is in the pool now taking a quick bath, then we’ll get to inspect and reassemble. I didn’t pull the lifter or rod. They slide and rotate freely in their spot and, unless I’m missing something, there’s just those two parts there and all they need to do is slide back and forth freely.
The other issue is where the thrust washers are. If moved from behind the outer to between the outer and inner basket, that can jack up the distance the rod has to work.

Maybe that's why your stack still looks short to me.
 
I would start with loosening all cable adjusters back to the most slack position, then turn the adjuster in the cover until you reach the point of resistance, then back off just slightly (1/16" rotation distance on the slotted adjuster in the front sprocket cover). If the ball bearing is in place, the clutch rod is in with the dimpled end out and the pressure plate is rotated until the splines are aligned so it drops in and makes contact with the outer-most fiber plate, it should be correct. Then you adjust the lower cable slack adjuster and use the adjuster at the lever to fine-tune for changes between cold and hot if necessary.
 
I would start with loosening all cable adjusters back to the most slack position, then turn the adjuster in the cover until you reach the point of resistance, then back off just slightly (1/16" rotation distance on the slotted adjuster in the front sprocket cover). If the ball bearing is in place, the clutch rod is in with the dimpled end out and the pressure plate is rotated until the splines are aligned so it drops in and makes contact with the outer-most fiber plate, it should be correct. Then you adjust the lower cable slack adjuster and use the adjuster at the lever to fine-tune for changes between cold and hot if necessary.
That’s what I’m back to. Went back a step further to clean everything and see if there was a burr or anything on the splines. Measured everything again. (Old spring for reference only, they were 39.9)
0808EC13-5554-4A5B-AC02-557F50B2141F.jpeg

image.jpg

Pack it with grease, put everything back in and find out now I guess.
 
The other issue is where the thrust washers are. If moved from behind the outer to between the outer and inner basket, that can jack up the distance the rod has to work.

Maybe that's why your stack still looks short to me.
This is everything that’s in that basket.

8ADD716D-1942-4A67-B341-9B480E08209E.jpeg
 
Adjustment wise - ended up in about the same place. Little more preload, little less cable tension. In the end, pretty much the exact same spot.
84D82C9D-2AFF-473D-87ED-072ECD6BDF31.jpeg


Still barely activates, now is binding up a bit on return - although that’s probably a function of a new grease seal and the cable probably getting yanked around a bit. Either way, same boat as before.

While I had the sprocket cover off. Figured I’d go ahead and put the 92 link chain on.

0194B3B6-379C-4436-97C6-579757691D81.jpeg

Should have known better.

936D8A88-5FC5-48F7-8B35-D8B8C5232DE4.jpeg

Rear axle at the stop. Not the tensioner. Solid link short. Knew I should have got the 100 link and just cut it down. And yes - it’s a 15/35 combo.

And on that note. I’m buttoning this thing up, throwing a tarp on it and pushing it to the side for a while. Sick of new parts straight out of the box not fitting and I just found out the GTO popped a lifter Sunday and it’s supposed to be in Canyon Lake for a show on the 10th. So that’s an engine out, pray the cam isn’t flattened and try to get back together in time for a run to Central TX. Going back to what isn’t so damn rusty, and wait for this thing to tell me it actually wants to get on the road.
 
As I was sliding everything around to clear space for the GTO that’ll be chewing up the shop for the next 10 days, I figured I’d give this thing one more chance to talk before getting out in a long timeout.

Went to play with the cable routing to see if that was the issue - nope. Next step was to swap out the cable altogether, as that’s literally the only piece of the equation that is brand new other than the plates and the return spring. And here we have it.

AC450D0A-6CEC-4333-9B5F-55BAA5DD877F.jpeg
At first I thought no way - that’s just a dent in the extra thick rubber part of this 4-1 cable. Came straight from the bag, hung with oil for a day, put on the bike. Could have been something I did along the way, but ham handing stuff isn’t usually my jam.

Swapped the cable - worked perfectly. The cable inside the brand new one was half snagged and stretching I think. Had to back the adjustment down to a little closer to the index mark.

Quality Control ain’t what it used to be I guess, or I somehow do not recall hitting it with a sharp heavy edged item. Either way, she kept the mothballs away.

Still gotta deal with the GTO, but that’ll be a good reset - I know that thing like the back of my hand.
 
As I was sliding everything around to clear space for the GTO that’ll be chewing up the shop for the next 10 days, I figured I’d give this thing one more chance to talk before getting out in a long timeout.

Went to play with the cable routing to see if that was the issue - nope. Next step was to swap out the cable altogether, as that’s literally the only piece of the equation that is brand new other than the plates and the return spring. And here we have it.


At first I thought no way - that’s just a dent in the extra thick rubber part of this 4-1 cable. Came straight from the bag, hung with oil for a day, put on the bike. Could have been something I did along the way, but ham handing stuff isn’t usually my jam.

Swapped the cable - worked perfectly. The cable inside the brand new one was half snagged and stretching I think. Had to back the adjustment down to a little closer to the index mark.

Quality Control ain’t what it used to be I guess, or I somehow do not recall hitting it with a sharp heavy edged item. Either way, she kept the mothballs away.

Still gotta deal with the GTO, but that’ll be a good reset - I know that thing like the back of my hand.
Well that's a new one. Glad you found it, and I know it would be difficult to describe what you felt with the bad cable in place, but it's certainly one of the odder things I've seen that manifested itself as an improperly working clutch mechanism.
 
Sometimes it's hard to force your mind to think something all the way through without assuming anything. We all neglected the idea that it could have been the cable, because ... it's NEVER the cable! But here it is.
 
Sometimes it's hard to force your mind to think something all the way through without assuming anything. We all neglected the idea that it could have been the cable, because ... it's NEVER the cable! But here it is.
It was actually thinking about cars that had me dig in on the cable. I had a VW that I did a front disc brake conversion/rear hydraulic set up to and it retained the cable-actuated emergency brake. Somewhere in the installation that cable was damaged internally, still felt fine until it was under the slight tension load and either randomly release when the brake was on (fun times), or suddenly lock up on rougher terrain. I must have torn that hub, lever and brake assembly apart 7 or 8 times until I swapped the cable out on a whim.

Now I need to cut down this other one so I don't have a foot of cable just flopping around. Probably replace the shift lever too, the flutes on the lever are looking rough and it's getting harder and harder to take on/off.
 
Got way more done on the car yesterday than anticipated, so with 2.5 sets of hands things started moving today.

While I’m definitely not looking at the credit card statement this month, almost all the Legos are there.

Still waiting on:
Tank Badges
Install the petcock (waiting for tank liner to cure - after the fifth vinegar bath a couple of pinholes showed up, had to go with the evil liner)
Fuel lines (already trimmed, just attached to the temp tank for startup tuning. - need to reinstall the drain tubes as well)
Tensioner bolts. PO had swapped in some 35mm bolts and I missed it.
Some wiring harness fiddling
Rotate kick starter forward a notch or two
Reroute starter cable. (Which I think I figured out now)
Then the old “will it run?” (Crossing my fingers on the carbs. One has aftermarket brass

Definitely going to need new pipes and a shift lever, but that’s probably going to be when I pull the trigger on moving the foot pegs - I really like those 2:1 headers out there and moving the pegs back 4” would be a lot easier with only one pipe to fight with. The brackets were both obviously home fabricated as well and don’t fit very clean. These will all work for the break in though - then a May road-trip to Austin for ROT rally.
ADC51B33-7169-4715-A486-E5673442DDD8.jpeg
5187BC2A-2FAD-45AE-AB39-D18A2D062DED.jpeg
0570C699-E752-47F5-A581-5C91375CDE7A.jpeg
 
Dangit. Spotted an oops - freaking clutch cable got tucked between the carbs instead of behind them. (Or I guess in front of them is the correct term).
 
Yeah. In version 2.0 either the tank is getting smaller, or the seat beefier to provide a little more balance.

I’m also not 100% convinced it’s a CB450 tank, either that or I have the wrong rubber mount for the tail of the tank. I had to open up the little bracket under the tank to get it to even drop over, and right at the neck it’s really really tight. I had to slide the tank toward the rear a little to allow a full left turn.

But it was (I thought initially) in good shape compared to what’s out there so I rolled with it. I’m debating putting the chrome trim back on, but that could end up making look even larger.
 
That's where I was leaning too, but that pic is the exact paint scheme that was on there (well, half of it was) so basically confirms it. I knew something was up when the tank wouldn't fit all the way on the front stops with the coils installed. I had to mill new plates to narrow that bracket down and bring the coils closer together.

It's also tighter along the upper frame rail, which is necessitating the wiring harness move. Oh well, that's half the fun of a build like this.

Ah, the wonders of trying to find a rubber tank cushion that's not falling apart... looks like it was only used on the 400F and 500T for 3 years. Well, hopefully whoever has it also has a gas cap gasket so I don't have another $45 in parts and $15 of that is shipping.
 
Well. We got some good. Some bad. Some ugly.

Good: It’s alive. I’ve got a video of it running but it looks like I’ll need a hosting service to pin it here. Wanted to get some more experienced ears on it. Compression is strong as all get out. Rolling it in gear with the chain in to get back to neutral was a feat - even with no plugs.

Bad: carb tuning is going to be a bear and either the timing is off, or the advancer springs are weaker than I thought. From 1/4 throttle it really coasts down to idle. Right cylinder seems like it’s hunting for fuel a bit and there’s a minor exhaust leak at the down tube/header to muffler connection. I’ll be slapping some muffler tape over that for the time being, don’t like those pipes at all.
Shifting (engine running in gear, no chain, is still janky and the 12m circlip popped again so I need to fish a new one in there - probably overstretched it installing and it’s just not clamping enough to take the leverage.
Charging system is weak as hell. Only registering 12.8 at the battery. Every contact and connection is .02 ohm or below. If I rev it way up, it’ll get to 12.9/13 so things are working, just poorly.

The UGLY
Effing cylinder base gasket is leaking fairly aggressively - it’s not a stream, but more than just a drip.80BD8059-860B-42D6-9200-DB0E65FB1D68.jpeg
Left exhaust bearing is leaking as well, slow seep so I’ll check the torque on that cover.
Drive sprocket is still spinning in neutral…
not good.

So. Looks like the engine is coming back out to solve the gasket failure. While I’m at it, replacing all the other crap ones. Pissed at myself for this one. I knew those gaskets were sub par and now I get to pay for it. I might as well crack the case again and figure out wtf is going on with the transmission - who’s the member that does the refurbs for the shift detent wheel?

Even though I’m going to have to do a crap ton more work, it was a glorious sound to hear that bad boy fire up.
 
Last edited:
Shifting (engine running in gear, no chain, is still janky
With no chain on the front sprocket it will never sit still. The constant mesh transmission design with oil friction added will cause everything to rotate when the bike is running on the centerstand in neutral, and because of oil friction between the clutch plates (even when disengaged, because they don't separate much) the transmission gears will continue to rotate even with the clutch pulled in when the chain is off. One shaft has to sit still so the gears on the other (mainshaft) that is moving can be successfully moved with the shift forks to allow proper engagement of the dogs on the gears.
and the 12m circlip popped again so I need to fish a new one in there - probably overstretched it installing
It's possible you put the circlip on with the rounded side facing out. Since circlips have a rounded side and a flat side because of the way they're made, the flat side should face outward so it grips the groove in the shift shaft and is retained in the groove better.
Charging system is weak as hell. Only registering 12.8 at the battery. Every contact and connection is .02 ohm or below. If I rev it way up, it’ll get to 12.9/13 so things are working, just poorly.
None of these charging systems have output at idle, it takes at least 2500 to 3000 rpm or higher to break even and then begin exceeding a minimum static battery voltage of at least 12.6
The UGLY
Effing cylinder base gasket is leaking fairly aggressively - it’s not a stream, but more than just a drip.
If you replaced the o-rings in the bottom of the sleeves with ones from a gasket set, they may have been too fat for the groove and can often cause this because they were not fully seated.
Left exhaust bearing is leaking as well, slow seep so I’ll check the torque on that cover.
Hard to say what's happening there.
Drive sprocket is still spinning in neutral…
not good.
Again, it will spin and it's completely normal - it will even spin in neutral due to the transmission design and oil friction.
who’s the member that does the refurbs for the shift detent wheel?
@12ozPBR, just send him a PM. EDIT: this is not part of the current shifting 'issue', this fix typically only fixes the need for double upshifts from 2nd to 3rd and dropouts to false neutral when downshifting from 3rd to 2nd
Even though I’m going to have to do a crap ton more work, it was a glorious sound to hear that bad boy fire up.
Yes it is, and I know the joy and frustration together all too well.
 
Last edited:
Yeah - I see now why so many of the videos online are garbage. Trying to juggle a camera, a small flathead to adjust the idle while still holding a little grip pressure to keep it running, I didn't realize I had my phone upside down. Both carbs need some tweaking for sure, the right cylinder is the one that feels like it's hunting a bit. After this video, I let it run for about another 2-3 minutes to get fully warm and started getting the idle set and that started regulating a bit better, but it's going to need some more fine tuning - Could be slightly mistimed as well - I haven't checked dynamic timing yet, just static.

On the drive sprocket, they usually have some spin under no load, this one just seemed like a lot more than just windage/friction - definitely far down the list of priorities and very likely just an extension of my unrealistic expectations around the transmission.

Some of what I feel are shifting issues could be related to the clip - I had never considered that there would be a beveled edge. I hate those things, so I tend to just get them on and run away. This one for sure feels loose though (rotates pretty feely in its groove), which is why I think I probably expanded it too much putting it in there. I've got a ton of them, so that's no big deal to replace (accidentally ordered a pack of 10, thinking "man, that's an expensive clip"). Could also be my own expectations of perfectly synchro'd gear boxes that slide like butter, which is why it's a damn burr under my saddle here.

On the exhaust bearings, after the over-torque horror stories, everything is snug, but has some room to tighten up. I figured if it seeped when hot, a 1/4 turn will clamp it up - surprising, it's the "problem" corner that had the oil pressure to start leaking, guess that's a good sign that it's getting plenty of oil flow there.

The big ugly is that cylinder base gasket leak. It's from that set (they were not the Vesrah's - those I just ordered to replace all these crappy ones) that I was dubious on, which makes the orings plausible as a culprit as well. They were definitely chunkier than what was in there, but I chalked that up to deterioration - although they did feel very well seated in their grooves. Hard way to learn a lesson, but those are usually the ones that stick. I did double check the head bolt torque hoping maybe I had been distracted at stage 3 (15 lb/ft > 22.5lb/ft), to no avail. they were all 22.5.

I figure I'll just tune the carbs with a leaky block while I wait for gaskets and more cam chain master clips - oil is going to have to be drained anyway.

Pertaining to the charging system, I must have misunderstood the charging/load table in the FSM, or at least was was intended by "Charging Initial RPM" (1000-1800 depending on load). With full LED conversion, I was expecting around 1300 with all lights on. If it's indeed 3000+ before anything meaningful, then it does appear to be functioning correctly.

At least the GTO turned out to be a bad rod, not a lifter so that was a 4 day job that turned into 4 hours. Time to drag the custom Home depot remnant 2x4 engine stand back out.

I guess it's a good thing. Had this fired right up with no issues, I'd probably be on my way up to Wylie to pick up those CX's and the GL - still having hard time passing on those (mostly for the GL). I was thinking of just getting one CX running and serviceable, flipping it for cheap to cover the original investment, parting out the remainder of the donor and focusing on doing something cool with the GL like a sport/muscle cruiser. Crap, now I'm talking myself into it again.
 
On the exhaust bearings, after the over-torque horror stories
I guess I need clarity here. If during the head assembly you checked the end play with feeler gauges to be sure the cam wasn't too tight in the bearing covers, this shouldn't be an issue. Mine are tightened like any other JIS screw (or in your case, allens) in the engine and no detrimental effects resulted, and it shouldn't on yours either. Many of these engines are running with no cam end-play shims at all, the variations in mass production and wear along the way on the well-used ones mean that sometimes they need shims but not always.
 
I guess I need clarity here. If during the head assembly you checked the end play with feeler gauges to be sure the cam wasn't too tight in the bearing covers, this shouldn't be an issue. Mine are tightened like any other JIS screw (or in your case, allens) in the engine and no detrimental effects resulted, and it shouldn't on yours either. Many of these engines are running with no cam end-play shims at all, the variations in mass production and wear along the way on the well-used ones mean that sometimes they need shims but not always.
Over torquing the Allen bolts and ripping up those 50YO threads in the case was my concern, so all of the exterior covers are tight, but not German spec (gudentite). There was about 1/8th of a turn left in the bolts behind the advancer plate before it got uncomfortable for me.

Abundance of caution? Maybe. But I’d rather wipe up a little oil, tighten if needed and move along than rip apart and start tapping new threads.

As for the shims. Exhaust cam was likely in the high teens, my .2 gauge was super tight squeezing in. Intake cam was almost at max range. .3 would fit without a lot of friction so I did two .1 shims (seemed more balanced than one .2) and that took me down to probably .12-.15 or thereabouts. The .2
 
Back
Top Bottom