74 CB 450K Build - "Texas Midnight"

EzPete

Veteran Member
Joined
Dec 27, 2023
Total Posts
2,854
Total likes
2,878
Location
Texas
Hello there fellow wrenchheads! I mean, you kind of have to be if you're posting and reading build forums...

Little background here. I worked as a parts kid at a MC shop 30+ years ago, definitely a kick-ass high school job, but my real interest was cars and trucks and I gravitated down that road, building a few 70's-80's trucks - most recently a 1970 C10 resto-mod that went from a six month project to a never ending rabbit hole I needed to pull myself out of as the truck was getting to the point that driving it wasn't that fun or even remotely practical and it was either really ramp up spending and go for a straight up drag truck, or bail. Had a guy make me an offer I couldn't refuse, which left me without a project in the shop. Enter another offer I couldn't refuse:

IMG_8835.jpg

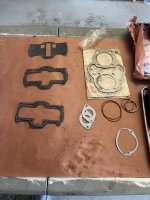
So, we got to work (my 11 yo son, myself and the shop supervisor). Unloaded the bed of the truck, started tearing everything down, sorting parts, figuring out what was supposed to be where with some really bad diagrams and no real "before" look - anyway, none of that mattered, just dove in with the evaporust and many hours of scrubbing, sorting, scrubbing, sorting, we had it fairly broken down, and a massive parts/seals/gaskets order placed right in time for the holidays to jack up any service availability, shipping, etc. So we do what we can do, and break out the project plan by phases, stack each part of the phase in a labeled tray, and get to work on the frame/mounts/etc. Someone had apparently installed the last swingarm with a 15lb sledge and bent the crap out of the bolt inside the sleeve... that was a fun extraction.

IMG_8847.jpg

I'll spare you photos of my highly OSHA-Approved, totally safe, spray rig in a 40 degree shop (timed just right with a nasty cold snap and a heater failure), but my son did a fantastic job priming and spraying - and gave me one of the best lines, when he put the sprayer down at one point and just said "dang 3D objects", when he realized he was missing an angle on all of the pieces.
IMG_8855.jpg

Still waiting for parts, we started doing some planning on the look we were going for, color scheme, etc. I happened to have some Honda/Acura paint from code B-518P, Midnight blue - and since it seemed it was always late nights on this thing, the name Midnight started bouncing around and stuck with Texas. So, it'll be that midnight blue on the tank, side covers, and the speedometer/control panel/headlight mount (eliminating handlebar controls other than brake/throttle clutch/turn , with a fairly aggressive cafe racer- inspired look. The rough mockup started here:
72565266683__52DD4519-5D8C-4C87-9693-479AA45BD8BC.jpg

Then we graduated from the table to the stand, and since it's too cold to paint, Still waiting on parts and there's this... we move on to electrical:
72577019130__AACA02B4-A850-43C1-83CC-5FC0DC30F0C5.jpg 72577730756__D616EB21-0B41-4CCD-A034-E9CDA5E4A15E.jpg
OK, Yes... I know, it's not technically the correct color wire to the neutral switch (and the high temp loom wrap isn't on yet), but it's hidden and this is why you never source extra wire from Amazon out of desperation and impatience., I guess it did say 7 colors, I just wildly assumed it was 7 different ones. Although, I will say, Amazon isn't all bad - I've been using those connectors below the wire in that pic for a while now and they're really awesome. Takes a little more work than a butt splice or crimp on blade connectors, but they look WAY cleaner, take an absolute beating and are temporarily submersible. Basically perfect for redoing 50 year old connections, or really any electrical build out.

IMG_8872.jpg

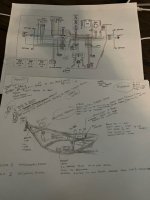
So, today is the last one I'll have for a week or so to really grind - what better time than now to build the harnesses and component pigtails, map out locations for everything and go pick up a battery that fits that weird size (I had 3 12v12a, all basically the same, but sideways so they don't work). OK - back to building the harness. In case you're wondering what it looks like to plan out something you've never seen, don't have a majority of the parts the harness terminates into, but have no intention of waiting. You plan the crap out of it. I like to take the schematic to a drawing of the area (frame in this case), so I can visually map in my head the structure, take notes on aftermarket connections/color swaps, etc. By the time you go through this exercise of transferring the line drawing from black/white to color and then from the color line drawing to the sketch, you've also damn near memorized all 30+termination points and 12 different colors and where they go.


IMG_8880.jpg

So, today, under the watchful eyes of the shop supervisor, we start pulling some wire. Little DIY tip here on 12V modular wiring that I've always used to save money, since wire is freakiing expensive when purchased in small amounts. I bought a ton of different colors of shrink tubing years ago (I think it was 1500 or so pieces), and I just buy white wire in bulk and use that for all "non-critical" modular wiring, and just tag every 9-12" of line and the ends with a little piece of that shrink wrap to keep the circuits separated, while being able to get a higher-quality wire. so it'll look like a mass of white wires inside the loom wrap, it's just an identifiable mass of white wires. Also a firm believer in planning and dry fitting and testing before wrapping, my OCD and messy wiring don't mix at all, so I tend to go a little crazy here.


IMG_8877.jpg

Sorry for the long-winded post. Admin, please feel free to tell me if I need to break these up or remove photos. Next round will be determined by parts arriving. Most likely it'll be the hub and suspension rebuilds, slaughtering a goat to the rust gods to see if I can get the spokes polished or if I'm going to have to break down and remove/powdercoat/replace all of them, brake system rebuild, then tackle the engine. Incidentally, if anyone has a 450 motor that is out of the bike, but complete - some pictures of all four sides would really help me out here. It just helps make the exploded diagram work in my head.

Until next time - just remember that you only have to be 2% smarter than what you're working against, always check for ground and continuity before panic, righty tighty left loosey goes backwards when your looking at the wrong side of the bolt, and anyone can do this. They built these things with technology and equipment that wouldn't even manage an oil change on some of today's cars, always be patient and when you get stuck, start talking about it (that's where these forums are great).

tl/dr: Some idiot with a wrench got ahold of a pile of scrap, took pictures of it.
 
Your post is fine, we don't mind long and detailed threads because it covers lots of stuff. Pics are fine too, you can add up to 15 per post - but yours are woefully small when zooming in, a lot of close-up detail can't be seen (iPhone with online storage almost full perhaps?).

If this is your first DOHC 450 engine assembly, it is not a typical engine and there are many things you'll want to learn prior to beginning assembly. When you say 'supervisor' are you referring to someone helping in a co-op situation? Or did I miss your explanation?
Good to know. I intentionally downsized those pics since for the most part they’re just storytelling and not too technical at this stage. That and kind of a force of habit - all the restomod forums I participate in always raise a ruckus over photos and want smaller sizes or offsite links. When we get to the more detailed parts of the electrical and the custom control panel, I’ll make sure to go with the higher res versions.

While it’s been a few decades, not my first DOHC build. The early waves of the late 70’s early 80’s ones that needed rebuilds were coming through the shop back then. I’ve done a ton of air cooled stuff with VW’s so I’ve done the torsion lifter dance as well. So far everything I’ve pulled has spec’d out pretty solid. Engine looks like it was partially dismantled at one point, and mercifully boxed and set aside (minus the drain plug, oil filter, head retaining nuts) but cylinder walls look really good, just a hone and new rings, maybe a first step bore at most.

I haven’t cracked the lower case yet, just the exterior covers to inspect what I could before really diving in. I’m sure that stage it going to be a very intentional step by step process. The good thing is there’s tons of resources out there on these engines.

The shop supervisor is my dog. He sticks his nose in like any good meddling middle management would.
 
If you're looking for correct color coded wire use Matt at https://www.vintageconnections.com/
Matt's a member here, aka Sonreir, and one of our approved vendors
Nice! Every vendor helps. I’m switching everything over to silicone, and there’s a couple of random one-off runs (neutral light, brake light stop switch, flasher relay to switch, etc) so, I have to get a little creative as silicone tends to be solid color wires (or at least 90% of my stock in hand is). I figured since I was going from absolutely zero that the flexibility, weight savings, etc would be a good thing - plus also trying to stay under the build budget. It’s amazing how fast little crap like wires, replacement switches, etc add up.

As for the build, I got going on the electrical (obviously) a lot later than I wanted to yesterday, but that’s life sometimes.

The previously wired points had some interesting splice work and were from 2010, so I now have at least one more point in the timeline of this bike that something was done right before the bike was sold in 2011. I had about a 95% expectation of replacing the coils, but tested them anyway. Sitting right at 3.5 ohms so I think I’m just going to set them aside as emergency spares and bite the bullet on new coils.
9D7C383C-DA72-4107-869C-5716DF2248CB.jpeg
Pulled them off, cleaned up the bracket and moved on to building out the harness.

After about an hour of agonizing over which side of the battery box I’d be putting the regulator/rectifier on, which side of the bike to run the tail harness, which side of the head tube to come up to the front harness plug and where to locate my ground lugs, I just dove in and started bringing the spaghetti monster to life.

0596B6ED-B9F8-4035-A0E8-1BA481B1B6A7.jpeg

Unfortunately, didn’t get nearly as much done as I wanted, but I did get heat back in the shop so more of a one step back, two forward kind of thing. Might have a chance tonight to at least get the rest of the ground taps run and the control panel harness connection/pigtails put together.

I was hoping for wrapped and dry-fitted/trimmed, but that’s the nature of any project. Sometimes they hit traffic, like this:
1C3785B8-C6DC-4369-B28A-51A365F19505.jpeg

Measuring out how much line I needed, I discovered the ultra-rare 50% Bluetooth mount for the neutral switch, so that’s going to need some attention. It’s kind of funny, but I feel like the PO snapping that bracket off may have been where they set aside the project and eventually forgot about it. Just about every part of the engine was touched/opened up prior to me until you get here - that’s the last opened gasket.

Oh well, given the fact that it really isn’t bearing much torsional load, I think I can get away with popping the dremel out to clean that area up, do a little JB Weld repair. Absolute worst case I’ve got a couple of welding jobs that need finer skills than mine and I’ll just run those down with this and see if he can build up a little tang there or has any ideas. I could likely rig it to work regardless, but if I’m going to be this far in, I’d rather get it as close to designed as possible.
 
Oh well, given the fact that it really isn’t bearing much torsional load, I think I can get away with popping the dremel out to clean that area up, do a little JB Weld repair.
Looks like you still have part of the screw left in the broken post. You could try drilling the screw and using an easy-out to extract it. There would be plenty of thread in the remains of the post to attach the neutral switch. Once the screw is extracted, you could then clean up the post to make it flat and use a spacer to get the correct height.
 
Looks like you still have part of the screw left in the broken post. You could try drilling the screw and using an easy-out to extract it. There would be plenty of thread in the remains of the post to attach the neutral switch. Once the screw is extracted, you could then clean up the post to make it flat and use a spacer to get the correct height.

Yeah - I did some light poking around at it. It's in a really awkward spot in my shop right now, and I didn't feel like lugging it over to better light until I was at that stage, but you're right, there is still some screw in there, I'm not sure how far into the case that runs as the PO(s) had an apparent affinity for just grabbing stuff at random.

Up to this point, I had only done a pretty light once over of the engine, and I decided that the combination of this little screw thing, and these couple of little things on the exterior covers has me thinking I might just yank all these off right now and take it all with the cylinder heads to my buddy at the machine shop and see if they can do anything to clean up that chip and do something about that alignment on the sprocket cover while honing the cylinders and rebuilding that screw hole.


Stator cover chip.jpg
sprocket cover damage.jpg

The fun part about all these projects - you never know what you'll find when you start digging through them, but the before and after makes it worth it.

On the brighter side - she's got keys and functional wiring! Ignition switch showed up a couple of days early, which means the big parts order should be here any day now. It'll be nice to get the electrical components mounted so I can tie off and wrap the harness, and get cracking on the suspension and brakes.

Harness dry fit, connectors installed, continuity checked - ready for trim and wrap when the components arrive.

Harness.jpg


Keys!!.jpg
 

Attachments

  • IMG_8880.jpg
    IMG_8880.jpg
    44.7 KB · Views: 1
Looks to me like someone tried to pry the front sprocket cover off and it got flexed out of shape because of it. With only 4 screws holding it, it's hard to understand how that would have happened but I've learned that POs can do some inexplicably ridiculous things.
 
I'm not sure how far into the case that runs as the PO(s) had an apparent affinity for just grabbing stuff at random.
The standard screw is 6x10mm and the depth of the standard post is about 18mm. Judging by where it broke off there are only a few mm of screw in there.
 
Haven’t had a chance to make a ton of progress this week. It seems like every parts order is 85-90% and pending one item. Oh well, it’s giving me a chance to puts with some other stuff and clean parts.

Got the harness completed and wrapped. Waiting on the GPS speedo and one stupid 3 way switch to complete tie offs at the front end, dry fitted, but I want to play with the routing at the head tube to try and minimize as much visible wire as possible.
77E4BAF0-37F9-4060-A76C-448CE565A791.jpeg

316076C2-D4CB-437D-B073-6C109752344A.jpeg


9D7B7963-9540-451F-A7B1-50F0EA43B8E7.jpeg
Hardware finds are fun. This was all on the same coil mount bracket.


It did get me looking at the previous coil set that was there (pic in prior post) and the random red Home Depot wire that appears to be intended as a ground, which makes no sense as the mount should be grounded already by virtue of being bolted directly to the frame, unless I’m mistaken? That ground wire isn’t anywhere on a wiring diagram.

Started breaking the wheels apart to get going on bearings/seals/brakes/cleaning which is always a good time with the heat gun.

Side note. Please don’t hammer out these bearing retainers. Good grief, your angle grinder tool works perfectly.

C38D73B4-5AE3-4BF7-8F95-6A58842E1D31.jpeg

Got them first round cleaned, they’re going to need some intense work to get some of the scale and there’s this weird layer of waxy hardened junk all over this thing and it takes forever to get off as it appears to be impervious to solvents - but they’re prepped and ready when the seals get here. The rear rim has some decent curb rash, but it’s small enough that I might be able to get away with some cheater after new tires are installed.

6CEBA578-D47C-4D16-A959-1D35A5FF454A.jpeg

Should have a roller by Monday if my bearings get here - then time for the engine and carbs.

Knock on wood, nothing too crazy outside of a couple mangled fasteners so far, and some missing hardware.

Speaking of tires. Does anyone have a decent source? Somehow a city the size of Dallas is almost a bike wasteland (unless it’s a HD).
 
The coil bracket needs to be grounded only because of the factory mounting location of the condensers, that's all. Coils themselves do not need a grounded mount alone.

Too bad you didn't wait to put the frame over the engine before assembling stuff on the frame, but the 450 engine actually goes into the frame more easily than a 350 IMO.

I bought Shinko tires for my 450 from Chaparral Motorsports - https://www.chapmoto.com/shinko-712-rear-tire.html
I really like them, they handle great and give a solid feel of confidence.
 
I think you're 'waxy substance' is old yellowed clear coat. Paint stripper works.
It almost smells like baked on pollen or something like that. It’s got a definite odor to it… whatever it is has hermetically sealed to some of these surfaces. But that’s what kids are wire brushes are for. Want a bike when you turn 16? Get to scrubbing.

The paint thinner does help a bit. I found that dipping a brush in it then scrubbing starts working it loose. I was actually thinking of trying some paint stripper to some of the metal that’s just going to get polished or painted later to test that.
 
The coil bracket needs to be grounded only because of the factory mounting location of the condensers, that's all. Coils themselves do not need a grounded mount alone.

Too bad you didn't wait to put the frame over the engine before assembling stuff on the frame, but the 450 engine actually goes into the frame more easily than a 350 IMO.

I bought Shinko tires for my 450 from Chaparral Motorsports - https://www.chapmoto.com/shinko-712-rear-tire.html
I really like them, they handle great and give a solid feel of confidence.
The rigged up ground wire threw me for a bit of a loop, as I’ve always grounded the coil to the retaining bracket in every vehicle (with external coils). And in this bike, that spot is the cleanest ground with only 0.2 ohms of resistance measured from there to the upper shock mount.

I had originally planned on using that thru bolt at the base of the head tube as a central grounding lug with a cool copper bolt that I had laying around, but it was registering almost 4 ohms of resistance and continuity was spotty and the next spot along the line that works is to run right to that front bolt retaining the ignition switch and coil bracket.

Oh. And all the stuff on the bike is just finger tight. Some of it there to measure for the wiring harness and others because they kept migrating around the shop and I didn’t want them growing legs, after spending over an hour digging through boxes finding the matching sets amidst all the random crap. Like the full set of valves I just found for what I think is a 550, maybe they got swapped with the missing rotor bolts.

I’ve hit my space limit and need to do some reorganizing this weekend to clear enough space to get some of this stuff a permanent home until it’s time, and get the engine up on the lazy susan for the real fun to begin.
 
It almost smells like baked on pollen or something like that. It’s got a definite odor to it… whatever it is has hermetically sealed to some of these surfaces. But that’s what kids are wire brushes are for. Want a bike when you turn 16? Get to scrubbing.

The paint thinner does help a bit. I found that dipping a brush in it then scrubbing starts working it loose. I was actually thinking of trying some paint stripper to some of the metal that’s just going to get polished or painted later to test that.
Nothing like an economics lesson in sweat equity.

Try acetone too, even better. If the acetone takes it off then it's not clear coat, that stuff is tough, nothing but stripper or sandpaper/abrasives will remove it.
 
The fun part about basket case builds with anything is the complete unknown.

Finally got around to a complete parts breakdown on the engine.

Cracked and inspected the lower case, new oil pump since I was in there, new clutch, everything else looked surprisingly good. It had been sitting drained and dry for years, so just some crust removal, light coat of oil, new seals/gaskets and replaced the retaining nut since it was looking a little chewed on and I hate that design with the fire of 1000 suns. Also waiting on a replacement rotor flange bolt to button that side up with new gaskets.

Cylinders out for bore/hone, should be good for a step one ring change and that’s it.

Got to the top end area of the parts bins and this is where things start getting fun.
I really like the parts breakdown on csml’s website, I had the laptop up with each section and just started sorting until I found complete sets and started stacking those all out.

Luckily, almost all major components were there, except the tach assembly innards, and there looks to be an extra set of valves for a different bike - almost an in-between size to the CB450’s. Oh well, set them aside and I’ll see if I can find a part number later.
Then this…

3EC21346-6328-422B-9F66-048893777E2B.jpeg
The elusive 5v DOHC setup, that’s so the two half followers can team up. I managed to source 2 NOS followers that I can use to see if the second and third ones down are salvageable and create a template to see if the others can be resurfaced or rebuilt enough to function as emergency spares. Little bit of sticker shock on those!! 3-4X all the post-81 bikes. And availability, the stuff on eBay that people were asking $100 for didn’t look much better than the top one in my photo.
So, I’m going to home for the best and keep poking around to find a couple more NOS, unless there’s a specific wear pattern that would be more prevalent - it’s impossible for me to tell exactly, since there’s no way to know which cam these were following to which valve - if so, I can definitely get away with putting the new stuff there and salvaging two from this stack.
It’s honestly kind of surprising that nobody out there has stepped into this market void, but I guess the scalability of tooling something like that would either lead to a junk materials product or borderline custom forged. I see now why some out there start screwing around with rollers and spring conversions.

While on the subject of parts, it seems like a real hodgepodge out there. I gave those guys in Houston a shot because they had a bunch of stuff that I needed and we’re just down the road from me - after spending two days chasing a damn gremlin in the 100% new from the ground up wiring harness that turned out to be a bad ignition switch and basically being SOL because I had clipped the plug off to shorten the wire and match my harness - i definitely need a new source for engine parts.
 
Good used followers are hard to find for sure. The worst ones are typically from the exhaust cam, last to get oil flow on cold starts and most aren't aware so they fire it up and ride off before oil flow arrives. I believe Rockers Unlimited has a NOS follower to use for refurbishing these followers, Jim (LDR) did much research and sent them one after our previous go-to (Delta Cams) was sold and the work quality went south. MegaCycle Cams also does cam and follower refurbishing, but their prices are the highest (though their work quality is also as good as anyone's). Typically $100 each for followers, it's almost (but not quite) like buying NOS, check out David Silver's price. https://www.davidsilverspares.com/parts/by-part-number/part_14431292010/
 
Last edited:
Not Oregon Cam. Rockers Unlimited in Redding CA does the rockers and has the NOS rocker for QC checking.

Still need the DOHC 450 cams in New or excellent condition so Oregon Cam can make masters.
Thanks for clarifying Jim, I need to make a note for future reference.

NOS is likely the only way for the 450 masters, since most 450 cams are average to poor (especially the exhaust) when you find them used
 
Thanks for clarifying Jim, I need to make a note for future reference.

NOS is likely the only way for the 450 masters, since most 450 cams are average to poor (especially the exhaust) when you find them used
Yeah, that's what I've seen so far. Since I have zero use for those cams by not owning one I'm having a hard time investing the money to buy NOS.
 
Yeah, that's what I've seen so far. Since I have zero use for those cams by not owning one I'm having a hard time investing the money to buy NOS.
Agreed, even in my case - neither of my engines will have stock cams, and I only have a decent stock intake cam which is pretty typical of the breed as used ones go. NOS is too pricey for me to invest in and let sit.
 
Not Oregon Cam. Rockers Unlimited in Redding CA does the rockers and has the NOS rocker for QC checking.

Still need the DOHC 450 cams in New or excellent condition so Oregon Cam can make masters.
Thanks for the tip! It’s actually perfect, just got off the phone with Gary up there - sent photos and measurements and he’s going to come back with basically a percentage chance of rebuild and cost.
Bonus they’re pretty close to some family I have up that way so if this works out, I may start buying cores and build a stash it’ll be my 450(k)instead of 401(k).

Either way, managed to find 2 more NOS from a place in Austin for a surprising $80/ea so I’ll have 4 new followers and one of the sets of cams is pretty clean looking for sitting in a box unwashed for over a decade. If the rebuilds pan out I’ve got some spares, which appears to be the best-case scenario. Definitely going to have to cobble together a full backup top end, given what parts availability is looking like.
 
...I may start buying cores and build a stash it’ll be my 450(k)instead of 401(k).
LOL, but they WILL be worth more money as time goes by - but not likely enough to retire on.
Either way, managed to find 2 more NOS from a place in Austin for a surprising $80/ea so I’ll have 4 new followers and one of the sets of cams is pretty clean looking for sitting in a box unwashed for over a decade. If the rebuilds pan out I’ve got some spares, which appears to be the best-case scenario. Definitely going to have to cobble together a full backup top end, given what parts availability is looking like.
Sounds like a good find. If you follow proper warm-up procedure, idle as low as you can without revving it up for at least 1 to 2 full minutes before riding away, you'll be fine. With stock exhaust on it you'll be able to hear the loud 'hissing' sound quiet down to less than half when oil flow arrives in the top end.
 
Yeah. Somewhere along the line with air-cooled engines people got the idea that a “calm” drive replaced just letting it idle, and with a bike, vintage or not, they’re still loading that unlubricated block up.

Speaking of valves and break in, since I’ll be reusing a cam with new followers that’s going to be different. I’d normally start a hair loose for the first 50 miles and adjust with a paired set, but I think I may want to go a hair tight as the followers seat in?

I see all kinds of valve settings out there, but I don’t see any specific reason that going either direction from the manual would somehow magically improve oil flow to the top end and seems like it could make it a bear to time and sync. Is there anything I’m missing that would make sense to run a looser intake valve?
 
Though there might be a slight gain to having the valves adjusted a bit loose, I wouldn't imagine much or enough to be realistically felt. With stock cams I set the 450 at .002", FSM calls for .0012" and we used to set them at .0015" at the Honda shops I worked back in the day (using long sections of shim stock to loop around the lobe). My MegaCycle cams call for .003" intake and exhaust and their hotter cams go as high as .004" and .005" New followers on existing cam lobes will not be an issue and I wouldn't expect much of a change in clearance after the first 50 miles or so. Can't hurt to run a higher zinc level oil like Rotella T4 15W40, with my camshafts I add a little ZDDP to it as well. Probably doesn't need it but it hasn't hurt either. The DOHC 450 apparently wasn't as prone to valve recession as many of the others in that era, my valve adjustments haven't changed more than .001" in over 3000 miles, most of which was pretty hard.
 
Well, not exactly what I was looking to find here in the land of PO boxes... After pulling the parts diagrams and lists, I've laid out each page by component, and associated hardware, seal and gasket. of course only missing the real fun stuff:

Cam Follower Nut (missing) - $2 piece of metal made of unobtanium, now $25
Cam Followers (trashed - also unavailable without blood samples)
Stator retaining bolt - made of the same unobtanium as the Cam Follower Nut

Oil Filter was apparently last installed by Paul Bunyan's younger brother Rusty, stator puller bolt hole was stripped down about 2 threads, so I had to grind the end off my puller to get enough threaded area to bite - you know, the usual fun stuff on these. Stuff like this - pretty sure that's not the correct washer.

IMG_8960.jpg

Replacing everything hardware with the new where at all possible (particularly all those JIS screws made of the softest metal available).

Then I get to this conundrum:

IMG_8964.jpg
IMG_8965.jpg

Obviously, not stock... 3mm oversize, so good thing I checked all this stuff a little better before taking it down to the machine shop. This'll be new bore/gasket or new pistons/rings.
This Oversize bore appears to be a fairly standard "upgrade", so if I do decide to go that route is there anything that needs to be done from a tuning/top end perspective. It's essentially a 5% increase in air demand.

For the oversize, since they're pretty much all aftermarket, is there a brand better than others? I don't mind the cheap stuff on the valve cover and cam end gaskets, but I always prefer OEM or as close as possible for high-stress areas.
 
That's the second set of 3mm oversize pistons in a 450 in the last week, the other set found in a spare CB450K0 engine @wentwest is working on. I did a search a few days ago looking for rings (or new piston sets) for his 3mm over pistons with no luck. You could either buy used cylinders and go 0.50mm over with piston sets readily available, or pay a LOT more (around $500) for 4mm oversize piston sets and get your cylinders bored to fit.
 
That's the second set of 3mm oversize pistons in a 450 in the last week, the other set found in a spare CB450K0 engine @wentwest is working on. I did a search a few days ago looking for rings (or new piston sets) for his 3mm over pistons with no luck. You could either buy used cylinders and go 0.50mm over with piston sets readily available, or pay a LOT more (around $500) for 4mm oversize piston sets and get your cylinders bored to fit.
I have a feeling the route I’m going to end up going is returning to stock or thereabouts. New cylinders and pistons are dime a dozen it appears.

These pistons do have rings so I might try a dry stack compression check at the machine shop. It’s not extremely scientific with the parts out of the motor but it’ll at least give a ring spec to work from if I go that route and take the whopping 4.2% displacement gain - who knows, could add 2-3 HP.

Well. Plenty of time to ponder whilst I peruse eBay for random nuts and bolts.

Probably bite the bullet on the Charlie’s place ignition while I’ve got the PayPal out. Seems to have the best reviews and doesn’t have the big ugly Shockwave thing. That still uses the factorybadvance plate, correct?
 
It does, along with the factory advancer unit on which you should check the springs and wear areas, along with cleaning and lubricating lightly.
 
I definitely going to try to put together a more standard set of cylinders and pistons. I feel like the 3mm over-bored cylinders and the one piston missing rings that I have are going to be more and more trouble. Obviously nothing is going to be thrown away, and maybe there will be a day when I'll want to try again, but for now I'd like to actually get something done. Lately I've been feeling like I should pull things together in the garage and maybe clear out some old scooter parts I'll never use. Getting old and watching friends get even older is scary and I don't want to leave my kids and wife to deal with all this stuff.
 
Going back and forth on which direction I feel like going in on this cylinder thing, and it’s too dang cold to get fiberglass to set, so all I have is time right now.

Honda did make a 73mm bore piston for the XR250R engine. Just some quick poking around and those rings look suspiciously close to the MC Brand 3.00 pistons.

I may swing past the Honda Powerwports store and see if they have a set on hand.
 
I may swing past the Honda Powerwports store and see if they have a set on hand.
If they're decent people, maybe they'll let you open the package and slip one of the rings into one of your pistons to test-fit in the ring land to be sure (not actually put it on the piston).
 
I think I searched and turned up something that made me thing the top 2 rings were too thin, but let me know for sure if you get to try one.
 
I think I searched and turned up something that made me thing the top 2 rings were too thin, but let me know for sure if you get to try one.
Well. The parts kid looked at me like I had 3 heads when I brought that old 3.00 piston and a ring in but wanted to look at parts for a 86 bike.

He wouldn’t let me test fit it, but they appear to be almost nuts-on from a visual inspection. Running the oversized bore has me intrigued, so I ordered the absolute cheapest Amazon set I could find, since they tend to always be on the absolute low end of spec. If those $10 rings can work, then the factory or decent aftermarket would definitely work and then the long term issue is solved.
 
He wouldn’t let me test fit it, but they appear to be almost nuts-on from a visual inspection.
So are you saying he wouldn't open the box? or he wouldn't let you slip one into the ring groove? (And to be clear, previously I tried to convey that you wouldn't have had to put the ring actually on the piston, just slip one of the rings into a land to check width/thickness of the rings). If not then it's just a sign of the times, back when these bikes were a lot more current pretty much any dealer would have opened the box so you could at least check the width before buying them.

ring test.jpg
 
Yeah. They wouldn’t open the package so I had to go by visual and laying the ring I had over it inside the plastic.

Anyway. I got the Amazon cheapies and the MC set that I already had and dropped those off with the heads. He’s going to test fit both after boring/honing to see how they fit and I’ll ride with those. Hopefully the other rings can work as backups if needed, otherwise this set of rings is likely this engines last ride as a +3.

What’ll be interesting to figure out is if I’m going to need a larger secondary jet. I don’t imagine a ~5% displacement difference would create much more demand, but considering how tight we’ll be on the sleeve walls, leaning out at 4-7K RPMs would seriously shorten the life of the top end.
 
Back to the drawing board on those rings. They fit, seemed good, but the leak down test said otherwise - on a fresh hone as well. Really odd readings - almost like one of the rings was fluttering.

Looks like we’re rolling with the MC rings made of unobtanium until those crap out, then rebuilding the engine back to stock.
 
I share your disappointment. The old rings are pretty wide and the "flutter" could easily be the reason you get odd readings. I wonder if you could put one (or 2) of the oil control rings in the same slot as the first or second ring to help fill the space? Seems crazy, but ... sometimes crazy works. And sometimes it fails really badly.
 
I’m going to have to rename this bike Donkey… freaking stubborn as a mule.

So, got the lower case split and everything out:

95D65920-155F-44F5-B5A5-30CBAD0C2250.jpeg

For once, something in this bike went to plan here - pretty smooth process of cleaning 50 years of gunk out. I tried something new here and used a cooler as parts tank with my of sous vide machine pumping 135 degree warmed cleaning solution. 24 hours in that and things really clean up!

Reassembled the bottom end, new seals, cam chain, oil pump, clutch, realized I had the stator wiring 180 degrees off (too long). Pulled it, trimmed new connections, put in a mounting stud to repair where the P.O. had snapped the screw base clean out.

84ACFA24-ED03-4DA0-BD37-67CBD2096B13.jpeg

Went to go grab a hop flavored water out of the bar and saw a UPS notification from about 90? Minutes prior - awesome, more parts. Go outside and… thanks UPS:

381B03D0-3B3B-4E22-B67F-EB94593FAD89.jpeg
Dumped in the gutter while it was raining. Outstanding work.

Back to the bike:
Got my cylinders and pistons in. Those old-style iron oil scraper rings are really fun on that 733mm bore.
Myotonic the head to about 80%ish - took way longer than expected there due to my own negligence - mixed the torsion tubes and valves by accident when cleaning everything and totally forgot about the A/B pattern. Side note, if you have a fairly dexterous child, those collets are way easier for them. Probably saved at least one cursing outburst there.

CCC662E7-EF98-47C2-AE3E-3423733B18E3.jpeg

Won’t have a chance to do anything much for the week. I’ll button up the rest. mount the heads, finish the cam chain routing next weekend and that’ll be a complete engine rebuild with new pistons, rings, all oil seals and gaskets, new cam followers (broke down and shelled out the $440 for 4 NOS. In for a penny, in for a pound). So that’ll leave me with (if I’ve done my math right) with a 542CC twin running close to 11:1 compression which means race fuel and probably retarding the spark a hair - either way it’s going to be a ***** to time.

After that, the last “big” piece is sorting out fuel delivery and this is where things are getting weird. In the box that said “carbs” there was basically a pile of parts that I started breaking down and sorting out.

Got to rolling on the first rebuild and everything from the GH14 rebuild kit was a dead match until I got to linkage and it started looking odd. Old style idle jet, small differences in the linkage on the butterfly valve. etc. strange but whatever. Grab the second body, marked “right” and hello Captain Dyslexia! That’s another left.. and another… and a fourth with a stripped main jet tube. Briefly toyed with the idea of seeing if I could just flip linkage around - nope, thought about just running two rights, but that sounded just as dumb then as it does now.

Hopped on eBay to find a LH body in decent shape, which got me thinking about trying to trade two of my rights for one right or selling those to offset and it turns out those carbs in the box were the precursor to the GH series that was used way early on. Unleash saved cursing episode.
08261973-0148-4565-898B-78D853F6AE4A.jpeg
So. I’m considering just going aftermarket on the carbs since I’m possibly going to have some different fuel needs from stock. Any thoughts on this?

Oh. And I built a seat. And mounting brackets that’ll provide just enough space to attach a lockbox for a subcompact CCW. Sorry, apparently the only picture I took was the template. The bracket allows the seat to flip up to access the battery compartment, etc.
CFB78E05-7333-49FA-8AAC-61983753B7E3.jpeg

A01351C8-CDF7-47CC-9528-743C3A3485BB.jpeg
FD85C12B-FB68-428B-A273-D9E1963F783C.jpeg
44D785BA-C0D8-49AA-8FB2-9FD0D4697CFF.jpeg
63DCE60F-2968-41D1-9E2C-FE0253A2855C.jpeg

So. That’ll do it for now. Got the spark/electrical and the air - time to solve the fuel.
 
Go outside and… thanks UPS:
Dumped in the gutter while it was raining. Outstanding work.
I feel your pain there, I've had many packages dumped outside somewhere near my house but fortunately none have suffered any real damage despite sometimes getting wet like yours did. All carriers seem to be that way today, equal opportunity carelessness.

So that’ll leave me with (if I’ve done my math right) with a 542CC twin running close to 11:1 compression
You'll get a little bump in compression ratio but I'm not sure it will be quite that high, the domes on your pistons look a little bit lower profile than the 11.6:1 pistons in mine. Stock piston on the right
20161213_110545.jpg

and your actual displacement will be this
73mm.jpg

I run ethanol-free 90 octane in mine with no issues.

Looks like you got ahead of yourself, it's easy to do.

450 top guide sprocket.jpg
 
I feel your pain there, I've had many packages dumped outside somewhere near my house but fortunately none have suffered any real damage despite sometimes getting wet like yours did. All carriers seem to be that way today, equal opportunity carelessness.


You'll get a little bump in compression ratio but I'm not sure it will be quite that high, the domes on your pistons look a little bit lower profile than the 11.6:1 pistons in mine. Stock piston on the right
View attachment 29113

and your actual displacement will be this
View attachment 29114

I run ethanol-free 90 octane in mine with no issues.

Looks like you got ahead of yourself, it's easy to do.

View attachment 29115
Yep. Realized right when I took the picture. Good thing I can do that just pulling the intake cam. That exhaust cam is a fingertip eater. I’m just glad I caught the roller in the cylinders before getting the pistons in. Getting crap in various stages of tear down makes it really hard to know what “before” was supposed to look like.

Also. I thought the stroke was 64.8. That changes things up quite a bit. Gives me maybe 9.7-1 ish. I was planning on ethanol free 90 since that’s what I’m running on my boat and it’d be way easier to just fill that and run a siphon when I need to for the bike. Makes the carb/timing thing a relative non-issue. Snapped up a RH body and springs. May run into a loss of max power at higher RPMs, but we’ll see.
 
That exhaust cam is a fingertip eater.
Not sure what you mean, perhaps it has to do with how you're assembling the head. I wondered when you mentioned the valve collets, the 450 head is the easiest to install valves in ever. Since you mentioned having done 450 engines in the past, have you looked at this to refresh your memory?


I thought the stroke was 64.8.
Yeah, that's the stroke of the 500T, Honda stroked the 450 to get there instead of going bigger on the bore.
 
The install process is basically the same, I just have limited flexibility in my right fingertip and always catch my dang cuticles due to the lack of feel.

The rust is definitely showing. I thought more of it would come back, but I guess 30 years fades some memories for sure and I need to slow the F down and quit racing this randomly self-imposed March 2nd deadline. Leads to stupid mistakes like actively watching yourself drop all four torsion bars into the parts cleaner thinking “this doesn’t look right” and costing time going back to fix.

Most likely the stubborn donkey here isn’t the bike.
It's all good, that's why we're here - to help refresh the memory. Believe me, it had been close to 40 years between 450 engine jobs for me but then again, I did it for a living for the better part of a decade when I was young so I guess it stuck a little better. But, I still made a mistake during my 450 build in 2016 when I disassembled an engine part (oil filter cover) I never had to touch back then because the engines were still pretty much clean inside. Not paying close enough attention to proper assembly, I put it together in a way that was close to correct and it mostly worked right, but caused intermittent oil flow and I ruined a couple of left exhaust cam bearings and the left exhaust cam lobe and follower before discovering how stupid I was.

 
So. I immediately went to check my oil filter, as it was completely seized to the engine when I got it, but cleaned up well and didn’t strip at all removing it - when reinstalling just followed the schematic, lined up the two holes in the cover and considered it good. By sheer kick I had it aligned correctly, but that’s a horror story in pictures right there.
 
So. I immediately went to check my oil filter, as it was completely seized to the engine when I got it, but cleaned up well and didn’t strip at all removing it - when reinstalling just followed the schematic, lined up the two holes in the cover and considered it good. By sheer kick I had it aligned correctly, but that’s a horror story in pictures right there.
Well, realize it wasn't the cover itself misaligned with the oil feed/flow passages, it was the loose oil filter valve in the cover that was the culprit. But yeah, it cost me a few months of discouragement, head-scratching, and a few hundred dollars for just not noticing the little holes for the valve alignment tabs. If you never actually disassembled the valve in the cover, yours is probably still assembled as it was from the factory. Back when I was still working in the business we never took them apart because there weren't many really sludged-up engines, they were too new then.
 
I actually did replace that valve piece with NOS parts as I really wanted everything oil delivery as absolutely new as possible. I remember it feeling a little odd until a little wiggling so I popped it back out to check out later - kind of retracing my steps right now and double checking to back up and organize the rest of this a little better.

In doing so,
Check out that supposedly NOS Rocky 73MM head gasket. Welp, looks like the project was going to take a pause anyway.
 

Attachments

  • 2F2C5CA0-1428-44CB-8F0A-249EAFB597D8.jpeg
    2F2C5CA0-1428-44CB-8F0A-249EAFB597D8.jpeg
    2.2 MB · Views: 9
Back
Top Bottom