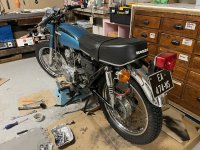
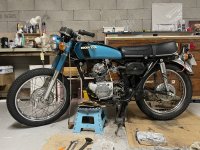
CB125 K5 '76 - 1st weekend.

That starter cable worries me. It carries the live feed from the solenoid to the starter motor, not protected by the main fuse. Only live when the starter button is pressed, but potential there for problems if the insulation was damaged as a result of incorrect routing. It should be held in clips under the engine, then routed up behind the engine through the hole in the frame provided for this purpose. Probably an engine out job to do this correctly.
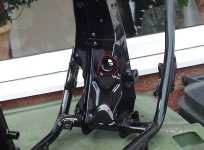
1782892613684.jpeg
 
That starter cable worries me. It carries the live feed from the solenoid to the starter motor, not protected by the main fuse. Only live when the starter button is pressed, but potential there for problems if the insulation was damaged as a result of incorrect routing. It should be held in clips under the engine, then routed up behind the engine through the hole in the frame provided for this purpose. Probably an engine out job to do this correctly.

View attachment 58937
.. I see. Not simple. This may be a job for later. I am still thinking about whether I will keep it and restore the bike properly - ie, strip it down and rebuild - in which case this particular task will be addressed. Or I live with it for now and I just tuck it out of the way and just use the kickstarter. I still feel like I'm assessing the whole project right now.
I came to the conclusion that the starter motor is not working because I tried it with this cable attached and nothing happened. The solenoid clicked. I have power at the end of the cable, when i press the starter button - so this suggests the starter needs attention - either a rebuild or replace - I haven't got that far yet.
 
Beat me to it, like the 17 and 200 engines, there should be a retaining clip to keep those wires away from the sprocket. Easy enough to fabricate something.

View attachment 58933

I have removed sprocket cover to check this. I do not have any hole or any mounting point to fix this clip. The only possible way is the slot with casting rib just under the cover. Surprising ...
 
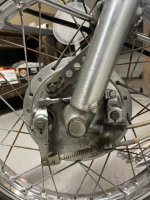
Front wheel brake hub.jpeg Ok, I'm going to take the wheel off to change the tyre. This looks like a spring-loaded trap from hell. I see I have to take off the brake cable somehow. Also the speedometer cable. Like I say, this looks like a trap for old Numpty to walk straight into.
 
Do I.. pull the cotter pin at the end of the brake cable? Then slide it off? Then it is still attached by a clamp with two nuts either side.
The Speedo cable looks like I undo the screw? Then unscrew the cable?
Help.
 
Hello,
1) Brake cable: Release tension from the spring convered by the rubber cover by screwing regulation nut. Cable end barrell can be released then from the drum brake arm. Then unscrew front nut and pull the cable.
2) Speedo cable: uncrew the locking screw and pull out the cable.
 
Hello,
1) Brake cable: Release tension from the spring convered by the rubber cover by screwing regulation nut. Cable end barrell can be released then from the drum brake arm. Then unscrew front nut and pull the cable.
2) Speedo cable: uncrew the locking screw and pull out the cable.
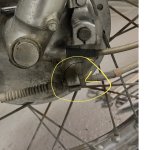
Screenshot 2026-07-02 at 12.51.21.jpegis this the regulation nut?
 
I have removed sprocket cover to check this. I do not have any hole or any mounting point to fix this clip. The only possible way is the slot with casting rib just under the cover. Surprising ...
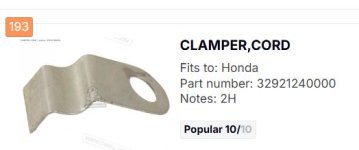
Odd. Just looking at the CMNSL fiche, this part is listed, on the large diagram it looks as though it is there to retain the cable in question.


1783085452330.jpeg
1783084403815.jpeg
 
Last edited:
Odd. Just looking at the CMNSL fiche, this part is listed, on the large diagram it looks as though it is there to retain the cable in question.

Thanks, I've seen this, but I have no retainer installed. Is there any special hole for screw to mount it? I can not see any hole in the casing
 
Thanks, I've seen this, but I have no retainer installed. Is there any special hole for screw to mount it? I can not see any hole in the casing
I wonder if it uses one the cover mounting screws, If so, you could see how it could easily be misplaced, But then, I'd expect a recess in the mating surface to make room for the thickness of the retainer.
 
I wonder if it uses one the cover mounting screws, If so, you could see how it could easily be misplaced, But then, I'd expect a recess in the mating surface to make room for the thickness of the retainer.
Exactly, I have no recess. There is also an option, that there is a pin (no 286) or the rounded cone just behind the neutral sensor module
 
Hello.
Progress Report.
Been a bit too hot here in Southern France to do much. Laid off the tire fitting to the local moto garage.
New tires. Mitas H03's.
Cleaned wheels. Trying them on for size. I think they look cool.
Brakes cleaned up - new shoes.
Swingarm ok. Did a bit of rust repair in a couple of small spots on the frame.
Was thinking of ordering a chain and sprocket kit - but to be honest they don't look too bad after a cleanup.
I like the way she looks with the front mudguard off. A bit fierce.
IMG_7964.jpegIMG_7965.jpeg
 
Looks brilliant, like a new bike.

Mitas HO3s. I fitted those to my CL175, thinking that the semi block pattern suited the look of the bike. I never really gelled with them, always felt that I was falling off the edge of the tyre when leant over in a bend. Probably just me though, a contributor to Classic Motorcycle Mechanics liked them. I'm happier with a more rounded profile and softer rubber.
 
The only downside to removing the front mudguard (apart from the engine getting dirtier) is that you lose some structural integrity on the front suspension. That brace point keeps the forks more in sync.
 
Back
Top Bottom