Newbie Engine Rebuild? CA160

bpink43

Well-known Member
Joined
Dec 4, 2025
Total Posts
62
Total likes
42
Location
Missouri
I have a 1966 CA160 that will not run. I have done all the checks to this engine and cannot get it to run. Cleaned carb, point, have spark to the plugs but just have low compression. Left cylinder has about 95 lbs while the right cylinder only has about 70 lbs. I'm guess at a minimum I need to have the top end rebuilt. My question is if this is something I should try and tackle myself? I have searched for local rebuilders and really didnt come up with any good results. I've looked online as well and it can get really expensive fast, especially considering adding in the shipping costs. If I were to take the engine apart and tackle the top end, I'd also just want to split the case and inspect/clean the bottom as well. However, I have never taken an engine apart before and am skeptical of doing it myself. I have the clymer book already and the honda manual. Any advise on how I should proceed. Tackle myself or continue looking for local help? Below is a couple photos of the bike. Thanks.
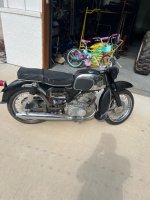
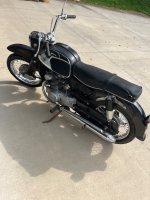
thumbnail_IMG_9971.jpg thumbnail_IMG_9972.jpg
 
Last edited by a moderator:
You really need to consider your skills, space, time and the amount of money you have to drop into this project. Really think about it before taking anything apart cause it be easier to sell if it is all together. If you do decide to go for it take lots of pictures and reach out with questions as you go to avoid any costly mistakes. Have you pulled the oil strainer apart and checked on how much crud and metal bits are in it? Post pics of what you find and knowledgeable members can advise on which way to go. Just my 2 cents.
 
First the CA 160 is one of the best bikes to work on . Throw the Clymer manual away and use only the HONDA FULL SERVICE MANUAL. Is this a one shot deal or are you going to build other bikes. I ask because of the special tools you will need to work on the bike. I see some of the hard to find parts on the bike are missing. Is the carb complete . They are rare.

A number of years ago I was in the same boat with a 1965 CB 77 . Few tools and no knowledge of motorcycles. It took 3 years and about $4000.00 to rebuild the bike . I went on to build about a bunch more and enjoyed a great hobby for years.

Think about it and let us know and we will try help any way we can to get you started.

Bill H
 
I should mention that the 77 was a wrecked flat tracker that sat in an open field for 7 years and was in pretty bad shape You are starting with a lot more than I had so cost shouldnt be as high.

Bill H
 
Yes as Ancientdad mentioned, I am in Missouri, Springfield to be exact. I have not pulled the oil strainer apart yet to check it out. I would consider myself a DIYer though. I just lack any firsthand knowledge diving into something like a motor rebuild. I do have most all the parts for this bike. I have the tank emblems, carb cover, and side covers. Carb is complete and I have already ultrasonically cleaned it and put it back together. I replaced the old selenium rectifier with a new sparck moto regulator/rectifier, cleaned and set the point and timing. I feel really confident in restoring the body and accessories of the bike, I’m just in more unchartered territory opening up the engine.
 
Yes as Ancientdad mentioned, I am in Missouri, Springfield to be exact. I have not pulled the oil strainer apart yet to check it out. I would consider myself a DIYer though. I just lack any firsthand knowledge diving into something like a motor rebuild. I do have most all the parts for this bike. I have the tank emblems, carb cover, and side covers. Carb is complete and I have already ultrasonically cleaned it and put it back together. I replaced the old selenium rectifier with a new sparck moto regulator/rectifier, cleaned and set the point and timing. I feel really confident in restoring the body and accessories of the bike, I’m just in more unchartered territory opening up the engine.
I will tell you that we've helped complete noobs do their first full build here including engine work, here are just a couple examples.


So if you have the motivation to read here and learn, know the basics of how an engine works and are willing to be patient as we help you based on the information you give us and the (ton of) pictures you should take and post along the way, we can get you through it.
 
Yes as Ancientdad mentioned, I am in Missouri, Springfield to be exact. I have not pulled the oil strainer apart yet to check it out. I would consider myself a DIYer though. I just lack any firsthand knowledge diving into something like a motor rebuild. I do have most all the parts for this bike. I have the tank emblems, carb cover, and side covers. Carb is complete and I have already ultrasonically cleaned it and put it back together. I replaced the old selenium rectifier with a new sparck moto regulator/rectifier, cleaned and set the point and timing. I feel really confident in restoring the body and accessories of the bike, I’m just in more uncharted territory opening up the engine.
There’s a bunch of us doing these same bikes right now, not to mention more than a handful of forum regulars that have a ton of experience with the 160’s.

Don’t forget the owner’s manual as a reference- this was before the days that the manuals didn’t just warn you not to drink the battery. Save that Clymer too, mainly for the pictures and a little bit of some of the disassembly.

A full rebuild isn’t that complicated, apart from cleaning 60 years of gunk, corrosion and the smell of the fork oil (and a couple of parts that are harder to find).

A lot of specialty tools can be rented from oreilly and the like, or just plain fabricated.

The ones you’ll need to order are the rotor puller and the oil filter locknut wrench (easy to find) along with a good JIS 2&3 bits, impact and driver. (Spend a little more here for quality, they’ll get some use when your 160 spawns a cousin right next to it.)

My $0.02, go for it. Farm out the machine work for a bore/hone and take your time. The cleaning will be the hardest part.
 
Well I’ve decided to give it the ol college try! I had a few minutes this evening and got the foot pegs off and exhaust removed. Drained the oil and it was was pretty dirty and slightly metallic looking. Next I’ll get the chain covers removed and get the old chain off. It’s toast anyway. Pretty badly rusted. Once I have the engine removed and on the table, that’s when the real fun begins.
 
Pleased to read that you've decided to do it yourself. Taking it to someone else to fix opens up all sorts of possibilities, they might or might not know what they are doing. If you already have basic DIY skills, able to wire an electric plug, assemble a flat pack etc, you should be fine. Just don't use brute force on anything, if it doesn't come apart or undone stop and take a break, maybe leave it a day and have a think about it, obviously ask on here.

So far as I know, the 160 engine isn't that much different to the 175 unit. On that one, the only mildly challenging things are getting the cam timing correct and linking the cam chain, refitting rings to the pistons without snapping them, and feeding the assembled pistons and rings into the cylinder block. Scary the first time, that's all. Dismantling the cylinder head and valves for cleaning and inspection involves use of valve spring compressor, suitable ones quite cheap on Amazon. Issue there is not to loose the little split collets that retain the valve springs.
 
I look forward to jumping in to this. I’ve got to dig an old phone out and charge to set up to video everything so I can refer back when putting back together. Hopefully my videography skills are up to the challenge.
 
I look forward to jumping in to this. I’ve got to dig an old phone out and charge to set up to video everything so I can refer back when putting back together. Hopefully my videography skills are up to the challenge.
As already mentioned, do not hesitate to ask questions here if you are at all unsure of how to proceed with anything. With enough pictures and good descriptions of what you're encountering, there will be someone here who has experienced it and will be able to help. Just be patient and wait for those answers before moving forward so you don't cause yourself undue expense or damage to what can often be hard to find replacement parts.
 
Regarding DIY skills, these do seem to be a dying art. I subscribe to our local Nextdoor group, and the number of folks who post asking for help with simple tasks such as putting up shelves, fixing dripping taps, asking if anyone has a cooker for sale because the element in their fan oven has failed etc etc. I do appreciate that some of these folks will be asking for help because of age, frailty, illness and so on, but there does seem to be a whole new generation whose only skills are keyboard and screen related.
 
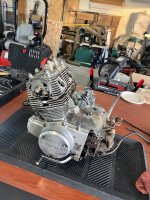
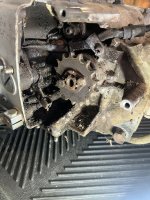
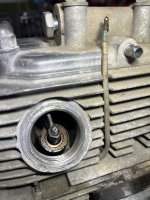
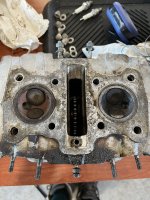
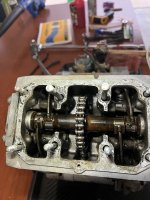
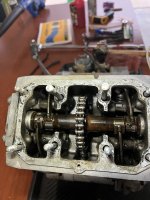
Alright so taking the plunge here. Got the engine removed today and on the bench. Here are a few pictures of what I’m working with. IMG_0120.jpegIMG_0115.jpegIMG_0119.jpegIMG_0118.jpegIMG_0117.jpegIMG_0116.jpegIMG_0120.jpeg
 
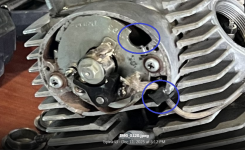
This is why we tell members to post pictures. You couldn't get this to run despite having spark (low compression aside for the moment). I can tell you immediately that the points plate is nowhere near the intended base position, it's nearly 90° off toward the retarded position. Note the upper blue circle shows the cutout in the plate that is intended for the points wire to go through.

1765496192455.png

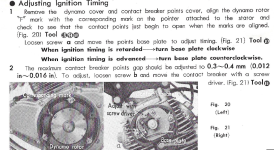
Though the points plate isn't exactly the same here on this CB160 image from the owner's manual, you can see the location of the points and plate is vastly different than how yours is set.

1765496957121.png
 
Looks as though that engine has not been apart, judging from the nice condition of the visible fasteners, apart from the generator cover screws. What state was the sump plug and tappet covers in ?
 
The drain plug and valve covers were both in good shape and looked unmolested. The oil plug actually took a bit of effort to break loose. Were the valve covers supposed to have a rubber o-ring? These did not, so possibly could have been removed before.
 
The drain plug and valve covers were both in good shape and looked unmolested. The oil plug actually took a bit of effort to break loose. Were the valve covers supposed to have a rubber o-ring? These did not, so possibly could have been removed before.
The valve covers absolutely had o-rings to seal them from the factory. And regardless the mileage shown on the speedo, those covers should have been off every 1000 to 2000 miles back when it was running regularly.
 
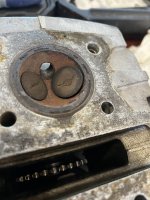
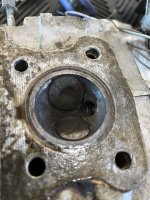
It looks like the right exhaust valve may have been making contact with the piston.

Have you figured out how you will keep track of everything during the disassembly and eventual rebuild? Ziploc bags of various sizes and a sharpie are helpful. Label everything carefully because this motor probably won't go back together very soon.
 
Last edited:
Yes I am bagging everything and labeling it. I also have a tripod set up with my phone filming all of the disassembly, so hopefully I can figure it out when putting it back together.
Any idea why the valve would be making contact with piston? Stuck valve maybe?
 
Any idea why the valve would be making contact with piston? Stuck valve maybe?
Possibly stuck and/or bent. Or something messed up with the valve timing at some point along the way. I understand this motor was never running in your possession, right?

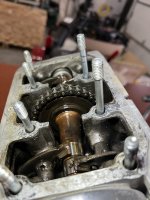
Are you able to post pictures of the cam lobes and followers?
 
The important part of the followers is the pad that rides on the cam lobes. The lobes don't look bad from this shot, but a separate picture would be better.
 
I’ll post a picture of the cam and the passing the followers when I have that apart. Currently it is still together as seen in the pic.
 
I would remove the cylinder also, so you can get a better look at the pistons and the cylinder walls. You can get a cheap valve spring compressor on Amazon if you're up for removing the valves.

Have you found a trustworthy machine shop nearby?
 
Yes I believe I have found a good machine shop in town to do the valve/cylinder work. I have a valve spring compressor on order as well. Hoping to have this apart and inspected soon so I know what my next step will be. I’m guessing I should probably go ahead and order new valves?
 
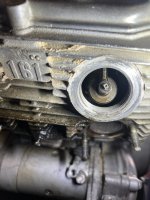
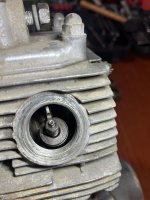
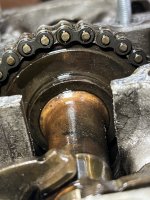
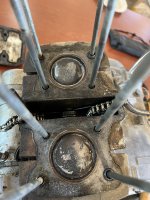
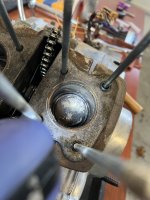
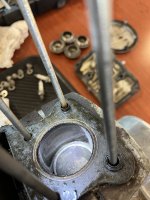
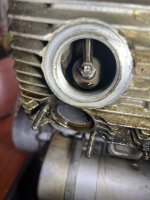
What is going to be the best way to clean up the head? The valve ports have carbon build up and the left port has what looks like maybe rust….
 
What is going to be the best way to clean up the head? The valve ports have carbon build up and the left port has what looks like maybe rust….
Usually, if you have work done at a machine shop, the head or cylinder miraculously comes back pretty clean. Some shops offer vapor blasting services. Or you can try DIY with a pressure washer, degreaser, hose, elbow grease, etc.
 
Soak. Solvent. Brush. Rinse. Repeat. Cleaning these up sucks.

I’ve had good luck with leaving all valves closed and pouring some carb cleaner into the combustion chambers and letting that just soak for a long time to help loosen carbon deposits.

On the exhaust port, you can get more aggressive. Some high concentrated solvent and a bottle brush on a drill will get it looking better. As long as you don’t ham hand the setting ring for the exhaust gasket you’re fine.

Or you can go crazy and have it hot tanked and vapor blasted.
 
I just wire brush everything with drill mounted wire brushes, combustion chamber, inlet and exhaust ports. I clean the valves by putting them in the drill chuck and holding them against some coarse aluminium oxide paper, very satisfying to see them come up nice and shiny.
 
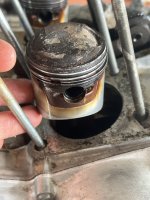
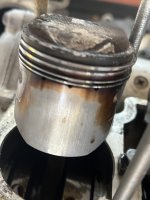
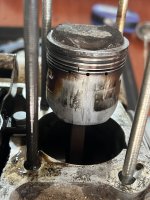
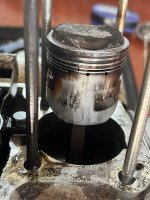
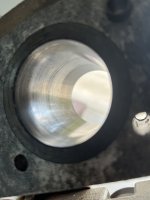
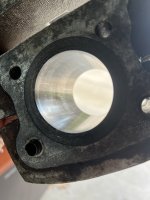
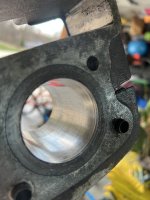
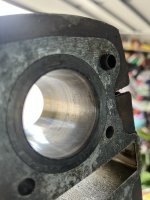
Few more pictures…..cylinders do not have any noticeable grooves or gouges. Pistons look to be in decent shape as well. But welcome your all expert opinions. Can I get away with a hone and new rings? The right piston, (which had very low compression) has its rings flush with piston surface all the way around. Could have been issue with compression. Or at least adding to the issue.IMG_0143.jpegIMG_0144.jpegIMG_0145.jpegIMG_0145.jpegIMG_0147.jpegIMG_0148.jpegIMG_0149.jpegIMG_0150.jpegIMG_0151.jpeg
 
The piston with the stuck rings also shows galling on the skirts, don't use that one. You should really take the cylinders to someone familiar with bike engines to be inspected and measured before making the decision about using them as is.
 
Unfortunately, with cylinders it’s kind of impossible to tell for sure without measuring if they’re within “hone/ring” or “rebore/new pistons” territory.

The stuck rings would definitely drive some compression issues, so those would likely need to be replaced and I’d probably opt for replacing the pistons as well.

Personally, I’ve taken mine all to a machine shop to get measured - they’ve just got better tools for this than I do.
 
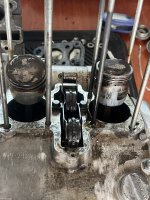
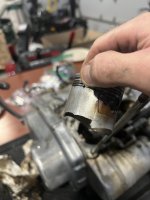
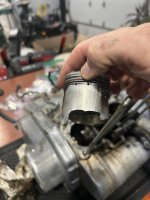
So I’m planning on dropping off the cylinder and head tomorrow at machine shop to be inspected. In the meantime I took off the pistons and found the left piston was missing a chunk that obviously has broken off at some point. Not sure if it got chewed up or is in bottom of case somewhere. Also the rod on same side as the broke piston is loose. I can move it up and down quite a bit. Could explain why piston was hitting valve. Was open to not have to split the case but now looks inevitable.IMG_0152.jpegIMG_0153.jpeg
 
Last edited:
That's not good news. With these crankshafts you have 2 options, find a good used one or ship yours to someone like @G-Man and have it fully rebuilt. It has to be done by a specialist because the crankshaft is pressed together and you need a 20 ton press to take them apart and the proper jigs to put them back together.
 
You may want to hold off on the machine work for the time being. There's always a chance you could find a donor motor in better shape to rebuild. At least, I would want to secure a usable crank before going forward with the top end work.

I think there are used cranks on eBay currently.
 
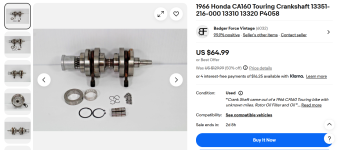
Is there any other reasons why this could be loose other than having to get a new crankshaft or rebuilding it? It just so happens there is a used crank on ebay right now for $65.Screenshot 2025-12-17 175549.png
 
Coupled with the piston damage, I’d say that crank is likely toast. It’d definitely run more than $200 to get rebuilt so I’d opt to replace.

It may be worth scouring around for a donor engine, although that crank is a good deal.
 
Is there any other reasons why this could be loose other than having to get a new crankshaft or rebuilding it?
If you can see the rod moving up and down when you try, it needs to be repaired or replaced. There should be no movement felt or seen vertically.
 
It might be a good idea to split the cases sooner rather than later to evaluate the extent of the damage. Hopefully the cases can be used if you secure a replacement crank, like the one you found on eBay.
 
It just so happens there is a used crank on ebay right now for $65.
While that seller has a great rating, the rust I see on one of the crank throws tells me it might have spent some time wet with water somehow. If the rusty water happened to come out of that rod bearing then there might be enough rust inside the rod big end to cause trouble. Both small ends of the rods look to have been overly hot as well, they're very dark in color and the wristpins show some evidence of excess heat. Also, it's missing one roller from the outer main bearing and since the outer race is off it would be nice to see a better picture of that journal surface on the crank itself. The price is right, but not if it's useless once you get it.
 
Still don’t have my case split yet but was wondering, as I’ve been looking at replacement crank options, is the cb and cl160 cranks the same as the ca160?
 
Back
Top Bottom