Joined
Sep 5, 2023
Total Posts
36
Total likes
13
Location
Winona Lake
So I bought a CB200T last Friday for 700$, clean title, but didn’t start, had bad tires, throttle was stuck, whole nine yards.
IMG_1828.jpeg
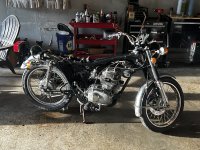
Here’s her on friday.
So I took her home and started working on it. Disassembled partially, gave it a bath, took the rust off the frame and painted/sealed it with silicon high heat paint, got the carbs off, minor stuff.
IMG_1835.jpeg
Day 2 I derusted the chrome, JB weld sealed the rust holes in the trumpet pipes, painted over the weld, cleaned the carbs, changed the oil/spark plugs/ steering bolts, and deep cleaned the chain. Before and after pipe de rusting and painting: IMG_1841.jpeg

IMG_1842.jpeg
Day 3, I got the carbs on again, ordered new air filters, tires, tubes, gas lines, battery, and -also deep cleaned the tank/seat. Ready to start reassembly. No new pictures.

Anyways, I’ll probably keep updating this thread with my progress if anyone is interested. If not probably just for my own personal notes. If there’s any advice or things I’m missing, please feel free to share! Thanks!
 

Attachments

  • IMG_1839.jpeg
    IMG_1839.jpeg
    3.4 MB · Views: 1
Carb kit? What would that include? Just used new seals. 😅

Most look for carb rebuild kits when they do carb cleaning, glad you didn't. They typically come with improperly-sized jets that will make the bike run worse, and often with incorrect float needles that will cause flooding and incorrect float height. You dodged a bullet there because many are still not aware of the industry problem.
 
IMG_1846.jpeg
Tonight’s progress: reassembled. Ran her off jumpers and a different battery + starting fluid (no gas tonight as the fuel lines dry rotted. New ones on order) and things moved but nothing started. Not super surprised. I’ll check compression with a gauge tomorrow and spark when I get the real battery in. Just need to fix my airbox covers, mirrors, tires, air filters, and tubing and that’ll be all I know how to do.
 
Last edited:
Just a thought, but did you change the oil yet? If the bike hasn't run in some time it would be better to get the old oil out of it before you run it very much, even if you don't bother with the centrifugal oil filter just yet.
 
Yep, fresh set of oil in there since day 2. One of my first steps. I’ll clean the filter out when I change the oil after I give it a couple miles once in get it running. Try to get it clean inside.
Just a thought, but did you change the oil yet? If the bike hasn't run in some time it would be better to get the old oil out of it before you run it very much, even if you don't bother with the centrifugal oil filter just yet.
 
Make sure to service the front brake caliper. They have a tendancy to take on some moisture and wreak havoc on the inside. just take it apart and give it a good cleaning and re-lube.
Will do. Only has 5k miles on it so hopefully the brake pads are decent.
 
IMG_1851.jpeg
Well, today was a mix. Compression check is a win and new fuel lines and air filters have been attached, but a bolt over my alternator is rusted to hell and mega stripped. Not sure what to do here.
 
Well, today was a mix. Compression check is a win and new fuel lines and air filters have been attached, but a bolt over my alternator is rusted to hell and mega stripped. Not sure what to do here.
Drill the heads off, then remove the threaded part after the cover is off.
 
Is that screw replaceable? Are there more somewhere?
Yes, and there are a couple ways you can go. You can buy them locally at a hardware store like Ace or even the big box places (though there you'll probably have to buy more than one, like a box of 5 or so) and even Tractor Supply often has metric screws and bolts, or you can buy the original Honda screws that look more original but they're pricier of course. But first, you go to CMSNL or Partzilla or the like and look up the screw to find the size (like 6x25mm) and use that to find what you need locally. Like this:


then this, #23


Note that there are o-rings on those 3 screws that hold the smaller cover over the alternator rotor where the timing marks are, and the o-rings seal best when used with screws that are not threaded near the screwhead.

And BTW, how to identify and locate parts for these bikes is one of the links in my Welcome Package of links... :)
 
Well, today has been not great. The battery, now charged, was installed, with mixed success. The key turned to on could activate the control cluster, back light, and both turn signals, but the headlight didn’t turn on, nor did the horn or starter work. With the key turned to ignition, all lights die, and no spark with kickstart or anything else. Oh boy. Time to break out the volt meter and stare at the service manual. Almost no idea what to do here. Hopefully it’s just a fuse.
 
Well, today has been not great. The battery, now charged, was installed, with mixed success. The key turned to on could activate the control cluster, back light, and both turn signals, but the headlight didn’t turn on, nor did the horn or starter work. With the key turned to ignition, all lights die, and no spark with kickstart or anything else. Oh boy. Time to break out the volt meter and stare at the service manual. Almost no idea what to do here. Hopefully it’s just a fuse.

First, there aren't 2 positions of the ignition switch where the bike runs. The first position is ON and the second position is Park, where only the taillight is on. It was used for roadside emergency situations back when bikes didn't have 4 way flashers. So, when you turn the key clockwise 1 position from Off you are in the only On/Run position there is, and if the headlight does not come on it's very likely that the starter button contacts are dirty internally in the right handlebar switch. The CB200 was among the bikes that the headlight on-off was eliminated when full time headlights became law in the US, and the starter button disconnects the headlight during cranking so the set of switch contacts within the starter button that are responsible for the headlight are probably a bit dirty. If you take the screws out of the switch and lift the two halves apart, you can spray some contact cleaner or Brakleen (NOT carb spray, it will melt some plastic parts) into the switch area and push the button repeatedly and it will likely clean it up and get it working. Since your horn button doesn't work as well (though it could simply be the horn itself) t is also possible that either the contacts in that button are dirty, or it could be that the handlebars are not grounded properly. The latter can be checked with a jumper wire from the bars to a clean ground contact on the frame for test purposes, if the horn works when the jumper is giving the handlebars a fresh ground then that needs to be looked into.
 
First, there aren't 2 positions of the ignition switch where the bike runs. The first position is ON and the second position is Park, where only the taillight is on. It was used for roadside emergency situations back when bikes didn't have 4 way flashers. So, when you turn the key clockwise 1 position from Off you are in the only On/Run position there is, and if the headlight does not come on it's very likely that the starter button contacts are dirty internally in the right handlebar switch. The CB200 was among the bikes that the headlight on-off was eliminated when full time headlights became law in the US, and the starter button disconnects the headlight during cranking so the set of switch contacts within the starter button that are responsible for the headlight are probably a bit dirty. If you take the screws out of the switch and lift the two halves apart, you can spray some contact cleaner or Brakleen (NOT carb spray, it will melt some plastic parts) into the switch area and push the button repeatedly and it will likely clean it up and get it working. Since your horn button doesn't work as well (though it could simply be the horn itself) t is also possible that either the contacts in that button are dirty, or it could be that the handlebars are not grounded properly. The latter can be checked with a jumper wire from the bars to a clean ground contact on the frame for test purposes, if the horn works when the jumper is giving the handlebars a fresh ground then that needs to be looked into.
Thank you! That’s such good information to know. I was highly confused as the other bikes I’d been on didn’t have that second position. I assumed that was ignition due to the writing on the switch. I’ll follow your instructions tonight!
 
So the good news is that it’s actually got spark in L cylinder, but none in the R. With the key in the proper position, starter turns over. Horn/headlight still dead but I’ll try contact cleaner and see where that gets me. Massively excited!
 
So the good news is that it’s actually got spark in L cylinder, but none in the R. With the key in the proper position, starter turns over. Horn/headlight still dead but I’ll try contact cleaner and see where that gets me. Massively excited!

Okay, so then the question is, how are you checking spark? Because the 200 is a 360° crankshaft where both plugs spark at the same time from a coil with 2 plug wires, so if one sparks the other should. BUT, they both have to be grounded at the same time you're checking spark.
 
Okay, so then the question is, how are you checking spark? Because the 200 is a 360° crankshaft where both plugs spark at the same time from a coil with 2 plug wires, so if one sparks the other should. BUT, they both have to be grounded at the same time you're checking spark.
I had taken one spark plug and wire out at a time, then held it very near the bare engine and pressed start. I could see the spark on the left pretty quickly, but right had none.
 
I had taken one spark plug and wire out at a time, then held it very near the bare engine and pressed start. I could see the spark on the left pretty quickly, but right had none.

Then I'd suspect the plug itself. Did you try switching the plug that sparks to the other side as a test?
 
Haha. So nope, a brand new-from-the-box spark plug didn’t spark off the right but did off the left.

Well then, unless anyone else has another suggestion I'd suspect it's time to get a new coil. You could give one last try to swapping plug caps from side to side. FYI, they screw into the end of the wires, literally, and when you have both caps off it's a good idea after some age to snip off about 1/4" from the end of the wire to get a fresh clean connection when you screw the cap back on.

If that doesn't work, here's one from 4into1 - https://4into1.com/ignition-coil-honda-cb-cl160-175-200/
Contact cleaner blast has fixed my headlight issue. So that’s a score. Tested and tried the plug caps idea, but no dice. Now neither side sparks. Tested the connection, and it’s not the wires fault. Maybe I burned out the coils. New ones ordered.
 
Maybe I burned out the coils.
At this point it's important to mention that leaving the key on for longer than a couple minutes without turning the kill switch off can overheat the ignition coil if the points happen to be closed when the engine last stopped running (and without removing the points cover, you wouldn't know for sure). So, when testing other electrical for any length of time with the ignition switch on, always turn the kill switch off. But don't forget that you did when trying to start the engine later, it's an easy mistake to make and all of us have done it at one time or another.
 
At this point it's important to mention that leaving the key on for longer than a couple minutes without turning the kill switch off can overheat the ignition coil if the points happen to be closed when the engine last stopped running (and without removing the points cover, you wouldn't know for sure). So, when testing other electrical for any length of time with the ignition switch on, always turn the kill switch off. But don't forget that you did when trying to start the engine later, it's an easy mistake to make and all of us have done it at one time or another.
Good to know. Thank you. Talked to the original owner when I picked up the title this morning and found some information: last time he tried to ride it (40 years ago) he remembers he installed the battery backwards for a minute and when he completed the circuit dark smoke came out from “somewhere under the tank.” Impressive memory, but I wish he’d recalled that’s why it didn’t run before he sold me the bike :laugh:
 
Good to know. Thank you. Talked to the original owner when I picked up the title this morning and found some information: last time he tried to ride it (40 years ago) he remembers he installed the battery backwards for a minute and when he completed the circuit dark smoke came out from “somewhere under the tank.” Impressive memory, but I wish he’d recalled that’s why it didn’t run before he sold me the bike :laugh:

Interesting. Wouldn't be the first time someone has hooked up the battery backwards in a bike. In that case, the rectifier may be suspect as well since it's essentially diodes to filter out ac current from the alternator, but you should replace the original separate rectifier and regulator components with a modern combo unit like this one from Sparck Moto, the best value out there for the component and the owner is a VHT member as well as one of our sponsors (and none of our sponsors pay us anything, we simply have website link exchanges with them).
 
Interesting. Wouldn't be the first time someone has hooked up the battery backwards in a bike. In that case, the rectifier may be suspect as well since it's essentially diodes to filter out ac current from the alternator, but you should replace the original separate rectifier and regulator components with a modern combo unit like this one from Sparck Moto, the best value out there for the component and the owner is a VHT member as well as one of our sponsors (and none of our sponsors pay us anything, we simply have website link exchanges with them).
Perfect. Ordered. Any other electrical components that are necessary upgrade parts? While I’m at it I might as well make sure I cover my bases.
 
Perfect. Ordered. Any other electrical components that are necessary upgrade parts? While I’m at it I might as well make sure I cover my bases.

I suppose I should have mentioned it when you ordered the coil, but since your test swapping the plug caps had a negative result and because they are also a part that deteriorates with age due to the resistance built into them, you should replace the caps too. And if the battery is suspect I'd replace it with an AGM version, it will last far longer than a conventional flooded lead acid battery. Do your shopping for those, the prices vary wildly and you can often do much better with a lesser known brand.
 
Ok sir! I have replaced the coil and got a continuity light tester probe thing. I witnessed spark at the points. I saw power through the cables to the brand new ignition coil (installed). But I still have no spark (or test light) at the end of the new cables leading to the spark plugs when started. Also, the condenser seems to be fine, power from kill switch is perfectly fine. I tried following this video and had been able to follow along all the way till the ends of my new cables where the plug caps connect. That’s where I get nothing.
First, we don't use or follow any video off the internet for diagnosis or repair. We follow standard mechanical troubleshooting methods, which you can learn, and I would NOT recommend you learn anything from the source of that video. They might be fine to see the components apart and while being worked on, but that is all.

If you see spark at the points and you have the coil connected correctly, AND you have a spark plug in each plug cap, grounded to the engine at the same time as previously suggested, you should see spark from both plugs. This sentence is a bit confusingly worded:

But I still have no spark (or test light) at the end of the new cables leading to the spark plugs when started

You don't use a test light to check for 25,000 volts at the ends of the plug wires, the test light is to check when the points open for setting the timing as well as for checking for 12 volts at the various connection in the ignition system. If when you say "when started" you mean when the engine is actually running, then I don't understand the question.

AND, pictures are worth 1000 words. If we can't see what you're describing and you have difficulty describing it to us in correct troubleshooting terms because you're unfamiliar, then show us what you're talking about so we can help better.
 
First, we don't use or follow any video off the internet for diagnosis or repair. We follow standard mechanical troubleshooting methods, which you can learn, and I would NOT recommend you learn anything from the source of that video. They might be fine to see the components apart and while being worked on, but that is all.

If you see spark at the points and you have the coil connected correctly, AND you have a spark plug in each plug cap, grounded to the engine at the same time as previously suggested, you should see spark from both plugs. This sentence is a bit confusingly worded:


You don't use a test light to check for 25,000 volts at the ends of the plug wires, the test light is to check when the points open for setting the timing as well as for checking for 12 volts at the various connection in the ignition system. If when you say "when started" you mean when the engine is actually running, then I don't understand the question.

AND, pictures are worth 1000 words. If we can't see what you're describing and you have difficulty describing it to us in correct troubleshooting terms because you're unfamiliar, then show us what you're talking about so we can help better.
edit: Completely ignore me, I screwed on the old dead plug caps instead of the new ones. Beginners mistake.
 
Last edited:
Well, new issues again. Did the combo regulator/rectifier install and now it won’t turn the starter when I press the start button on the handlebars. Here’s the pictures of the new wiring, (please ignore the yellow ground, I will be replacing that with green later today.)

Here is also a wiring diagram of what I’ve done, maybe there is some obvious reason why this isn’t working.


diagram.png


IMG_1984.jpeg
 

Attachments

  • IMG_0082.jpeg
    IMG_0082.jpeg
    343.9 KB · Views: 4
Last edited by a moderator:
Back
Top Bottom