Scruffy UK CB400A Hondamatic project

mylovelyhorse

Member
Joined
May 14, 2021
Total Posts
35
Total likes
0
Location
Gosport, Hampshire, UK
Several years ago, in a set of strangely difficult to quickly explain circumstances, I acquired a history-unknown 1979 CB400A Hondamatic. After some fussing, including new tyres, an oil & filter change, a carb strip & clean, a fresh battery and other TLC I'm pleased to say it ran. I didn't ride it much, in part because it wasn't easy to start on the kick-start and the electric starter mechanism made a horrid screeching sound.

So a while ago I was considering what I might do to to improve the bike when it came upon me that I might do some tinkering about to sort out this and that, like replacing the seals and oil on both forks. I also wanted to fix that starter problem. I don't want a perfect restored vehicle - there's dents in the tank that would prevent that anyhow - but I would like it to run and behave as nicely as possible. At about that time I was offered a whole car-full of spare CB spares in middling to awful condition, including a spare engine that was so externally scruffy it immediately gained the nickname 'the Boat Anchor' on account of it looking like it had been left underwater for a few years. This plus some wheels, a whole host of other things like a pair of clocks, two & a half sets of carbs and so on cost me a total of £230 (about $320). Twice what I paid for the bike itself, mind...

I first partly stripped down the boat anchor, very quickly realising that it was actually - internally only - looking to be in better order than the original engine. Here's some examples - original generator & boat anchor generator assemblies. So at the very least it was (a) practice engine disassembly / reassembly and (b) possible spares for the original engine. Externally, the only usable part was the generator cover and by gum that was going to need some work.

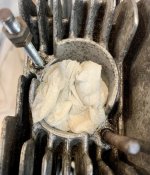
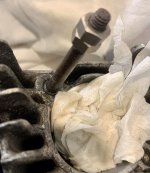
To cut a long story somewhat shorter, the original engine is now on the bench in many, many parts, all of which have been cleaned, labelled and packaged away. All except the crankshaft, rods and shells. Once i removed the starter roller and clutch assembly I found three very unpleasant looking areas of damage. I am not sure what on earth has gone on there but I don't like the look of it at all. Further, the original torx bolts holding the mechanism to the crank had gone, the crank tapped and new allen head bolts put in. Someone has clearly had a good mess about in here and I am not overly impressed with their handiwork. Plus at least one filter appears to have disintegrated (this is mainly paper residue) and the engine not cleaned up.

While the original engine is stamped BBB on the cases and the boat anchor BBA, the boat anchor crankshaft has none of the damage that's on the original. I considered a crankectomy and did some measuring, which nicely justified some tool purchases, so that was a bonus. All looked good and after doing the crank and shells transplant, I applied plastigauge and torqued things up. All measured nicely within tolerance, so after taking advice and discussing things with several extremely knowledgeable engineers of my acquaintance I have decided the swap is to be permanent.

I've also very thoroughly cleaned out the forks, repainted the lower sections, replaced one slider as it had chrome defects in the swept area and reassembled with 140ml of Honda fork oil and new seals. Very little fork oil came out, so goodness knows how long since someone last paid the forks any attention.

I have found the Honda Service Manual, CB400A supplement and parts catalogue to be invaluable as I work on the bike. Parts aren't cheap but I hope - once the bike is finished - to sell off a good number of the spares i have in my lock-up, so that should help replace some of the funds spent. Need to order some gaskets soon, will go for Honda ones where possible.

So that's where the bike stands at the moment. Next job is to replace the balancer weights with solid ones as the rubbers are in poor condition & I have a set from a CB400N, complete with chain and uprated return spring. After that - and further internal cleaning - the engine will very slowly go back together. I say slowly because I am in no rush and I only have one day a week to work on the bike. Also I like to check and recheck things just in case...
 
I say slowly because I am in no rush and I only have one day a week to work on the bike. Also I like to check and recheck things just in case...

Sounds like you’re well on your way, and with plenty to work with. It’s great to be able to work at one’s own pace, and I believe “check and recheck” is a normally acquired vintage condition. Carry on and keep us posted!


Tom - 1982 CM450E
 
Balancing act

Today’s tasks included refitting the balancer assembly. Unfortunately it didn’t go quite to plan. Fitting the balancers, chain, guide etc is a fun-time 3-hander of a job, it turns out.

Given that my bike clearly hasn’t had much looking after over the years, also that it wasn’t exactly vibe-free when I had it running, I have acquired a set of solid balancer weights & chain from a CB400N. These turned up a while ago and have been filed under ‘spares’ for some time. I dug them out and started the refit today. They look a bit different - I assume the original’s splash-plates were more to retain the rubbers more than anything else. I also acquired the later, stronger balancer adjustment return spring from a Honda spares place that had exactly one left. It can be seen in place in this picture.

So I fiddled about quite contentedly and fitted the front balancer, tensioned the adjuster spring as per instruction in the manual. Next job was the cam chain tensioner and the chain guide that goes by it at the back of the crank. My old cam chain tensioner wasn’t the strongest of things - in fact I’d say it had had a hard life and wanted only for a nice retirement. There were chunks out of the material as well as deep wear marks, plus it wasn’t as stiff as one might expect that sort of thing to be. I sourced a new old stock one to replace it, which is fine except, well, it’s all stiff and unbendy. Good when it comes to cam chain tension, not so good when the crankcase is upside down on the bench being worked on. I spent some time being indecisive, considering drilling a hole in my bench for the tensioner to go through and eventually went for the “taller blocks of wood” option. It’s crude but it works. In went the tensioner blade and over it went the smaller of the two chain guides.

After a cuppa, I fitted the front balancer weight and the chain, lining up the weight as per the service manual. Naturally it doesn’t want to stay in that position. I lined up the rear balancer too. And then did it again (one tooth out). And then again (the crank had moved). And again - this time because I’d not got things quite right to get the rear balancer shaft through both crankcase set and balancer. Figuring that out took a while.

After much mucking about I managed to get all the right parts in, even the blasted difficult to insert & position inner chain guide. The front balancer lined up fine. The rear balancer lined up too. As you can see in this image the red ring shows the crank is properly lined up as well. Unfortunately as the green ring on the same image shows, I cannot quite get the bottom half of the crank set to go into place at the rear. I’ve tried this three or four times now and somehow something I cannot see is stopping things lining up just right.

I've had to stop now - things to do, grandchild to see - so I won’t get back to this until next week. Hopefully coming to it fresh will let me see what’s going on. By that time the new seal for the generator end of the crankshaft will have turned up too so I’ll be able to fit that and torque the thing down, hopefully not to return to it. We shall see…
 
Try unwinding the balancer adjuster shaft, to the 9 o'clock position with the engine upside down, that would be 3 o'clock if the engine were upright. That's the loosest the chain gets. If the chain is too tight it lifts the crankshaft.
 
Do what Jim said and get all the slack you can. I line everything up and the inner slipper is the last piece I put on. Kind of a pain but will give you enough slack to line every thing up. There are other ways to do it but thats how I do it.

Bill H
 
Well, it’s been a busy month or two, despite the pandemic, and I’ve done little on the engine. I’ve had three goes at getting everything fitted on the balancer & crank set. No luck, I’m afraid. It just won’t sit square and I cannot see why. I’m afraid that for the time being the engine hasn’t moved on further than where it was last time I posted.
 
Count the chain links, 68 is the right number. Here's something I grabbed from somewhere and saved

"It's long time ago, I've changed the spline twice or more, I remember I felt "it's loosen so often.." and...
the chain was tore at over 100mph.
I'm assuming balancer chain is major weak point of hawk engines. so I don't
even use honda genuine chain. It's DHA-219TS, 219 is a special size that honda requested D.I.D to
make it just for honda engines. Nowadays, it's common size of drive chain of kart.
DHA is die hard alpha. I don't know what alpha means.. T means seamless rollers, S means
something strong (I don't remember precisely).
And SDH is available now. super die hard is an advanced version of DHA.
SDH-219HTZ (H is hardened and thicker plates, T is same above, Z is something good) is
really tough. almost never loose. If someone wants a stronger engine, try that."
 
And so I have spent some time working on the engine this afternoon. A fresh attack and all that :)

First I checked there was nothing on the crank set that might be a problem FMhI6GW.jpg but no, the bearing shells are all in fine and the dowels are straight. I might have mentioned that I have a spare engine; I looked at the balancer chain guide from the original engine and compared it to the one from the spare 32aXWcY.jpg. I'm using the one from the spare engine rV5FTXQ.jpg because while I'm not sure if these pics show it, it is in much cleaner condition than the original. I reinstalled the balancer shaft with adjuster, uprated later model spring & the front weight, then got it lined up nice EHgsScn.jpg. I then put the guide in place and after much fiddling got the rear balance fitted and aligned JbkSNNX.jpg. Notice that the crank set has slotted into place this time - I think that's to do with having pre-fitted the chain guide. Note that the crank is also properly lined up PZqcA22.jpg.

I am still concerned about the balancer chain adjuster - this dimple should be roughly where it is X0IeLlE.jpg and then get wound on 250o AGeuXDW.jpg. No chance. Plus I think there might already be too much tension on the chain (link to very short & soundless video.)

Nevertheless, I've done a very loose trial assembly wmtZQNH.jpg and it all looks OK. Well, probably :)
 
Well, I think I’ve got it done. The balancer marks all line up, the dot on the adjuster is at the bottom after a 250o turn was applied, the adjuster is bolted down in the mid-point of the slot, the chain guide is in place, crank set is torqued down.

I rotated the crank several times and the marks all still line up afterwards.

Minor problem: I have a fresh new oil seal for the generator end that I forgot to replace. The old one wasn’t leaking but it seemed a good idea to replace it - I’m not sure I’m going to take it all apart again just to replace the seal.

Next job will be next weekend now, but it’s probably to start reassembling the engine.
 
You're going to hate me but now is the time to replace that seal. To do it later means taking the bottom end apart again after removing the engine, if you want to do it correctly. There is a cheat that I have done because of circumstances, like being over 2000 miles from home, but you can end up using 2-3 seals before getting one in right.
 
You're going to hate me but now is the time to replace that seal

Oh goodness yes, you’re absolutely right and I am going to do it before moving on any further. For a start it’s the seal off the spare engine as it moved over with the crank - I remembered last night, after I’d written the last post, that I have no idea if that seal is actually any good. It’ll have to wait because Real Life has temporarily got in the way again but at least I now know I can do balancer chain etc.
 
Oh goodness yes, you’re absolutely right and I am going to do it before moving on any further. For a start it’s the seal off the spare engine as it moved over with the crank - I remembered last night, after I’d written the last post, that I have no idea if that seal is actually any good. It’ll have to wait because Real Life has temporarily got in the way again but at least I now know I can do balancer chain etc.

You took that very well. :)
 
A balancing act

I’ve had all sorts of fun trying to get the balancer setup correct. Last time I did it the crank was really hard to turn and as I had to replace a seal anyway, I took it apart to redo.

My first action was to take out the main bearing shells, clean very thoroughly behind them and reinstall, making sure they fitted into place properly. I then applied some assembly paste (molybdenum disulphide grease), not too much, and slotted the crank into place without the balancer mechanism. After torquing down the crank set, I found I could easily, smoothly, spin the crank by hand & here's a short video: https://i.imgur.com/SwFWPfo.mp4.

Satisfied that the bearing shells weren’t the problem, I undid everything and changed the oil seal I’d forgotten to do on the last assembly run through (as mentioned in a previous post.) Next I started very slowly and carefully adding in the balancer mechanism. First I put the front balancer and associated adjuster mechanism in place, got the dot at 250o, wound the adjuster on to the 180o position as per service manual.
PKpJ6sa.jpg

I then fitted the adjustment arm & nuts GVr5gjQ.jpg, again to match the diagram in the service manual iMRENTV.jpg. Getting the two weights in place and the three marks lined up for correct balancer adjustment is a lot trickier than it looks and requires a lot of reading the manual and noticing what they don’t say. It took me some time to realise that while it talks about getting the rear balancer in place, somehow implying that you do this after fitting the crank set, actually you do that - and fit the chain guide - while holding the crank set above the crank. Presumably one uses one’s other pair of hands for that bit…


Goodness knows what angle this picture XtzizwQ.jpg was taken from but I couldn’t replicate it. What I could do was reasonably easily get the crank set in place with the front OZHTtQB.jpg, rear GEinxwx.jpg and crank jgBlBXh.jpg marks all nicely lined up. On previous tries it’d been OK to get the marks lined up but the crank set was then very awkward to fit. This time, as I said, it just popped into place easily.


I put 10Nm on the 6 main bolts that hold things together and tried to turn the crank. By hand, not so easy. With a socket on the alternator end of the crank, nice and smooth .


I torqued the bolts up to 21Nm, repeated the test and all was the same so I torqued up to the final amount of 34Nm. The last job was to let the auto-adjustment on the balancer chain do it’s magic. The idea is that one undoes the adjuster clamp nut and the mechanism should settle to the right amount of slack. I undid the specified nut OonvRxe.jpg and no adjustment took place. The chain is really taught wXfbIh8.jpg and frankly I’m not sure why. Next time I’m in the garage (not today, it’s our wedding anniversary) I’ll see if I need to do something with both lock nuts on the adjuster. The manual refers to “temporarily tightening up the larger nut” and later says that it needs tightening again but funnily enough there’s no mention of loosening it after the first tighten. Seems slightly odd.


I installed the chain guard bolts and the oil strainer and apart from possible balancer chain adjustment, there it is: Eiv6psx.jpg.


Oh goodness. Now I have to remember how to install everything that came off to get it to this point! The manual will help, I hope!
 
Not trying to be critical in any way, I like the detail you put into what you share - but if you used Imgur's BB Code instead of direct links, we could see all the pictures within the post and not have to go back and forth to view what you've described. :)
 
if you used Imgur's BB Code instead of direct links, we could see all the pictures within the post

They're larger pictures if i do that and I have an intense dislike of large pictures interrupting text. Instead I've used the insert image method allowing the site to host & inserting a smaller image that links through to a larger one.
 
...and I have an intense dislike of large pictures interrupting text.

Well, you must hate my threads then... I prefer the larger pictures, in part because they're hosted elsewhere which saves our server space, and in part because you can see them without having to enlarge. No worries, I appreciate the thumbnails instead of links.
 
The stiffness in turning the crank sounds like the balancers adding load which is normal but also you should only use a few drops of oil on the bearings, not grease. Grease is too thick.
For the chain I would remove the adjuster completely and then turn the shaft clockwise a few degrees, @20-30, to see if it loosens a bit. If it does then turn a bit more and release it. The spring preload should reset to the right amount. If you used grease on the shaft instead of oil then it may not move because of the thickness of the grease. Only motor oil should be used on engine assembly.
 
you should only use a few drops of oil on the bearings, not grease. Grease is too thick.
I used it because the service manual says to do so and I used the specific product the manual mentions. Are you recommending I dismantle the engine, clean off the assembly grease and reassemble it?

For the chain I would remove the adjuster completely and then turn the shaft clockwise a few degrees, @20-30, to see if it loosens a bit. If it does then turn a bit more and release it. The spring preload should reset to the right amount.
Thank you for the advice, I shall try that tomorrow.
 
No need to clean the grease off. I know Honda as well as other manufacturers call for using that grease. I used it a couple of times and wasn't thrilled with the spin of the crank after bolt torque so I went back to the old time standard of using motor oil.
 
remove the adjuster completely and then turn the shaft clockwise a few degrees, @20-30, to see if it loosens a bit. If it does then turn a bit more and release it. The spring preload should reset to the right amount.
And that worked as soon as I tried it. Thank you for the advice.

If you used grease on the shaft instead of oil then it may not move because of the thickness of the grease
Actually the balancer shaft just got a little bit of oil on it - I only used the assembly grease on the main bearings.

I think the chain might have hooked up somewhere, somehow (although I couldn't see where) as I can now turn the crank by hand quite easily. Either that or the tension on the balancer chain was so strong that it was stopping movement. Or a bit of both. I have rotated the engine and inspected the balancer chain but can see no issues. The marks all still line up too :)
 
Next steps and a bit of a temporary stopper

We left things with the crank case lower ready to slip onto the upper as a test fit.
82BD697D-34ED-4C03-99F6-7C2CFC1AEF82.jpg

That was successful so I ordered in the Hondabond. £21 including postage, so I’d been waiting until I was sure I’d need it before ordering. Given that my time available to work on the bike is limited, the delay was fine. Had I had it to hand that day it’d not have been immediately used.

After using my tap die set to clean up the threads on the relevant bolts - and my dremel to clean up the heads slightly, I applied a layer of Hondabond and fitted the crankcase lower cover, slowly torquing it down in 3 cautious stages. That night I woke at 01:30 (really!) worried that I’d over-liberally applied the Hondabond and that oil ways might get blocked. The following evening I used my endoscope to find that (a) I slightly had and (b) it’d be fine.
04E781F5-EE38-4749-BC28-F06DFFD75E0C.jpg
I mean: it’s not Just So but it’ll do.

After that, no more engine work until today. I flipped it over to find that I’d not yet cleaned up the old base gasket detritus & so set out to rectify. Application of a Stanley knife blade took the mating surface from this:
3CCE6842-A2DC-47B2-BC78-EE822D59E68D.jpg
to this:
4E789D1D-B0D3-4EAE-A457-B7B40E8719A4.jpg

A further gentle scape over will follow another time. I also ran some cleaning cloth & paper towel into where the cylinder head and barrel retaining bolts go. Horrid quality endoscope pics taken just to illustrate how they were before cleaning.
65E99F5D-439C-4609-B31E-EC097CF964A9.jpg and 49021968-0F1A-432C-A467-E77A23F934DF.jpg

And over the engine went back to upside down. This time it was to fit the starter motor and oil cooler. The starter motor was in manky condition, externally, so some while back it’d had a bit of a going over to check it out and clean it up. It fitted in place nice and easy.
A9A0BF0A-3108-4B50-8C76-2D94CB58F9D4.jpg
The motor has been tested and definitely works. Whether the whole mechanism will start the bike remains to be seen, of course… Can’t be any worse than the 3-turns-and-scream affair it was before.

After that I made a start on cleaning up the oil cooler. I’d some time back used an ultrasonic cleaner to get the accumulated road gunk off the cooler, however some sort of unpleasant grey coat seemed to be present on the metal which I don’t like at all.
EE788E63-01CB-40B7-BB90-2BE24786E1D0.jpg

I used some scotchbrite dremel pads to clean up the metal, however I suspect to do the whole thing will retake many, many of them. Here’s the progress so far.
8220F6F5-15B2-43AF-A04D-2C3D2C207025.jpg plus just a couple of fins started FDC25C00-AA3A-4F60-B772-96FCE16B0A7F.jpg. There must be a better way, but I don’t know what. Suggestions welcomed.

And then I did a spot of spare part searching and realised that I’ve a Bigger Problem: the seals. Honda part numbers 15911-417-000 and 15912-417-000 are basically unobtainable in the UK. There’s a couple of places I have to call tomorrow that don’t do online parts sales but my hopes are not high.

I have the old seals but they’re not overly nice looking and I worry they’d leak if re-used. I am particularly unhappy about the large oval - that has some unpleasant looking deposits on it.
97D8769D-1660-4A57-8A87-C56D94647AF6.jpg

So there we are - I’m really not sure what to do now. Keep on cleaning the oil cooler and hope something turns up on the seals front.
 
Looking good so far. Don't hate me but the base gasket surface needs more work with cleaning. There's still gasket material imbedded on the surface that carb cleaner and a razor blade dragged across the surface will clean out.
This is what I call a clean surface
201_4259.jpg 201_4277.jpg

Granted I'm a bit a^&l about clean gasket surfaces and this was accomplished using a sanding block followed by an whetstone. The cleaner the better for sealing purposes.
 
Looking good so far. Don't hate me
Why on earth would I hate you for giving advice?

the base gasket surface needs more work with cleaning. There's still gasket material imbedded on the surface that carb cleaner and a razor blade dragged across the surface will clean out.
Oh yeah, it still needs some work. I don’t have any single sided razor blades, which is why I’ve been using the Stanley knife blade (not sure how that compares but it’s thin and definitely very, very sharp.) The carb cleaner suggestion is a very good one, ta.

This is what I call a clean surface
Cleaner than the rest of my engine :)
 
In the same boat here, cleaning gasket surfaces using a succession of brand new Stanley blades. Once the edge has gone off, time for a fresh one. Final clean and polish using a stainless steel scrunchie pan scourer works for me.
 
A turn up for the books

Only a few miles away is a small Honda spares place called John Oldfield Motorcycles that I've used before for one or two minor bits and pieces. I called him today on the vague off-chance that he might have the two gaskets I need for the Hondamatic. We had a nice chat - including "I remember selling those when they were new" - while he went over his stock. He didn’t have what I needed but said he’d see if he knew anyone that might have them & to call him back. Seemed like a kind thing for him to do.

So half an hour later or so, I called him. He'd looked up the part number for the bottom end rebuild gasket kit, which was thoughtful - I didn't even know such a thing existed. Not only that but he had found one on eBay and read me the item number. The kit is in the US but even including import duties it’ll be a full set for £26.


Now that’s what I call going way above and beyond any form of normal service - and I said so. He said “well I like to help people.”


Wow
1f62f.png

 
Only a few miles away is a small Honda spares place called John Oldfield Motorcycles that I've used before for one or two minor bits and pieces. I called him today on the vague off-chance that he might have the two gaskets I need for the Hondamatic. We had a nice chat - including "I remember selling those when they were new" - while he went over his stock. He didn’t have what I needed but said he’d see if he knew anyone that might have them & to call him back. Seemed like a kind thing to do.

So half an hour later or so, I called him. He'd looked up the part number for the bottom end rebuild gasket which was thoughtful - I didn't even know such a thing existed. Not only that but he had found one on eBay and read me the item number. The kit is in the US but even including import duties it’ll be a full set for £26.


Now that’s what I call going way above and beyond any form of normal service - and I said so. He said “well I like to help people.”


Wow
1f62f.png

What? A business still exists that does thing correctly? I miss those days, almost everything is sales oriented rather than customer oriented.
 
What? A business still exists that does thing correctly? I miss those days, almost everything is sales oriented rather than customer oriented.

I was so shocked by it I was left speechless, so I couldn't find the words to answer... I'm experiencing the usual with some of our preparations to go away for a week. Reactivate our alarm monitoring? Sure, easy phone call... until you find out that they didn't bother to let you know that the equipment you have (and bought from them) can't be used now because of the 5G rollout, the SIM card in it won't work and they want to sell you all new stuff. For the same price we already paid for our (almost) completely functional current system parts... oh, and ALL of the parts have to be replaced, not just the main unit because the new base unit won't work with the older sensors and sirens. THAT is what we've come to expect these days, NOT the incredible results the OP got from his nearby Honda dealer (which, of course, is on another continent).

Certainly happy for your experience, mlh.
 
I was so shocked by it I was left speechless, so I couldn't find the words to answer...

I was amazed by the poor service your alarm company is giving you. I hope you’ve managed to resolve that problem in a reasonable way.

While I wait for the seal set I’ve started working on the cylinder head, which isn’t pretty externally (none of the bike is). I want to replace the exhaust studs (I have new ones) so I’m dousing the old ones with PlusGas penetrating oil first.
 

Attachments

  • 0EE58B95-ADCE-4829-9A50-0489754D6B0C.jpg
    0EE58B95-ADCE-4829-9A50-0489754D6B0C.jpg
    209 KB · Views: 5
  • 54548872-D880-4D44-A5E3-7DA2A92BCB75.jpg
    54548872-D880-4D44-A5E3-7DA2A92BCB75.jpg
    132.1 KB · Views: 5
I was amazed by the poor service your alarm company is giving you. I hope you’ve managed to resolve that problem in a reasonable way.

Yes, it's frustrating. They shipped a new module for the base unit and it is supposed to arrive today (unknown time), but they don't guarantee it will make ours functional and if not it will have to be replaced. I know the system will function as a standalone unit while we're gone, but if the communication can't be resolved we won't know if it is set off by anyone nor will we be able to control it remotely either. Grrr...
 
Give the studs a twist to the right, tightening, before starting removal. It breaks them free usually.


Yeah, I have tried that, plus heat and a product called Aerokroil that a friend raves about. Three of the 4 are now out but the last one point blank refuses to move. More heat, I guess :)

Addendum: more heat has had no effect and it looks an awful lot like both studs on this cylinder have previously been helicoiled. I'm leaving that thing where it is and cleaning it up in situ.

WontComeOut.jpg
 
Did it arrive and did it work?

Yes, to their credit it arrived the day before we left (sent overnight) and the installation was simple. Best part was that it worked, despite the person I spoke to saying it might not and if not the entire system would have to be replaced. All turned out well, each time I checked in while we were gone it gave me a timeline and checked all sensors during its functions. Was able to view our living room camera as well in a separate section that had worked all along prior to the alarm board upgrade, and when we got home late last night it disarmed with the remote app on my phone. Good conclusion to what started out to be a PITA, so some kudos to SimpliSafe for their efforts.
 
Just a little update on the project.

These new-old-stock items turned up today, all the way from the US:

C86929BA-4B63-4751-8FE4-E6A9072D56E3.jpg

8D8053D2-382F-4E62-B71B-C0E44B02345B.jpg

They took some time to arrive (ordered 18 Oct) but then it’s quite a distance from Ohio to my place :lol:

This afternoon I whipped the starter motor off then removed the lower crankcase. I changed the figure-of-eight gasket/seal thing on the seal to the oil filter, then cleaned off all the fresh Hondabond and gave the mating surfaces a going over with a Stanley knife blade.
4F40DAF3-3ACD-4744-A8BB-62AC3759DA78.jpg

This was the worst part - it felt odd because it was clearly some sort of old gunk but was much more determined to stay stuck on, not like the old Hondabond at all:
B5950CC2-7B07-4A49-A7CB-FDD1AD6881AB.jpg

So that’s all been cleaned, fresh Hondabond applied, more sparingly than last time, the crankcase lower refitted and torqued up. I then put a new seal on the starter motor, lubed it up slightly with some rubber grease and slipped the thing back into place.

Tomorrow’s job is to try to clean up the oil filter in preparation for refitting that. I might even get as far as fitting it - we shall see.
 
you're fortunate it arrived at all. the US postal service has discontinued international mail to 52 countries and is not honoring it's delivery time guarantee on Priority Mail Express International (at 6 times the price of 1st class intl.)
i just had 2 packages bound for Australia returned to me as Undeliverable due to this new "temporary" restriction.

international mail disruption.JPG

countries of disrupted mail service.JPG

priority mail delivery not guaranteed.JPG
 
Back
Top Bottom