Engine Teardown

misskatlizzy

Member
Joined
Mar 4, 2026
Total Posts
10
Total likes
5
Location
York, PA USA
Hi all,

This is my first question post. Thank you in advance for your advice.

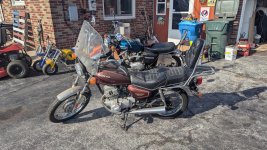
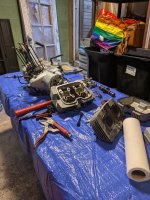
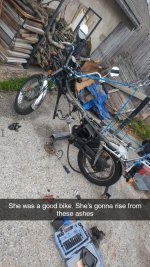
My '80 CM200T was a barn find. She sat for 13 years before I got her. After putting 3000 miles on the bike, the inevitable happened. All the gunk let loose and every gasket and seal started leaking. Instead of nickel and diming the repairs, I decided to dive right in and do a full engine teardown. This was aided by a troubling noise coming from the transmission. I suspect the bearing on the countershaft has given up the goat, but I won't know for certain until I'm in there.

I'm writing this post to mainly ask for any tips or tricks from folks who have gotten this deep into a Twinstar motor. Is there anything to look for while I'm in there? Any perils to avoid? Also, how do I go about compressing the piston rings to get them back into the cylinder? Is there a trick for that?

Also, I'm learning to hate JIS screws. Has anyone had any luck with replacing them with hex heads, or should I suck it up and deal with them?

Pictures attached for reference.

Thanks again,
Kat
 

Attachments

  • PXL_20260221_200013311.MP.jpg
    PXL_20260221_200013311.MP.jpg
    1.7 MB · Views: 7
  • PXL_20260510_210201686.MP.jpg
    PXL_20260510_210201686.MP.jpg
    653.6 KB · Views: 7
  • Snapchat-1846187620.jpg
    Snapchat-1846187620.jpg
    443.7 KB · Views: 7
Nothing wrong with JIS screws IF you have the right tools. Philips head screwdrivers cause most of the head damage. Vessel makes some real good JIS screwdrivers. Most people use SS Allen head socket screws when substituting for the JIS. Note that SS to aluminum requires the use of anti-seize on the threads which in turn requires a 20-25% reduction in torque values.
Reinstallation of pistons/rings into the cylinders is a PITA. Without the proper ring compressors, no one has them, you're stuck with manually collapsing each ring using fingers, popsicle sticks, etc. Since this is a 180* crank both pistons are going in at the same time so you need 2 people and some creativity. It helps to sand/polish the bore taper at the bottom of the cylinder to easy insertion.
 
On the rebuild - photos and more photos. It's easy to get ahead of yourself and get in the zone on a tear down - leaving you with a WTF moment or two during reassembly. A copy of the FSM here works well too - I print it out on single side in a binder so the back page is good for notes and stuff. Also - watch out for crappy gasket sets and making sure your surfaces are cleaned really well without gouges. The hard scotchbrite pads and WD-40 do wonders on removing gasket residue and leaving a really nice polished surface.

The piston rings unfortunately are either a really expensive Honda tool, or fingertips. Luckily, there's a bit of taper on the cylinder base to help with this but you'll be cursing that one thick oil ring.

As for the JIS screw v Hex head, I agree. Particularly the older JIS screws that are made of the softest steel out there and have already likely been partially stripped. Tons of bolt kits out there like THIS at 4into1 , or you can assemble your own off Bolt Depot or the like. Just remember that you'll need anti-seize on fresh stainless fasteners and - most important - you can apply a lot more torque to the hex head than you can a screw, so don't go ham when installing them. They're all around 9 ft/lb, which is basically a 2 finger pull on a 1/4" drive ratchet. too much and you can yank the threads clean out of that softer aluminum.
 
Nothing wrong with JIS screws IF you have the right tools. Philips head screwdrivers cause most of the head damage. Vessel makes some real good JIS screwdrivers. Most people use SS Allen head socket screws when substituting for the JIS. Note that SS to aluminum requires the use of anti-seize on the threads which in turn requires a 20-25% reduction in torque values.
Reinstallation of pistons/rings into the cylinders is a PITA. Without the proper ring compressors, no one has them, you're stuck with manually collapsing each ring using fingers, popsicle sticks, etc. Since this is a 180* crank both pistons are going in at the same time so you need 2 people and some creativity. It helps to sand/polish the bore taper at the bottom of the cylinder to easy insertion.
I have a driver that does the job, but with the bolts having been in the holes for 46 years, they don't want to come out. I snapped the tip off my impact screwdriver trying to get one out. I might do the SS swap. Good to know about the 20% torque reduction.

I'll have to clean up the bore a bit to help with insertion. Shockingly, the cylinder walls are in great shape. I can't even feel a lip at the top.

Thanks for the info :)
 
On the rebuild - photos and more photos. It's easy to get ahead of yourself and get in the zone on a tear down - leaving you with a WTF moment or two during reassembly. A copy of the FSM here works well too - I print it out on single side in a binder so the back page is good for notes and stuff. Also - watch out for crappy gasket sets and making sure your surfaces are cleaned really well without gouges. The hard scotchbrite pads and WD-40 do wonders on removing gasket residue and leaving a really nice polished surface.

The piston rings unfortunately are either a really expensive Honda tool, or fingertips. Luckily, there's a bit of taper on the cylinder base to help with this but you'll be cursing that one thick oil ring.

As for the JIS screw v Hex head, I agree. Particularly the older JIS screws that are made of the softest steel out there and have already likely been partially stripped. Tons of bolt kits out there like THIS at 4into1 , or you can assemble your own off Bolt Depot or the like. Just remember that you'll need anti-seize on fresh stainless fasteners and - most important - you can apply a lot more torque to the hex head than you can a screw, so don't go ham when installing them. They're all around 9 ft/lb, which is basically a 2 finger pull on a 1/4" drive ratchet. too much and you can yank the threads clean out of that softer aluminum.
I've been taking pics as I go along. I've thought about printing the manual, but I have one of those fancy folding phones, so that has been doing a fair enough job playing service manual for me. I've also been putting the bolts back into the holes they thread into so I don't get them swapped around. Been down this road enough times, and I hate the "where did that bolt go" game.

As far as the rings, I can feel my finger tips hurting already.

Thanks for the info on the screw kits. I think I might take that option. I'd rather have an allen key in my travel kit than a JIS driver anyway. I have a torque wrench that I plan to use for the rebuild. I have the "oversized gorilla" issue when it comes to hand tightening, so this will help a lot.

Thanks for the advice :)
 
It's not that bad on the finger tips compressing the rings, more a angle flexibility issue.
Inch pound torque wrench for anything under 15 ft. lbs. Foot pound torque wrenches are notable for inaccuracy at the lower settings.
 
  • Like
Reactions: J-T
It's not that bad on the finger tips compressing the rings, more a angle flexibility issue.
Inch pound torque wrench for anything under 15 ft. lbs. Foot pound torque wrenches are notable for inaccuracy at the lower settings.
Oh, for certain. I've made the ft-lb to in-lb mistake before and have the dull drill bit to prove it 😝

I bought a fancy Chinese digital torque wrench designed for low end that even does kg-m so I don't have to do any conversions. I wouldn't use it for anything that was super sensitive, but with the wide torque specs in the service manual, I think it'll do just fine.
 
Back
Top Bottom