73 CL450 Build/Restoration

supersport

Member
Joined
Nov 10, 2025
Total Posts
21
Total likes
18
Location
NJ
hi all
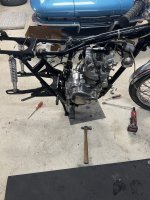
Recently picked up a complete and low mile but a little rough cosmetically 1973 CL450 . I plan to do a good restoration, not a museum piece but a mechanically sound and good looking bike. I bought this project to keep busy over the winter.
I’m not crazy about the red/burgundy color and the chrome on the headlamp cover attachment is wanting. I wondered if I change the color to one of the other year nice Honda candies and painted those chrome items and headlamp bucket like in other years would I be doing the bike a disservice.

I know engine block was painted and some covers are polished but I have seen more than a few with painted side covers. Is this correct? My plan is to pull all of them and polish.

The main harness sleeve (under tank) is cracked an brittle as is the front brake harness grey sleeve. What's a good source for these? The one under the tank I think I'll use a split sleeve to avoid disconnecting everything.

I'll have more questions soon and thank you!
Brian


IMG_6150.jpeg
 
If the wiring harness is in good shape you can get new sleeving from Vintage Connections but if it is like mine was, cut, sliced and spliced with bad connectors then I recommend going with a new main harness from Sparck Moto. Both companies are owned by a member of the forum and he is very helpful if you have questions or issues. After fooling with 2 old harnesses trying to make one good one I bought a new one and my only complaint was why did I bother with the old ones.


I’m not crazy about the red/burgundy color and the chrome on the headlamp cover attachment is wanting. I wondered if I change the color to one of the other year nice Honda candies and painted those chrome items and headlamp bucket like in other years would I be doing the bike a disservice.
Though all of our favorite vintage models have historic value and as a result, better resale value when original or stock paint, some versions of some models are less popular than others. The earlier CL450s tend to be more popular than the later, quieter exhaust models when styling also changed a bit. IMHO, the K1 through K4 models are the most attractive of CL450s and typically bring bigger money when kept original. That said, it's your bike and those decisions are yours alone. The consideration of whether you plan to keep the bike long term, or simply refresh it and ride a bit before selling it, would be part of the equation. I bought a repainted CL450K5 like yours in fair condition in 2016 with a plan in mind that I'd been thinking about for a few decades (long story) and knowing that I planned to keep the bike for good, I went for a restomod style so keeping it original wasn't important. Here's the before and after of my bike.
I know engine block was painted and some covers are polished but I have seen more than a few with painted side covers. Is this correct? My plan is to pull all of them and polish.
Some models and years had silver painted engine covers, some lightly polished and clear-coated from the factory. Looking for factory literature helps determine what yours was originally. Here's a flyer for your bike when it was new, Honda marketed it as a "dual use" bike (well before the term dual sport) but that was a big stretch, LOL.

double agent.jpg
 
Last edited:
Stripped down, painting, gauges restored, new gators and seals, valves adjusted, Allen screw update and a whole lot of mechanical corrections and cosmetic tlc.

Best thing for stripping clear coat from aluminum is Pryme wheels. If you haven’t heard of or use these, they are absolutely awesome. Fine leaves a slightly more aggressive finish than I would like for polishing but with a sisal wheel and black compound, it comes up very nice with a little effort.
IMG_6668.jpegIMG_6611.jpeg
 

Attachments

  • IMG_6580.jpeg
    IMG_6580.jpeg
    2.4 MB · Views: 4
Also looking for replacement seat foam for this bike but all I can find is 350 and 750. Any suggestions?
 
You might try making your own as shown in this video..

 
Yes I did see that one and that will probably be the direction I go.

Thanks
 
Making some good progress.

Regarding tires: I'm a bit confused but I think I'm going with Shinko 712's 110/90-19 front and 110/90-18 in the rear. Am I correct with this assumption size wise? Ancientdad any advice appreciated.

Thanks!IMG_6760.JPGIMG_6761.JPG
 
Looking pretty good there! as an FYI for those filter boots that are kind of chewed up, you can get really large diameter adhesive heat shrink that will seal them up and not be as volatile as tape. I used it to seal the NLA intake boots on the GL. Works pretty well.

On tires, the 712's have a bit of a narrower profile so the 120/110 combo will fit, but rather snug. I'm running 100/110 F/R in those same tires.
 
Making some good progress.
Everything is looking beautiful. A couple observations - first, I realize the marks line up on your clutch adjuster in the front sprocket cover, but that is only a base setting and likely will be quite a ways off the actual amount needed unless the inner cable of your clutch cable is a little shorter than typical. Second, the pictures aren't quite clear enough to know where your valve adjuster index marks are, and I'm sure you're aware they should be oriented like this, away from the spark plugs:

450 index marks.png

Regarding tires: I'm a bit confused but I think I'm going with Shinko 712's 110/90-19 front and 110/90-18 in the rear. Am I correct with this assumption size wise? Ancientdad any advice appreciated.
The 110/90-19 should be good on the front, my 100/90-19 looks a tad small but it handles like the bike is on rails, crisp and not heavy feeling. The 110/90-18 rear is the best size for it IMO, it matches the front size really well and feels as good as the front does.
 
Very nice work on the engine, looks really nice.
Not to nitpick your fine work, but the clamps on the intake boots could be slid back towards the carb so it is at the end of the boot. The lip of the carb does not go far into the boot and the carb may pop out the way the clamp it right now.

1771551108779.png
 
Looking pretty good there! as an FYI for those filter boots that are kind of chewed up, you can get really large diameter adhesive heat shrink that will seal them up and not be as volatile as tape. I used it to seal the NLA intake boots on the GL. Works pretty well.

On tires, the 712's have a bit of a narrower profile so the 120/110 combo will fit, but rather snug. I'm running 100/110 F/R in those same tires.
Yes thanks I am looking into shrink tube.
Everything is looking beautiful. A couple observations - first, I realize the marks line up on your clutch adjuster in the front sprocket cover, but that is only a base setting and likely will be quite a ways off the actual amount needed unless the inner cable of your clutch cable is a little shorter than typical. Second, the pictures aren't quite clear enough to know where your valve adjuster index marks are, and I'm sure you're aware they should be oriented like this, away from the spark plugs:

View attachment 55273


The 110/90-19 should be good on the front, my 100/90-19 looks a tad small but it handles like the bike is on rails, crisp and not heavy feeling. The 110/90-18 rear is the best size for it IMO, it matches the front size really well and feels as good as the front does.
The cam adjusters are all just slightly pointing away from the plug but yes pretty close to perpendicular. Is that wrong? Cam cover on intake isn't on yet but front is and I don't have another gasket but will get one if you think I should change what I have.

Clutch cover is just in place. I haven't attached the cable yet and cover is loose.

As far as the tires, What tubes fit those sizes? Place I am getting from only goes by standard measurements. I like a bigger tire in the rear. Is the 110/90-18 same as a 4:00 for example?

Very nice work on the engine, looks really nice.
Not to nitpick your fine work, but the clamps on the intake boots could be slid back towards the carb so it is at the end of the boot. The lip of the carb does not go far into the boot and the carb may pop out the way the clamp it right now.

View attachment 55275
Another good point. I just put them back where they were but I did notice they don't go in to far.
 
The cam adjusters are all just slightly pointing away from the plug but yes pretty close to perpendicular. Is that wrong?
The eccentric valve adjuster shafts should not point toward the plugs, that's all. As long as they are pointing away from the plugs, the positions will vary according to each individual engine's wear condition and valve adjustment, among other factors. This is why - if oriented roughly 180° the opposite direction, the tip of the follower (think rocker arm but different) will not be centered over the tip of the valve stem, and will cause wear and long-term complications.

450 valve adj indexing.jpg
Clutch cover is just in place. I haven't attached the cable yet and cover is loose.
Just pointing out that the index mark from Honda is a fair amount less than the typical adjustment needed, no worries.
As far as the tires, What tubes fit those sizes? Place I am getting from only goes by standard measurements.
For the rear tire, a 3.50/4.00-18 tube is fine. For the front, the stock 3.25-19 tube should be fine as well. You don't want tubes too oversized to avoid folds that can allow friction to cause a leak at the tip of a fold, or too undersized so the tube is stretched to fit.
I like a bigger tire in the rear. Is the 110/90-18 same as a 4:00 for example?
110mm is 4.33 inches, so the 110/90-18 is larger than a 4.00-18 and the stock tire is a 3.50-18. You can do what you want for the looks, but the larger the tire the slower the handling.
Another good point. I just put them back where they were but I did notice they don't go in to far.
The clamping area is intended to be directly over the area where the rib in the outside of the carb throat engages into the groove molded into the rubber intake manifold.
 
Thanks Ancientdad,

OK I think I should be good since none of them are pointing toward the plug off perpendicular.

Currently there's a 4:00 in the back, it fits fine.

As always, thanks again to you and the others for the help. This forum is a lifeline!
 
OK I think I should be good since none of them are pointing toward the plug off perpendicular.
To be completely clear - they don't always have to be perpendicular, they just shouldn't point inward toward the plugs. Here is mine as an example.

1771691237303.png
 
Back
Top Bottom